
As I rummaged through the pantry, I stumbled upon bright packets of flavored gelatin that whispered, “Spring is here!” and I could practically feel the sunshine pouring into the kitchen. Inspired by the vibrant colors and flavors, I whipped up a batch of Pastel Rainbow Gelatin Cups, an easy-to-make, no-bake treat that’s perfect for celebrating special moments like Easter or a sunny spring gathering. These delightful layered desserts are not only kid-friendly but also a visual feast, bringing joy to anyone at the table. Each cup is a creamy, pastel wonder that comes together effortlessly, leaving you with more time to bask in compliments rather than slaving away in the kitchen. Curious to see how to create your own cheerful, colorful masterpiece? Let’s dive into the fun!

Why Are These Gelatin Cups So Irresistible?
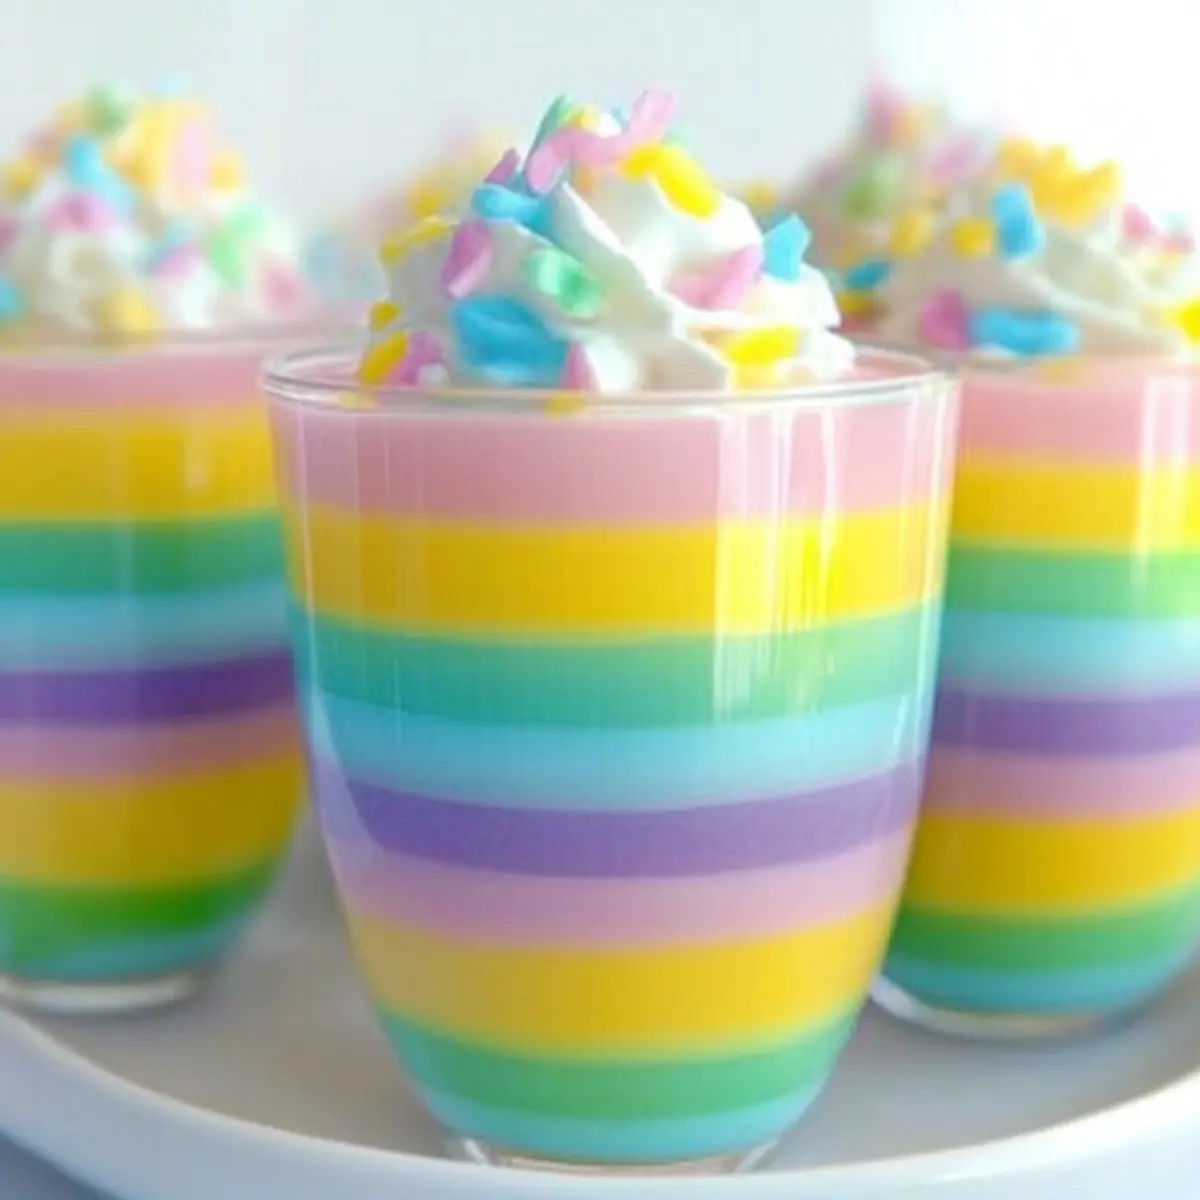
Vibrant Visuals: Each bite of these Pastel Rainbow Gelatin Cups is a feast for the eyes, making them an eye-catching addition to any dessert table.
Kid-Friendly Fun: Perfect for children’s parties, these colorful cups promote excitement and creativity—something kids (and adults!) love!
Effortless Preparation: The no-bake, easy-to-make nature of this treat means you can whip them up in no time, freeing you up for more time with loved ones. Have you tried my delightful Baked Apple Cups?
Endless Flavor Combinations: With so many flavored gelatins available, the flavor possibilities are endless! Mix and match colors to suit any occasion, from summery celebrations to cozy autumn gatherings.
Perfect for Spring Gatherings: Their light, refreshing taste and cheerful appearance make them an ideal spring dessert ahead of Easter brunch or warm-weather picnics!
Deliciously Creamy Layers: The combination of vanilla yogurt and gelatin provides a smooth, creamy texture that complements the fun, fruity flavors perfectly.
Pastel Rainbow Gelatin Cups Ingredients
For the Gelatin Layers
• Water – Essential for dissolving gelatin; use 3¾ cups, divided for layering.
• Flavored Gelatin – Provides sweetness and flavor; 5 packages (3 oz each) in assorted colors (e.g., purple, blue, pink, yellow, green). Note: Use flavored, sweetened varieties only.
• Milk – Adds creaminess to the gelatin layers; 1½ cups, divided. Substitute with cream for a richer taste.
• Vanilla Yogurt – Contributes to the soft, pastel appearance and creaminess; 2½ cups, divided. Can be replaced with plain yogurt or Greek yogurt.
For the Topping
• Whipped Cream – For topping; adds texture and a finishing touch. Substitute with Cool Whip for ease.
• Sprinkles – For decoration; use your favorite.
Create your Pastel Rainbow Gelatin Cups using these delightful ingredients and watch as they bring cheer and color to your spring celebrations!
Step‑by‑Step Instructions for Pastel Rainbow Gelatin Cups
Step 1: Prepare Containers
Begin by arranging twelve 4-ounce glasses on a baking sheet for easy transport. Alternatively, lightly grease a baking dish or bundt pan if you prefer a single large serving. This will set the stage for your colorful layers of Pastel Rainbow Gelatin Cups, ensuring they’re ready to be filled as you move through the recipe.
Step 2: Boil Water
Next, boil enough water to use for all layers—about 5 cups should suffice. This is crucial for dissolving the gelatin properly. As the water heats, keep an eye on it to ensure it reaches a rolling boil, which will help create those beautifully vibrant, smooth layers of gelatin that make your dessert so appealing.
Step 3: Mix Gelatin
In separate bowls, add each 3-ounce package of flavored gelatin. Pour ¾ cup of the boiling water over each package and whisk vigorously until completely dissolved, taking about 30 to 60 seconds for each. The vibrant colors will begin to bloom, making it hard to resist sampling the mixtures!
Step 4: Cool Gelatin
Allow the first gelatin mixture to cool to room temperature. To speed up this process, you can refrigerate it for 10 to 15 minutes. Be sure it feels just right—room temperature—before proceeding to maximize the creamy texture of your Pastel Rainbow Gelatin Cups when you add the dairy.
Step 5: Add Dairy & Layer
Once cooled, blend in ¼ cup of milk and ½ cup of vanilla yogurt with the first gelatin mixture until smooth. Next, pour the mixture evenly into the prepared cups, filling them about one-third of the way. Chill the cups in the refrigerator for about 15 minutes, or until the first layer is set before moving on to the next.
Step 6: Repeat Layers
After the first layer has firmed up, repeat the cooling and layering process with the remaining gelatin colors. Remember to give each layer enough time to set properly—about 15 minutes is ideal. Visualize the beautiful layers stacking up in your Pastel Rainbow Gelatin Cups as you continue to create this delightful dessert.
Step 7: Final Chill
Once all layers have been poured and set into the cups, cover them gently with plastic wrap and refrigerate for at least 4 hours. This final chilling step will ensure that your pastel layers fully set, resulting in the perfect treat ready for any spring gathering or Easter celebration.
Step 8: Serve
Just before serving, add a generous dollop of whipped cream on top of each cup and sprinkle with your favorite colorful sprinkles. This last step enhances the visual appeal of your Pastel Rainbow Gelatin Cups, making them irresistible to both kids and adults alike!

What to Serve with Pastel Rainbow Gelatin Cups
Elevate your spring celebration with delightful accompaniments that perfectly complement these colorful, creamy treats!
-
Fresh Berries: Sweet, juicy strawberries or blueberries add a pop of freshness that enhances the vibrant flavors of the gelatin cups.
-
Whipped Shortcake: A light sponge cake topped with whipped cream offers a soft, pillowy texture, enhancing the dessert experience.
-
Fruit Salad: A colorful mix of seasonal fruits not only brightens the plate but also balances the sweetness of the gelatin with a refreshing crunch.
-
Lemonade Spritzers: Light and bubbly, these fizzy drinks provide a refreshing contrast against the creamy layers, perfect for sipping on sunny afternoons.
-
Chocolate-Dipped Pretzels: The salty crunch of pretzels dipped in chocolate creates a delightful contrast to the sweet gelatin, making for a fun finger food option.
-
Pistachio Muffins: These nutty muffins bring a unique flavor twist, while their subtle sweetness pairs beautifully with the playful dessert.
-
Vanilla Ice Cream: A scoop of creamy vanilla ice cream perfectly complements the fruity gelatin layers, adding an extra indulgent touch.
Get ready to impress your guests with a joyous feast centered around the playful Pastel Rainbow Gelatin Cups!
Expert Tips for Pastel Rainbow Gelatin Cups
- Temperature Matters: Ensure the gelatin mixtures are at room temperature before adding dairy. This prevents curdling and keeps your layers creamy.
- Layer Precision: Allow each layer to fully set in the refrigerator for at least 15 minutes before pouring the next to achieve distinct, vibrant stripes in your Pastel Rainbow Gelatin Cups.
- Cooling Hacks: If your gelatin layers aren’t setting properly, briefly microwave the mixture to re-fluidize it, then let it cool before pouring again.
- Ingredient Variations: Feel free to get creative! Experiment with flavored gelatins like tropical fruits or berry mixes to customize the taste and color of your gelatin cups.
- Whipped Cream Timing: Add whipped cream and sprinkles just before serving to maintain their freshness and prevent them from wilting or melting into the layers.
Storage Tips for Pastel Rainbow Gelatin Cups
Fridge: Store prepared Pastel Rainbow Gelatin Cups in the refrigerator, tightly covered, for up to 7 days. This ensures they stay fresh and ready for a delightful treat anytime!
Freezer: While freezing isn’t recommended for these gelatin cups due to texture changes, if needed, you can freeze individual cups for up to 2 months. Allow them to thaw in the fridge overnight before serving.
Wrapping: To prevent the gelatin layers from drying out, wrap individual cups in plastic wrap or tin foil if you’re not serving them right away. This keeps them visually appealing!
Reheating: For best results, do not heat gelatin cups. If layers become too soft after thawing, simply refrigerate them for a few hours to firm back up before serving.
Pastel Rainbow Gelatin Cups Variations & Substitutions
Feel free to sprinkle your own creativity into these delightful cups, making them truly yours!
- Fruit-Infused: Add fresh fruit puree to flavored gelatin for a fruity twist. Strawberry or mango puree can elevate the sweetness!
- Dairy-Free: Substitute vanilla yogurt with coconut yogurt and milk with almond milk for a delightful dairy-free version. The tropical flavor pairs beautifully with your gelatins.
- Color Pop: Mix contrasting colors of gelatin for a vibrant surprise. Imagine orange and green layers for a fun Halloween twist or red and white layers for Christmas!
- Mini Gelatin Cakes: Instead of cups, use a bundt pan for a layered gelatin cake. Slice and serve at gatherings, showcasing beautiful layers with each cut.
- Chocolate Surprise: Create hidden layers of chocolate pudding for a decadent twist. The creamy chocolate adds richness that perfectly complements the fruity gelatin.
- Healthier Option: Use sugar-free flavored gelatin and low-fat yogurt to cut calories without sacrificing flavor. This way, everyone can enjoy a guilt-free treat!
- Different Textures: Incorporate crushed nuts or granola between the layers to create a fun crunch. It adds a surprising texture that everyone will love!
- Adult Twist: Mix in a splash of liqueur, like peach schnapps or coconut rum, to turn this treat into a fun party dessert. Just be careful to adjust the gelatin’s sugar if needed!
These variations ensure your Pastel Rainbow Gelatin Cups can be tailored to fit any occasion! Whether it’s a spring gathering, a child’s birthday party, or an elegant adult soirée, there’s a little something for everyone. For even more sweet ideas, check out my delightful Cheesecake Cookie Cups or these whimsical Cream Dessert Cups. Happy customizing!
Make Ahead Options
These Pastel Rainbow Gelatin Cups are a fantastic treat to prepare ahead of time, making your spring celebrations a breeze! You can create the gelatin layers up to 24 hours in advance; simply complete the layering process, and refrigerate them covered until serving. If you want to prep even further ahead, the cups can be made and stored in the fridge for up to 3 days—just avoid topping them with whipped cream until right before serving to maintain their freshness. When you’re ready to impress your guests, add a dollop of whipped cream and sprinkles to each cup just before serving. This way, you’ll have a stunning dessert ready with minimal last-minute effort!

Pastel Rainbow Gelatin Cups Recipe FAQs
How do I choose the right flavored gelatin for my Pastel Rainbow Gelatin Cups?
Absolutely! When selecting gelatin flavors, go for bright, fruity tones that simulate the spring vibe—think raspberry, lemon, lime, or blue raspberry. It’s also important to use flavored, sweetened varieties for the best taste and texture. Make sure to check the packaging to avoid any sugar-free or unsweetened options, as these can affect the overall sweetness and success of your dessert.
What’s the best way to store leftover gelatins?
Very! Store any leftover Pastel Rainbow Gelatin Cups in the refrigerator. Cover them tightly with plastic wrap or place them in an airtight container to keep them fresh for up to 7 days. If you find any layers starting to dry out, simply wrap them well before storing, ensuring they remain a treat worth enjoying later.
Can I freeze my Pastel Rainbow Gelatin Cups?
Of course! While it’s best to avoid freezing them to maintain their texture, you can freeze individual cups for up to 2 months. Just wrap each cup tightly with plastic wrap or foil and label them with the date. When you’re ready to indulge again, thaw them in the fridge overnight. If they appear too soft, just refrigerate them for a few extra hours to firm back up before enjoying.
What should I do if my layers aren’t setting properly?
Absolutely! If your gelatin layers aren’t setting as expected, don’t worry! Simply pop the cups in the microwave for about 10-15 seconds to re-fluidize the gelatin, then let it cool down before pouring the next layer. Always ensure each layer has sufficient time to cool to room temperature before adding the dairy, as this will help to avoid curdling!
Are there any dietary considerations for Pastel Rainbow Gelatin Cups?
Very! If you’re considering the dietary needs of children or guests, be aware of potential allergies, especially concerning gelatin, dairy, and any added toppings like whipped cream. You can substitute the vanilla yogurt with dairy-free yogurt alternatives or use coconut whipped topping if needed. Always read labels to ensure that the products are allergy-friendly if you’re serving sensitive individuals.
How can I make these Pastel Rainbow Gelatin Cups more festive?
What a great idea! To elevate these delightful desserts for special occasions, try adding themed sprinkles or edible glitter on top. You can also create layers with different flavors that represent the colors of a holiday, or add small candy decorations suitable for Easter or spring gatherings. The more the merrier when it comes to deck them out for celebrations!
Pastel Rainbow Gelatin Cups: Fun and Easy Spring Treats
Ingredients
Equipment
Method
- Prepare twelve 4-ounce glasses on a baking sheet or lightly grease a baking dish or bundt pan.
- Boil about 5 cups of water for dissolving the gelatin.
- In separate bowls, add each 3-ounce package of flavored gelatin. Pour ¾ cup of boiling water over each package and whisk until dissolved.
- Allow the first gelatin mixture to cool to room temperature, refrigerating if necessary.
- Blend in ¼ cup of milk and ½ cup of vanilla yogurt with the first gelatin mixture. Pour evenly into prepared cups and chill for 15 minutes.
- Repeat the cooling and layering process with remaining gelatin colors, ensuring each layer sets properly.
- Cover cups with plastic wrap and refrigerate for at least 4 hours.
- Before serving, add whipped cream on top and sprinkle with colorful sprinkles.
Leave a Reply