
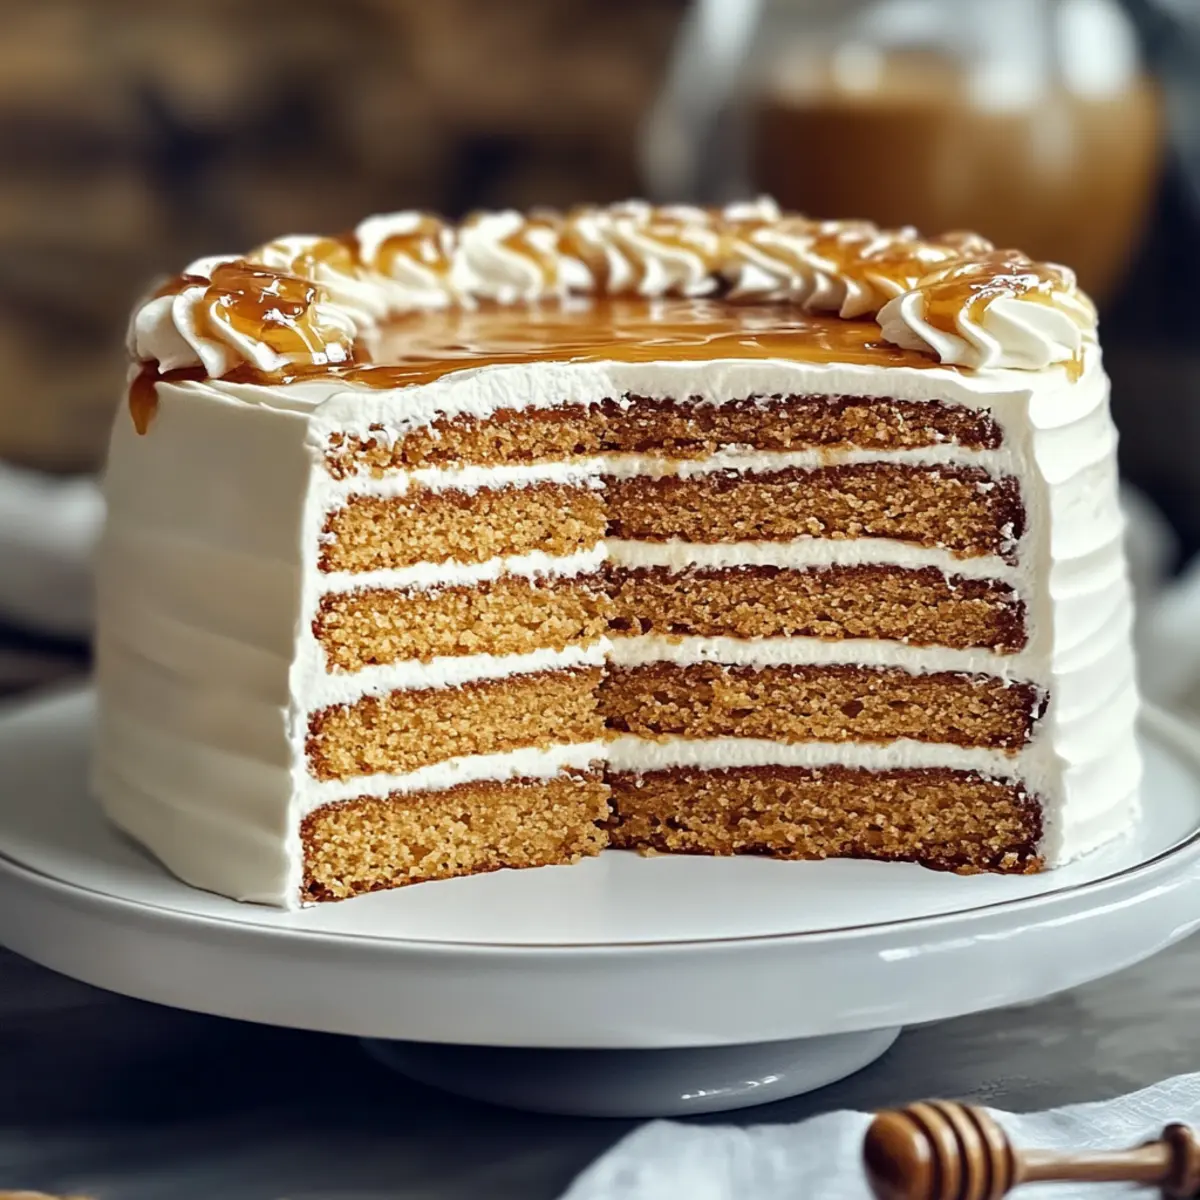
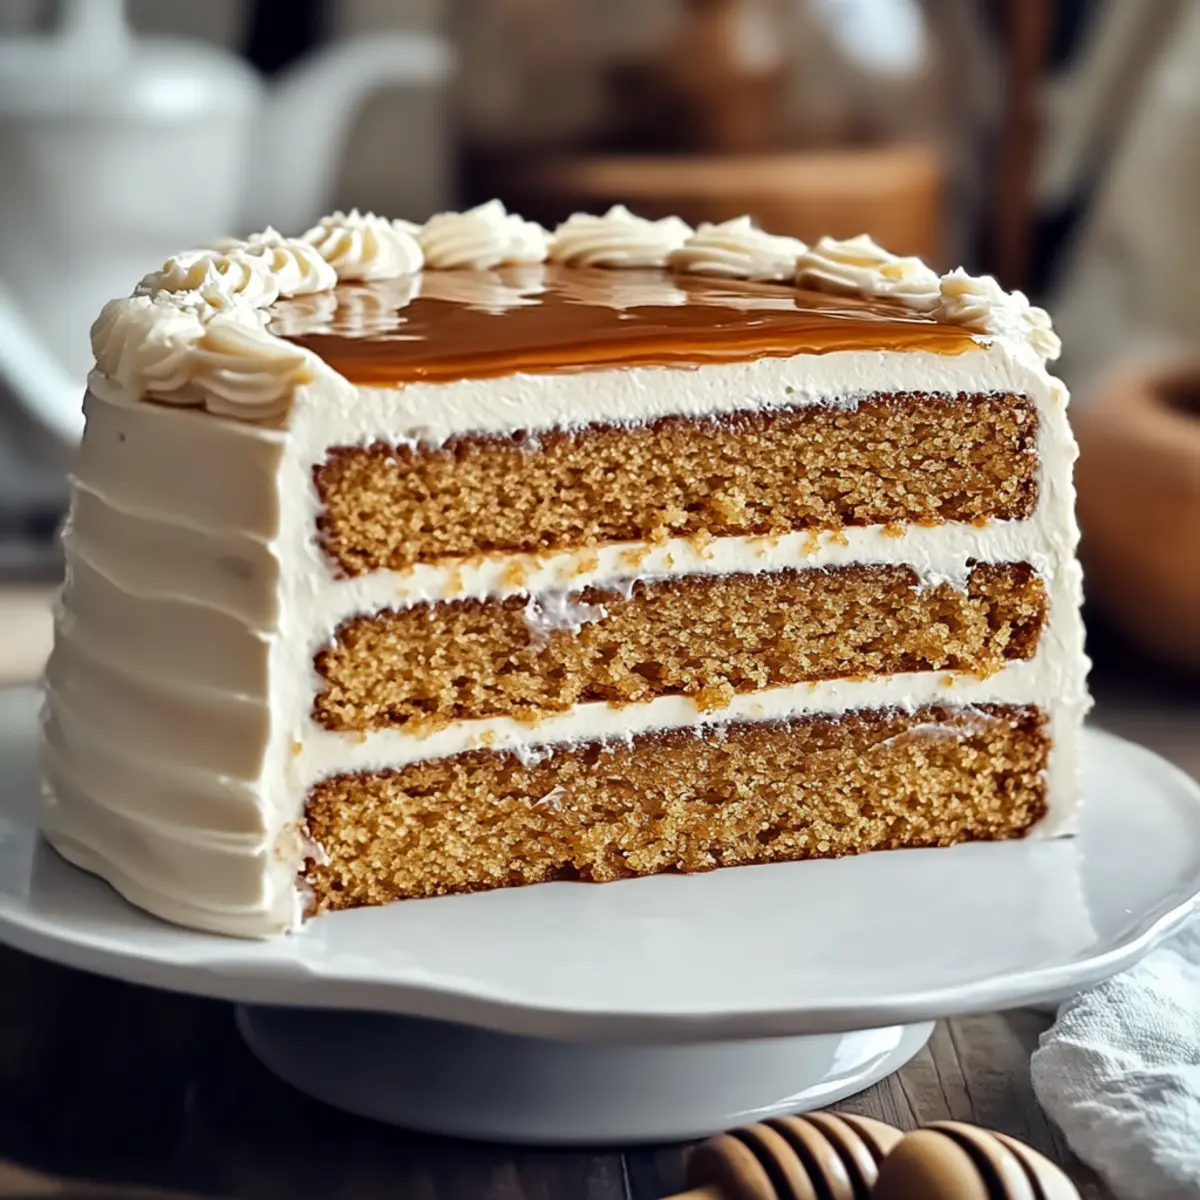
As I stood in my kitchen, the sweet aroma of honey enveloped me, transporting me to a cozy Russian café where time slows down with each slice of a treasured dessert. Today, I’m excited to share the recipe for Authentic Russian Honey Cake, or Medovik, a layered dessert that is sure to delight your taste buds and impress your loved ones. One of the best parts about this indulgent treat is its wonderful balance of textures—think soft honey-infused cake layers embraced by a rich dulce de leche frosting and fluffy whipped honey cream. Not only is this cake perfect for special occasions, but it’s also surprisingly simple to make, proving that you don’t need to be a pastry chef to create a showstopper. Ready to dive into a world of creamy sweetness and explore this traditional recipe with me? Let’s get baking!

Why Is Russian Honey Cake So Special?
Rich Honey Flavor: The deep sweetness from wildflower honey elevates this cake, making each bite a unique sensation.
Layered Perfection: Crafted with multiple delicate layers, each slice tells a story of indulgence that guests won’t forget.
Quick Yet Impressive: Despite its complex look, this cake is surprisingly straightforward, perfect for home bakers looking to impress.
Cultural Delight: Medovik is a traditional Russian dessert, often gracing family celebrations, making it a nostalgic treat that sparks joy.
Versatile Options: Feel free to experiment—swap dulce de leche with chocolate ganache or add fruit for a fresh twist. This cake also pairs beautifully with a side of fresh berries, adding a zing to its richness.
Russian Honey Cake Ingredients
• A delightful mix for a layered treat!
For the Cake Layers
- Wildflower Honey – 1 1/2 cups; provides sweet flavor and moisture. Can use other types for a unique taste.
- Water – 1/4 cup; essential for mixing with honey.
- Granulated Sugar – 1 cup + 2 tablespoons; sweetens and helps structure the cake.
- Unsalted Butter – 14 tablespoons; adds richness; cut into pieces for even blending.
- Large Eggs – 6; adds stability and body to the cake.
- Baking Soda – 2 1/2 teaspoons; necessary for leavening.
- Kosher Salt – 2 1/2 teaspoons (or 1 1/4 teaspoons fine sea salt); enhances flavor—adjust based on preference.
- Ground Cinnamon – 1 teaspoon; infuses warmth and complexity to the cake.
- All-Purpose Flour – 3 3/4 cups; gives the cake its structure.
For the Frosting
- Dulce de Leche – 1 1/4 cups; creates a rich, creamy layer. Can substitute with other caramel sauces.
- Heavy Cream – 4 3/4 cups; whipped for frosting—ensure it’s chilled for best results.
Engage your senses and create this delightful Russian Honey Cake that captures the heart of every gathering!
Step‑by‑Step Instructions for Russian Honey Cake
Step 1: Prepare Parchment
Preheat your oven to 375°F (190°C). Take two sheets of parchment paper and trace 9-inch circles on them, then flip them over. This will help you create even layers for the Russian Honey Cake, ensuring the cakes will bake uniformly without sticking.
Step 2: Heat Honey
In a small saucepan over medium heat, combine the wildflower honey and 1/4 cup of water. Bring the mixture to a gentle simmer, stirring occasionally until it’s well combined, about 3-4 minutes. This honey syrup will add a delightful sweetness and moisture to your cake layers.
Step 3: Combine Mixture
In a heatproof bowl placed over a pot of simmering water (double boiler), melt 14 tablespoons of unsalted butter. Add 1 cup plus 2 tablespoons of granulated sugar and the prepared honey syrup. Stir continuously until melted and smooth, about 5-7 minutes. Remove from heat and allow it to cool slightly.
Step 4: Add Wet Ingredients
Incorporate 6 large eggs and 1 teaspoon of ground cinnamon into the warm butter mixture. Whisk until well blended, ensuring the eggs don’t scramble. Let this mixture cool for about 5 minutes before proceeding to the next step to allow the mixture to stabilize.
Step 5: Incorporate Flour
Gradually sift in 3 3/4 cups of all-purpose flour, mixing gently with a whisk until you achieve a smooth batter with no lumps. This is the foundation of your Russian Honey Cake, so be sure to combine it well but don’t overmix, as you want to keep the cake light and airy.
Step 6: Bake Layers
Pour approximately 1/3 cup of the batter onto each prepared parchment circle, spreading it evenly. Bake in the preheated oven for 6-7 minutes, or until the edges are lightly golden and the top springs back when touched. Repeat this process until all batter is used and you have 11-12 cake layers.
Step 7: Toast Layers
For any imperfect cake layers, reduce the oven temperature to 250°F (120°C) and toast them for about 15 minutes. Once toasted, let them cool and then grind them into fine crumbs using a food processor. These crumbs will add a beautiful topping to the finished cake.
Step 8: Make Frosting
In a mixing bowl, combine 1 1/4 cups of dulce de leche with some of the ground crumbs for added flavor, then gently fold in 4 3/4 cups of chilled heavy cream. Whip the mixture until it reaches stiff peaks. Chill your frosting for 30 minutes to set before assembling the cake layers.
Step 9: Assemble Cake
Take one cake layer and spread a generous amount of frosting on top. Layer another cake over it and repeat this process until the cake is fully stacked, applying frosting to the top and sides. Be sure to create a smooth finish for a professional look, and decorate with the leftover cake crumbs.
Step 10: Chill and Serve
Cover the assembled Russian Honey Cake with plastic wrap and refrigerate overnight. Chilling this dessert enhances the flavors and melds the textures beautifully. Once ready to serve, slice into wedges and indulge in this delectable treat that will delight everyone at the table.
Make Ahead Options
Busy home cooks will love how the Russian Honey Cake can be prepped in advance, making it an excellent choice for meal planning! You can bake the cake layers up to 24 hours in advance; just let them cool completely before wrapping them tightly in plastic wrap to avoid drying out. Additionally, the frosting can be made up to 3 days ahead—just whip it up and refrigerate until you’re ready to assemble. When it’s time to serve, simply layer the cake with the chilled frosting and allow it to sit for a few hours to meld the flavors. This way, your indulgent Russian Honey Cake will be just as delicious, even with all the prep done ahead of time!
Storage Tips for Russian Honey Cake
Room Temperature: Store leftover Russian Honey Cake at room temperature for up to 1 day, keeping it covered with plastic wrap to retain moisture.
Fridge: You can also refrigerate the cake for up to 3 days. Make sure to wrap it tightly to prevent it from drying out and losing flavors.
Freezer: For longer storage, freeze individual layers wrapped in parchment and then in airtight packaging for up to 2 months. Thaw overnight in the fridge before serving.
Reheating: If desired, warm slices in the microwave for about 10-15 seconds to enjoy a cozy, fresh texture without compromising the integrity of the cake.
What to Serve with Russian Honey Cake
As you prepare to indulge in this delightful dessert, consider these exquisite pairings that will elevate your dining experience.
-
Fresh Berries: A medley of strawberries, blueberries, and raspberries adds a tart contrast to the sweetness and creaminess of the cake, enhancing each bite.
-
Creamy Vanilla Ice Cream: The smooth, cold ice cream melts into the cake, offering a comforting, rich texture that complements the spongy layers beautifully.
-
Citrus Zest: A sprinkle of lemon or orange zest brightens the palate, cutting through the sweetness and bringing a refreshing note to your dessert experience.
-
Herbal Tea: A warm cup of chamomile or peppermint tea balances the flavors, inviting a relaxing atmosphere that enhances the cake’s rich complexity.
-
Whipped Cream Topping: Serve a dollop of lightly sweetened whipped cream for an added fluffy texture, providing an extra layer of indulgence alongside the dulce de leche.
-
Honey Drizzle: A gentle drizzle of honey over the top not only beautifies your creation but amplifies the honey essence that’s central to the Russian Honey Cake.
-
Dark Chocolate Shavings: Add a sprinkle of bittersweet chocolate for a delightful contrast—a touch of decadence that brings an elegant finish to your dessert platter.
Combining these elements will create a symphony of flavors, ensuring your celebration is nothing short of magical.
Russian Honey Cake Variations & Substitutions
Feel free to personalize your Russian Honey Cake with these fun twists that enhance flavor and texture!
-
Dulce de Leche Swap: Substitute dulce de leche with chocolate ganache for a rich, decadent twist. This change adds an intriguing depth of flavor.
-
Fruit Infusion: Add layers of fruit puree, like raspberry or strawberry, between the cake layers for a fresh zing. Fruit complements the sweetness beautifully.
-
Spice It Up: Boost flavor by incorporating spices like cardamom or vanilla into the frosting. This little tweak adds warmth that’s simply delightful.
-
Nutty Crunch: Fold in crushed nuts like walnuts or hazelnuts into the layers for added texture. It introduces a delightful crunch contrasting with the soft cake.
-
Gluten-Free Version: Substitute all-purpose flour with a gluten-free blend to make the cake gluten-free. Just ensure it’s a good quality blend for best results.
-
Layered Variations: Create a marble effect by swirling in cocoa powder or melted chocolate into half of the batter. This visually stunning cake will leave guests in awe.
-
Honey Alternatives: Try using different types of honey, like clover or orange blossom, to experiment with flavor profiles. Each brings its own charming twist.
-
Top it Off: To elevate the cake, sprinkle a layer of toasted coconut on top before serving. It adds a tropical flair and mouthwatering texture.
Once you’ve discovered your favorite variation, you may want to explore other delightful recipes like Honey Lime Chicken or savor the sweetness of Salted Honey Pie. Happy baking!
Expert Tips for Russian Honey Cake
- Use Scale for Precision: Ensure to weigh your ingredients to achieve evenly baked layers; even a slight variation can impact texture.
- Chill and Set: Allow the assembled cake to chill overnight; this melds flavors beautifully, resulting in a richer taste experience.
- Handle Layers With Care: Be gentle when stacking the cake layers. A careful touch prevents breaking or crumbling, keeping everything intact and beautiful.
- Whip to Stiff Peaks: For the frosting, whip the heavy cream until it reaches stiff peaks; this provides the perfect structure for your Russian Honey Cake.
- Garnish Creatively: Use any leftover crumbs to sprinkle on top for added texture and a professional finish; it enhances the visual appeal and taste.

Russian Honey Cake Recipe FAQs
What type of honey is best for Russian Honey Cake?
Absolutely! Wildflower honey is ideal for this recipe as it provides a rich sweetness and moisture. However, feel free to experiment with other honey varieties like clover or orange blossom for a unique flavor profile that matches your taste.
How should I store leftover Russian Honey Cake?
You can store leftover cake at room temperature for up to 1 day, covering it with plastic wrap to retain moisture. If you plan to keep it longer, refrigerate it for up to 3 days, ensuring it’s tightly wrapped to prevent drying out and losing flavor.
Can I freeze Russian Honey Cake?
Yes, you can freeze the Russian Honey Cake! To do so, wrap individual layers in parchment paper and place them in airtight packaging. They can be frozen for up to 2 months. When you’re ready to enjoy them, simply thaw overnight in the refrigerator for optimal freshness.
What should I do if my cake layers are uneven?
No worries! If your layers are uneven or imperfect, toast them in a preheated oven at 250°F (120°C) for around 15 minutes. Once toasted, allow them to cool and grind into fine crumbs. These crumbs can then be used to decorate the cake, giving it an appealing texture and appearance!
Is this dessert suitable for people with nut allergies?
Yes! The traditional Russian Honey Cake doesn’t contain nuts, making it a great option for those with nut allergies. However, always double-check your ingredients and any substitutes to ensure they’re nut-free.
How long can I make the cake ahead of time?
You can make the Russian Honey Cake up to 1-2 days in advance. Simply assemble and allow it to chill overnight in the refrigerator to let the flavors meld beautifully before serving. This preparation makes for a great time-saving strategy for your celebrations!
Irresistible Russian Honey Cake for Your Next Celebration
Ingredients
Equipment
Method
- Preheat your oven to 375°F (190°C). Take two sheets of parchment paper and trace 9-inch circles on them, then flip them over.
- In a small saucepan over medium heat, combine the wildflower honey and 1/4 cup of water. Bring the mixture to a gentle simmer, stirring occasionally until it's well combined, about 3-4 minutes.
- In a heatproof bowl placed over a pot of simmering water (double boiler), melt 14 tablespoons of unsalted butter. Add 1 cup plus 2 tablespoons of granulated sugar and the prepared honey syrup. Stir continuously until melted and smooth, about 5-7 minutes.
- Incorporate 6 large eggs and 1 teaspoon of ground cinnamon into the warm butter mixture. Whisk until well blended.
- Gradually sift in 3 3/4 cups of all-purpose flour, mixing gently with a whisk until you achieve a smooth batter.
- Pour approximately 1/3 cup of the batter onto each prepared parchment circle, spreading it evenly. Bake for 6-7 minutes.
- For any imperfect cake layers, reduce the oven temperature to 250°F (120°C) and toast them for about 15 minutes.
- In a mixing bowl, combine 1 1/4 cups of dulce de leche with some of the ground crumbs, then gently fold in 4 3/4 cups of chilled heavy cream.
- Take one cake layer and spread a generous amount of frosting on top. Layer another cake over it and repeat this process.
- Cover the assembled Russian Honey Cake with plastic wrap and refrigerate overnight.
Leave a Reply