
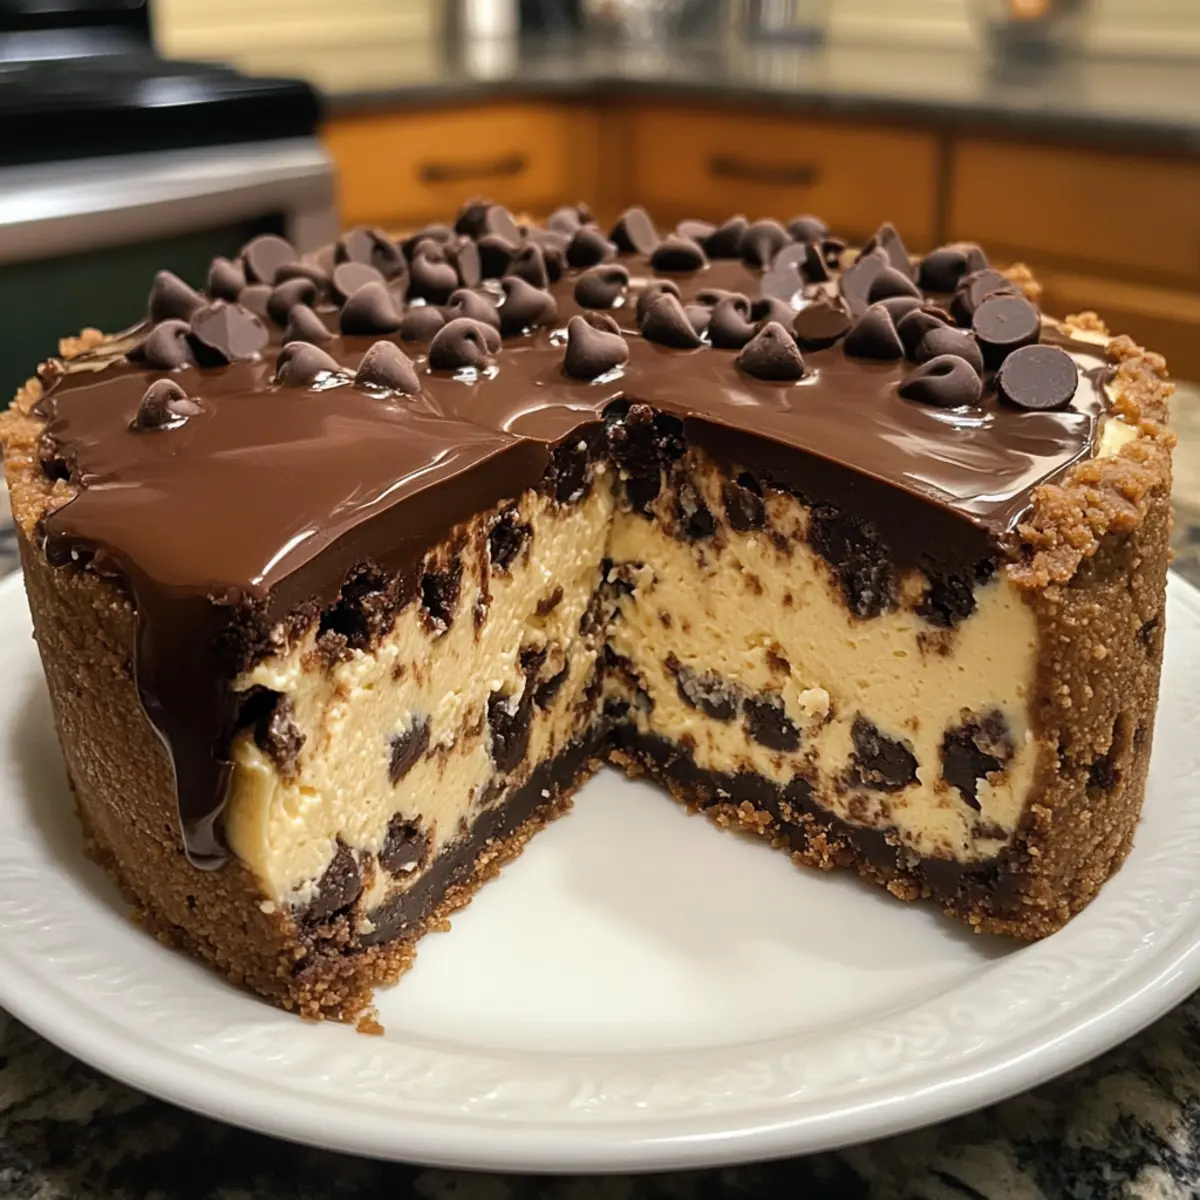
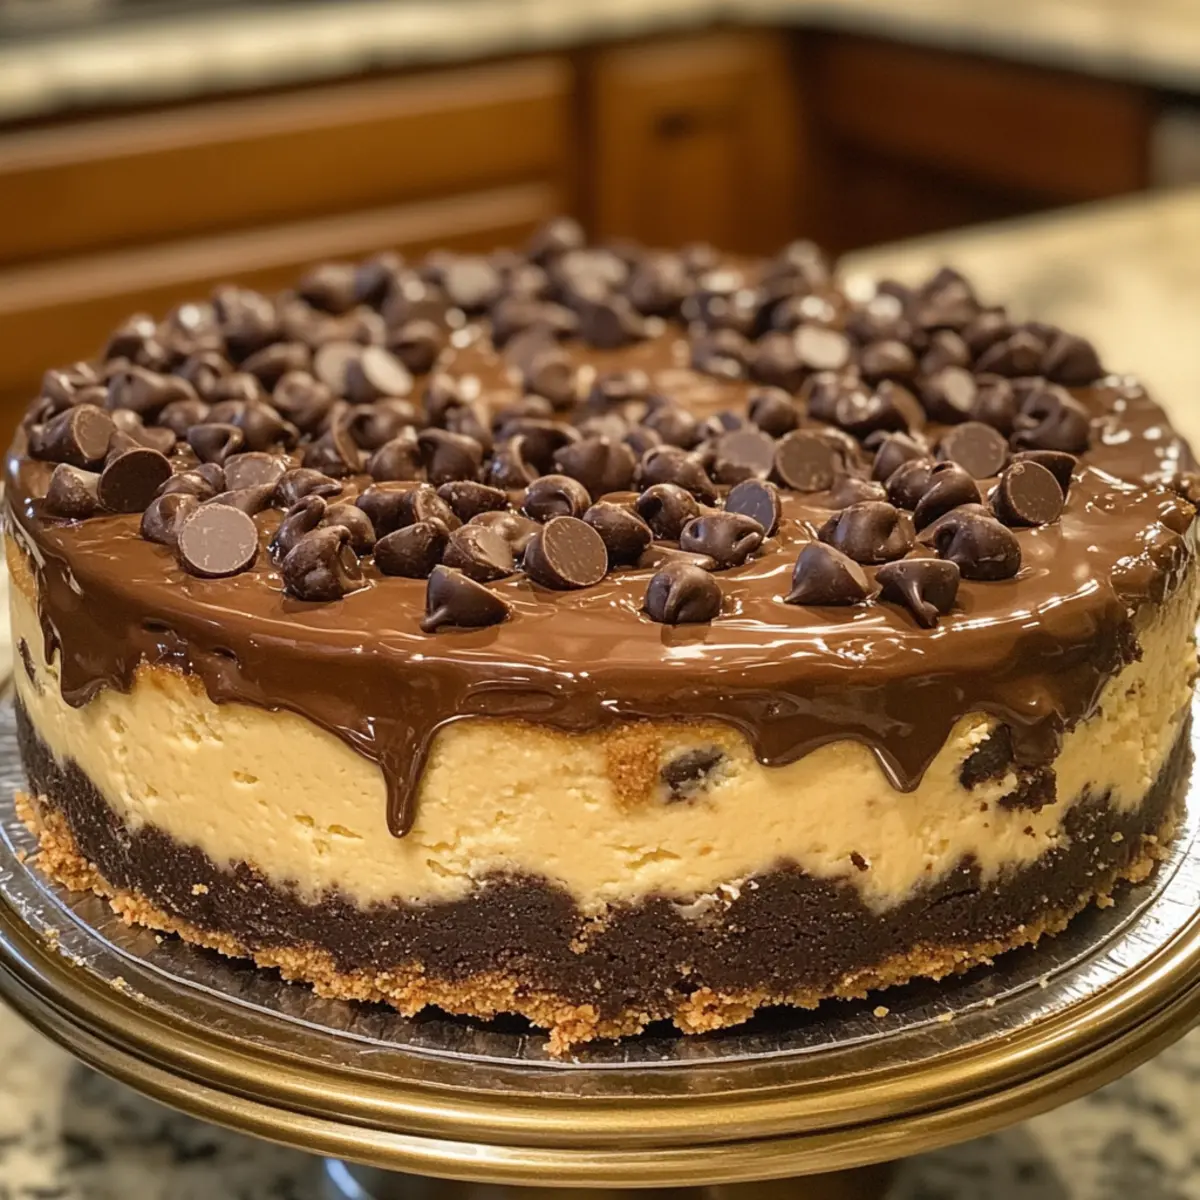
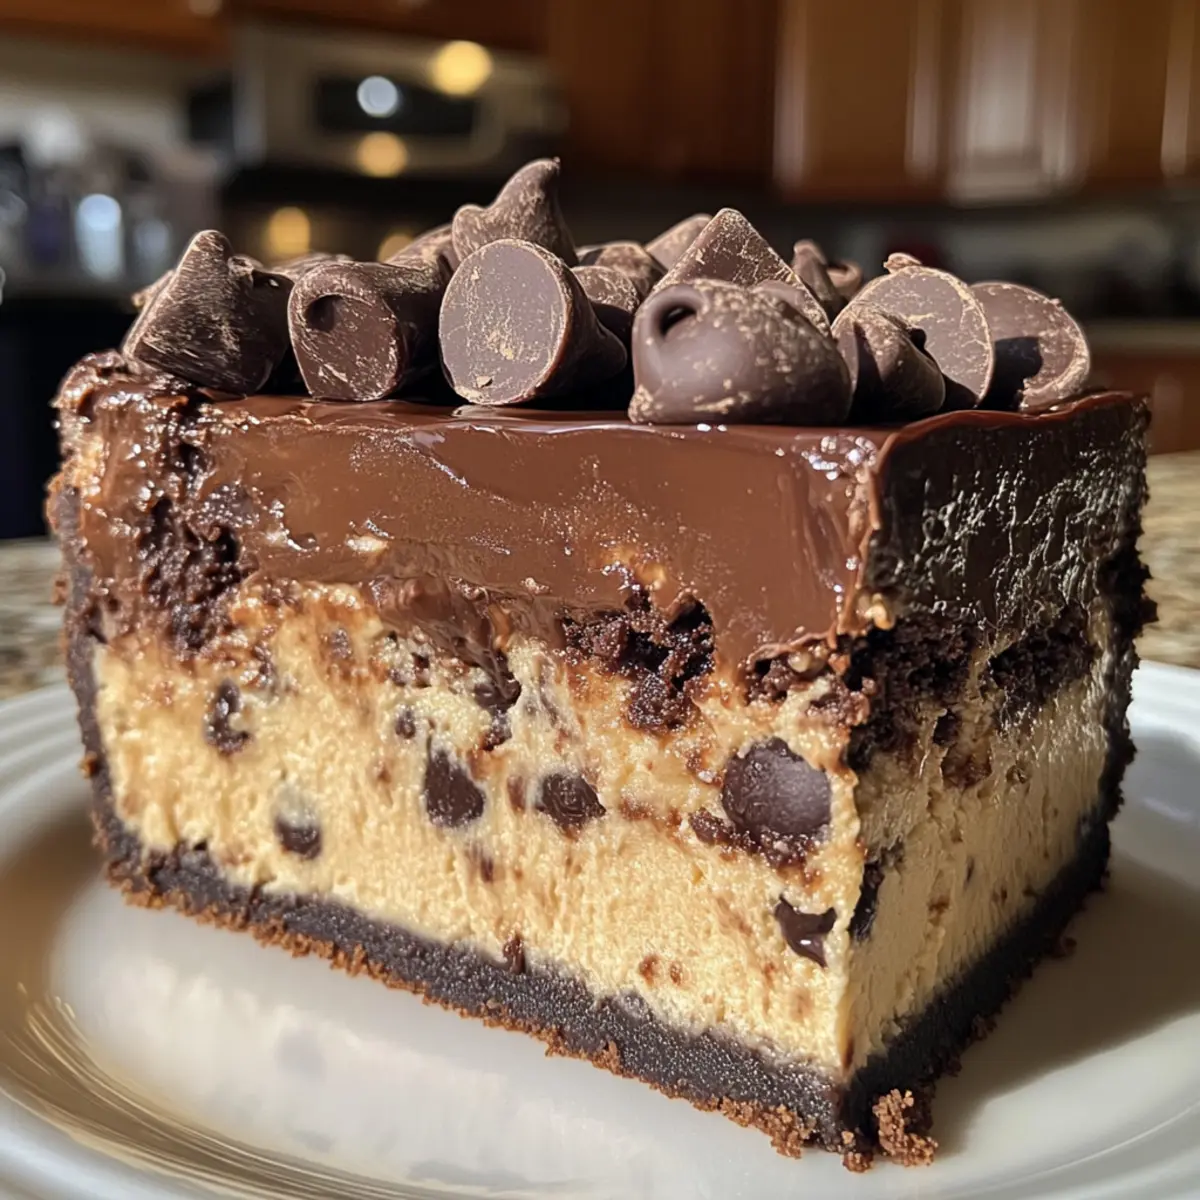
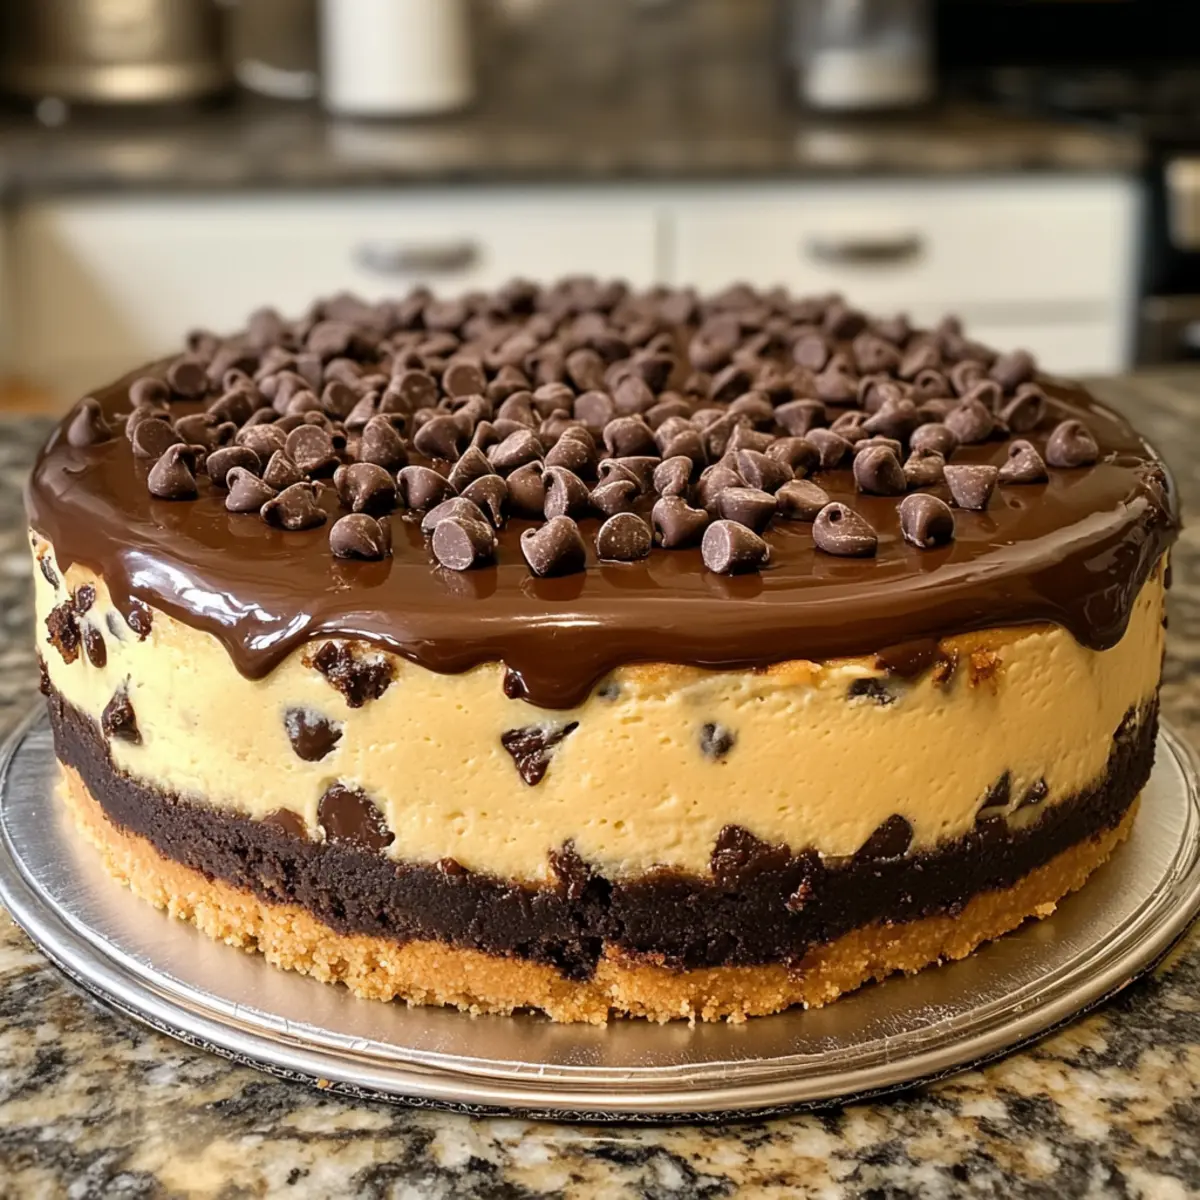
You wouldn’t believe the sheer joy that fills my kitchen when I create my Ultimate Chocolate Chip Cookie Dough Cheesecake. With its buttery cookie crust, luscious cream cheese filling, and tantalizing bits of cookie dough, this indulgent dessert has become my go-to for celebrations and cozy nights alike. Not only is it remarkably easy to whip up, but the fact that it’s egg-free opens the door for a wider array of baking enthusiasts to experience this decadent delight. Imagine each slice revealing gooey bites of cookie dough, all wrapped in a rich cheesecake topped with smooth ganache. What’s not to love? As you scroll down, I can’t wait to share the simple secrets that make this creation a crowd-pleaser in your home!
Why Is This Cheesecake So Irresistible?
Indulgent, this Chocolate Chip Cookie Dough Cheesecake is a dessert lover’s dream, with a combination of cookie crust and creamy filling that satisfies cravings. No Eggs Needed means you can whip it up safely and easily, making it accessible for everyone. Versatility allows you to customize with gluten-free ingredients or swap toppings for a unique twist, while effortless preparation ensures you spend less time in the kitchen and more time enjoying delicious moments. Perfect for gatherings, this cheesecake’s gooey surprises of cookie dough will have your guests asking for seconds!
Chocolate Chip Cookie Dough Cheesecake Ingredients
For the Crust
- All-Purpose Flour – Provides structure for the crust; can use gluten-free 1-to-1 flour.
- Baking Soda – A leavening agent essential for the crust’s texture.
- Salt – Enhances the flavor of both the crust and cookie dough.
- Unsalted Butter (room temperature) – Adds richness; swap with salted butter if needed.
- Brown Sugar – Introduces moisture and depth of flavor in the crust.
- Granulated Sugar – Sweetness; coconut sugar can be a lower-glycemic substitute.
- Vanilla Extract – Amplifies flavors in both the crust and cheesecake.
- Egg – Provides structure; replace with a flax egg for a vegan twist.
- Semi-Sweet Chocolate Chips – Adds a delightful chocolate flavor; opt for dark chocolate for a richer taste.
For the Cookie Dough
- Heat-Treated All-Purpose Flour – Ensures safety for the raw cookie dough; heat it at 300°F until it reaches 160°F.
- Milk – Keeps cookie dough moist; non-dairy milk works well too.
- Unsalted Butter (room temperature) – Creates a creamy texture; use salted butter if that’s what you have.
- Brown Sugar – Adds sweetness and moisture for the cookie dough.
- Granulated Sugar – Sweetness; can also substitute with coconut sugar.
- Vanilla Extract – Vital for flavor; don’t skimp!
- Salt – Enhances overall flavor in the dough.
- Semi-Sweet Chocolate Chips – Fold in for delicious chocolatey bites.
For the Cheesecake Filling
- Cream Cheese (room temperature) – Forms the creamy base of the cheesecake; vegan cream cheese works as an alternative.
- Sour Cream (room temperature) – Adds a tangy flavor; Greek yogurt can replace it for a twist.
- Heavy Whipping Cream – Necessary for rich texture; coconut cream is a great non-dairy substitute.
- Powdered Sugar – Sweetens the whipped cream.
- Frozen Edible Cookie Dough Balls – These surprises throughout the cheesecake are the ultimate treat!
Remember, this Chocolate Chip Cookie Dough Cheesecake is more than just dessert; it’s a celebration with each luscious layer sumptuous with flavor!
Step‑by‑Step Instructions for Chocolate Chip Cookie Dough Cheesecake
Step 1: Prepare the Crust
Preheat your oven to 350°F (175°C). In a large mixing bowl, cream together 1 cup of unsalted butter and both sugars until light and fluffy. Mix in the vanilla extract and egg until well combined. In another bowl, whisk together the dry ingredients—flour, baking soda, and salt—before folding them into the wet mixture along with the chocolate chips. Press this crust mixture evenly into the bottom of a 9-inch springform pan and bake for 18-23 minutes, until it’s golden brown.
Step 2: Make Edible Cookie Dough
To create the edible cookie dough, first heat-treat 1 cup of all-purpose flour by spreading it on a baking sheet and baking it at 300°F (150°C) for about 7-8 minutes, ensuring it reaches 160°F. In a mixing bowl, cream together ½ cup of unsalted butter and both sugars until fluffy. Add the vanilla extract and milk to the mixture, then gradually incorporate the cooled flour and salt, folding in the chocolate chips. Roll the dough into small balls and freeze them for at least 10 minutes.
Step 3: Prepare the Cheesecake Filling
Lower your oven temperature to 325°F (163°C) while you start on the filling. Beat 16 ounces of room-temperature cream cheese in a large bowl until smooth. Gradually mix in ¾ cup of granulated sugar, followed by ½ cup of sour cream, ½ cup of heavy cream, and 1 teaspoon of vanilla extract, mixing on low speed until just combined. Carefully add in the eggs one at a time, then fold in ½ cup of mini chocolate chips and ⅔ of the frozen cookie dough balls for delightful pockets of goodness.
Step 4: Bake the Cheesecake
Pour the luscious cheesecake filling over your pre-baked crust, ensuring an even layer. For best results, place the springform pan inside another larger pan filled with hot water to create a water bath, which helps prevent cracks. Bake for 75-90 minutes, until the edges are set but the center still has a slight jiggle. Once done, turn off the oven and let the cheesecake cool inside for 30 minutes before transferring it to the refrigerator to chill overnight.
Step 5: Make Ganache
While the cheesecake chills, prepare the ganache. Heat 1 cup of heavy whipping cream in a small saucepan until it just begins to simmer. Pour the hot cream over 1 cup of semi-sweet chocolate chips in a mixing bowl and let it sit for a few minutes. Afterward, stir the mixture until smooth and glossy, then allow it to cool slightly before using it to top the cheesecake.
Step 6: Prepare Whipped Cream
In a mixing bowl, beat 1 cup of heavy whipping cream with 2 tablespoons of powdered sugar and 1 teaspoon of vanilla extract using an electric mixer. Whip until stiff peaks form, creating a light and fluffy topping that will beautifully complement the rich flavors of the Chocolate Chip Cookie Dough Cheesecake.
Step 7: Assemble
Once your cheesecake is chilled and set, carefully remove it from the springform pan. Drizzle the smooth ganache over the top, allowing it to cascade down the sides. Pipe the whipped cream on top in decorative swirls, then garnish with the remaining edible cookie dough balls for an irresistible finish. Chill the assembled cheesecake for an additional hour before slicing and serving, creating a show-stopping dessert for any occasion.
Expert Tips for Chocolate Chip Cookie Dough Cheesecake
- Heat Treat Flour: Always heat-treat your flour for the edible cookie dough. This step ensures safety against raw flour consumption and keeps your cheesecake delicious.
- Water Bath Usage: Don’t skip the water bath when baking! It helps prevent cracks in your cheesecake, ensuring a beautiful presentation.
- Cool Gradually: Allow the cheesecake to cool in the oven before transferring it to the fridge. This gradual cooling process improves texture and reduces the chance of cracks.
- Chill Time Matters: For the best flavor and texture, allow your Chocolate Chip Cookie Dough Cheesecake to chill overnight or even up to two days before serving.
- Mini Cheesecakes: If you’re short on time or serving fewer people, consider using cupcake molds for mini versions. Just adjust baking time to about 25-30 minutes!
Chocolate Chip Cookie Dough Cheesecake Variations
Feel free to let your creativity shine and customize this delightful cheesecake to suit your taste buds!
-
Gluten-Free: Swap regular flour with gluten-free 1-to-1 flour to create a safe option for gluten-sensitive eaters. Your cheesecake will still be indulgent and delicious!
-
Vegan Twist: Replace cream cheese with vegan cream cheese and use a flax egg instead of a regular egg for a plant-based delight. You’ll still capture those creamy and rich flavors!
-
Flavor Boost: Experiment with flavored extracts, like mint or almond, instead of vanilla for a unique twist on this classic dessert. The result will be a refreshing and unexpected taste.
-
Nutty Addition: Fold in crushed nuts, like walnuts or pecans, into the cheesecake filling for an extra crunch and a rich taste. This adds not only flavor but also delightful texture!
-
Chocolate Lovers: Use a combination of dark chocolate chips and semi-sweet chocolate for the filling. The depth of chocolate flavors will elevate your cheesecake to new heights!
-
Less Indulgent: Skip the ganache topping and opt for a simple sprinkle of powdered sugar instead. This keeps the dessert light while still maintaining its sweetness.
-
Mini Cheesecakes: Transform this recipe into mini cheesecakes using cupcake molds. Bake for about 25-30 minutes for the perfect, shareable bite-sized treat.
-
Seasonal Flavors: Add in some pumpkin puree and warm spices for a fall-inspired treat, or fresh berries for a summer cheesecake. These options can keep your dessert fresh and exciting year-round.
Let your imagination run wild! And if you’re looking for other cookie-inspired sweets, you might enjoy these delightful Oreo Cheesecake Cookie or Yogurt Cookie Dough. Your cookie dough adventures are just beginning!
Make Ahead Options
These Chocolate Chip Cookie Dough Cheesecakes are perfect for meal prep enthusiasts! You can prepare the crust and edible cookie dough up to 24 hours in advance, allowing flavors to meld beautifully. Simply bake the crust and let it cool, then make the edible cookie dough and freeze the cookie balls. When you’re ready to finish the cheesecake, whip up the filling and assemble. Be sure to chill the cheesecake overnight for optimal texture and flavor, enhancing your delightful dessert experience. By preparing these steps ahead of time, you’ll save precious minutes on the day of serving, enjoying a decadent dessert with minimal last-minute effort!
How to Store and Freeze Chocolate Chip Cookie Dough Cheesecake
Fridge: Store leftover cheesecake in an airtight container for up to 5 days. This keeps the flavors locked in, so every slice tastes fresh and delightful.
Freezer: Wrap each slice individually in plastic wrap and foil, then freeze for up to 30 days. Thaw slices at room temperature before serving to enjoy that luscious cheesecake experience.
Serving After Freezing: For an optimal taste, allow the cheesecake to sit out for about 30 minutes before indulging. This enhances the rich flavors and creamy texture of the Chocolate Chip Cookie Dough Cheesecake.
Reheating: There’s no need to reheat this dessert, but if you prefer a warm experience, gently microwave a slice for about 10-15 seconds for a cozy treat!
What to Serve with Chocolate Chip Cookie Dough Cheesecake
Indulging in a slice of this heavenly dessert opens the door to a world of magnificent pairings that will elevate your dining experience.
-
Fresh Berries: Juicy strawberries, blueberries, or raspberries offer a bright contrast, balancing the richness of the cheesecake with their tartness.
-
Vanilla Ice Cream: This classic accompaniment melts beautifully on the warm cheesecake, creating a delightful mix of textures and flavors.
-
Espresso or Coffee: A warm cup of espresso enhances the chocolate notes in the cheesecake, making each bite even more satisfying.
-
Chocolate Sauce: Drizzling a little extra chocolate sauce over the cheesecake adds an indulgent layer to this already decadent treat.
-
Nuts: Chopped pecans or walnuts introduce a satisfying crunch and nutty flavor, rounding off the creamy sweetness of each slice.
-
Mint Leaves: A few fresh mint leaves as a garnish not only brighten the presentation but also add a refreshing element to each bite.
-
Sparkling Water: For a refreshing drink, serve sparkling water with a lemon slice to cleanse the palate between bites of rich cheesecake.
-
Whipped Cream: A dollop of additional whipped cream brings extra creaminess, perfect for those who want an indulgent touch.
-
Sweet Red Wine: Pair your dessert with a sweet red wine, like a dessert Zinfandel, to complement the rich flavors of the cheesecake.
Each of these pairings enhances the experience, inviting you to savor the magic of homemade goodness in every delightful bite!
Chocolate Chip Cookie Dough Cheesecake Recipe FAQs
How do I choose ripe and fresh ingredients for this cheesecake?
Absolutely! When selecting ingredients for your Chocolate Chip Cookie Dough Cheesecake, opt for room-temperature cream cheese to ensure a smooth mix. Look for unsalted butter that feels soft yet firm, and always check the chocolate chips for freshness; they should have no signs of discoloration. For the perfect cookie dough, ensure your flour is fresh and avoid any bags that have dark spots or an off smell.
What is the best way to store leftover cheesecake?
Very simple! Store your leftover cheesecake in an airtight container in the refrigerator for up to 5 days. This will help maintain its delightful creaminess and flavors. Just remember to cover it well to avoid absorbing any other fridge smells!
Can I freeze Chocolate Chip Cookie Dough Cheesecake?
Absolutely! To freeze your cheesecake, wrap each slice individually in plastic wrap and then in aluminum foil to prevent freezer burn. It will stay good for up to 30 days. To enjoy, just thaw a slice at room temperature for about 30-60 minutes before serving. It brings back its luscious texture and flavor beautifully!
What if my cheesecake cracks while baking?
Don’t worry; it happens to the best of us! If your cheesecake cracks, it’s often due to baking at too high a temperature. Always use a water bath, as this gentle cooking method helps maintain a uniform temperature and moisture for the cheesecake. Additionally, make sure to cool your cheesecake gradually in the oven to prevent sudden temperature changes that can cause cracks.
Are there any dietary considerations for this cheesecake?
Yes, indeed! This Chocolate Chip Cookie Dough Cheesecake is egg-free, making it safer for those concerned about consuming raw eggs. If you have dietary restrictions, feel free to substitute with a flax egg for a vegan option. For gluten-free variations, simply use gluten-free 1-to-1 flour in place of all-purpose flour. Always check ingredient labels for allergens, especially the chocolate chips, to accommodate any additional dietary needs!
Decadent Chocolate Chip Cookie Dough Cheesecake Bliss
Ingredients
Equipment
Method
- Preheat your oven to 350°F (175°C). In a mixing bowl, cream together the unsalted butter and both sugars until light and fluffy. Mix in the vanilla extract and egg until well combined. Whisk together the dry ingredients before folding them into the wet mixture with the chocolate chips. Press into the bottom of a 9-inch springform pan and bake for 18-23 minutes.
- For the edible cookie dough, heat-treat the flour at 300°F (150°C) for about 7-8 minutes. Cream together unsalted butter and both sugars until fluffy. Add the vanilla extract and milk, then incorporate cooled flour and salt, folding in the chocolate chips. Roll into small balls and freeze for at least 10 minutes.
- Lower your oven temperature to 325°F (163°C). Beat room-temperature cream cheese until smooth, then mix in the granulated sugar, sour cream, heavy cream, and vanilla extract, mixing on low speed. Carefully add the eggs one at a time and fold in mini chocolate chips and ⅔ of the frozen cookie dough balls.
- Pour the cheesecake filling over the pre-baked crust. Place the springform pan inside a larger pan filled with hot water to create a water bath. Bake for 75-90 minutes until the edges are set but the center jiggles slightly. Cool inside for 30 minutes before transferring to the refrigerator to chill overnight.
- To prepare ganache, heat heavy whipping cream until it simmers, then pour over semi-sweet chocolate chips. Let sit for a few minutes and stir until smooth, then cool slightly before topping the cheesecake.
- Beat heavy whipping cream with powdered sugar and vanilla extract until stiff peaks form. This will be the topping for the cheesecake.
- Remove the cheesecake from the springform pan, drizzle the ganache over the top, pipe whipped cream on top, and garnish with remaining edible cookie dough balls. Chill for an additional hour before serving.
Leave a Reply