
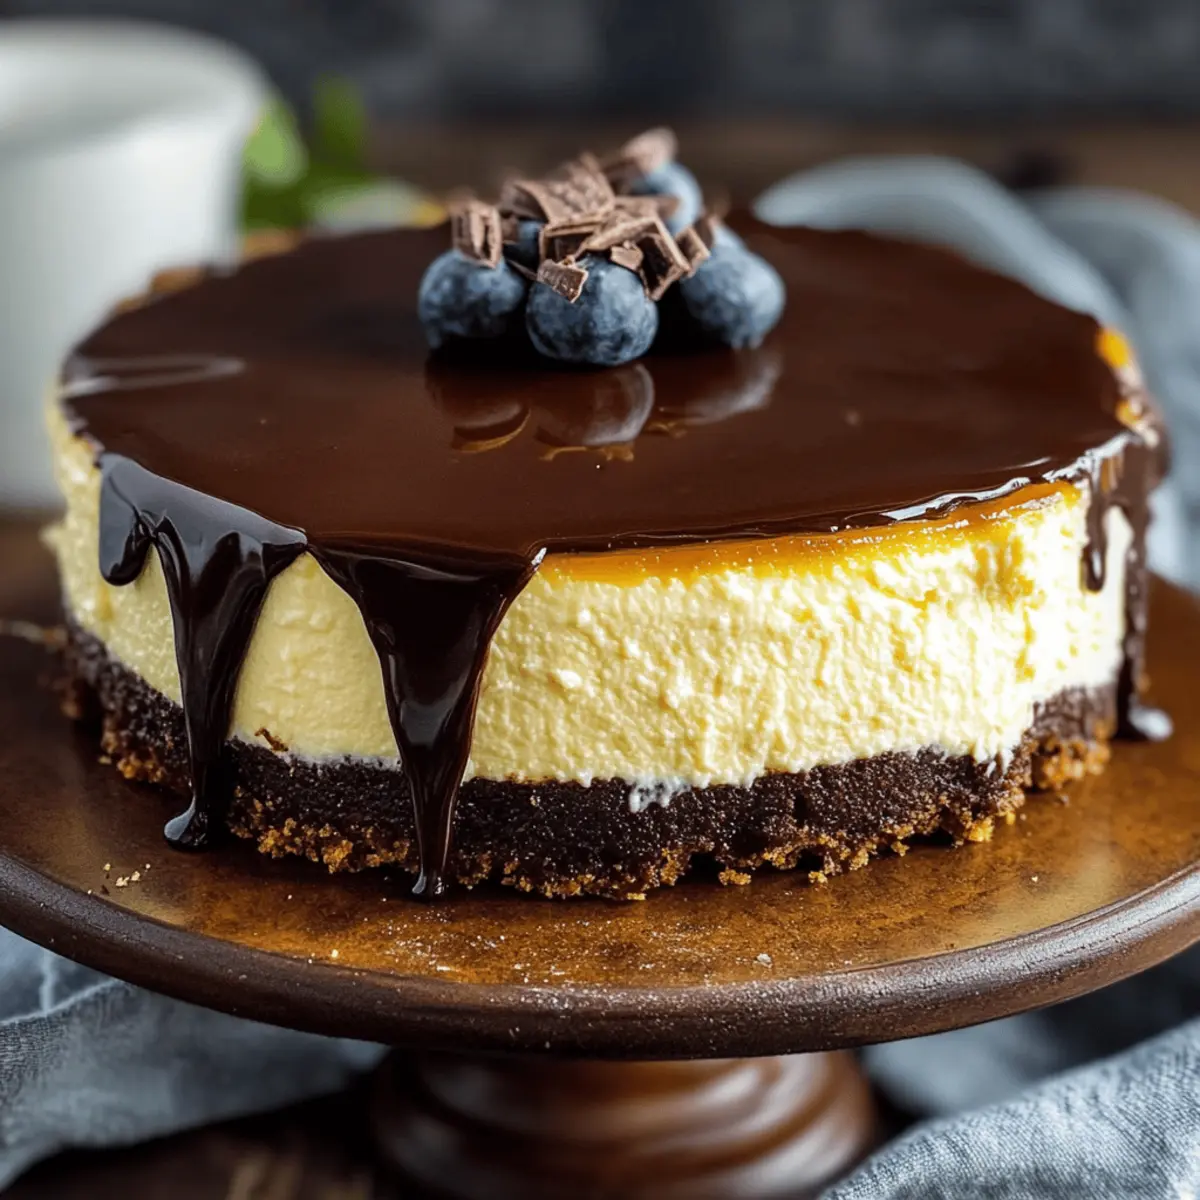
As I lifted the lid off my dessert stand, I was captivated by the sight of my freshly made Boston Cream Pie Cheesecake—a masterpiece where creamy cheesecake meets the exquisite layers of silky custard and luscious chocolate ganache. This luxuriously layered dessert is not just a treat for special occasions; its heavenly combination of textures makes it perfect for any moment when you crave a little indulgence. The best part? It’s surprisingly simple to whip up, making you the star of any gathering. Whether you’re celebrating a milestone or trying to elevate a quiet night in, this Boston Cream Pie Cheesecake will surely have everyone asking for seconds. Curious how to create this stunning dessert yourself? Let’s dive into the delicious details!

Why is Boston Cream Pie Cheesecake Irresistible?
Luxurious combination: The blend of creamy cheesecake and rich custard topped with chocolate ganache creates a dessert experience like no other.
Crowd-pleasing delight: No one can resist the allure of this decadent treat, perfect for family gatherings or special occasions.
Easy to create: In just a few simple steps, you can transform everyday ingredients into a show-stopping dessert that impresses everyone.
Versatile options: Adapt the recipe to suit your taste by experimenting with different crusts or seasonal flavors, like peppermint or orange zest.
Make-ahead friendly: Prepare it a day in advance to allow flavors to meld, making it an ideal dessert for busy hosts.
Get ready to impress your friends and family with this Luxurious Boston Cream Pie Cheesecake that’s sure to leave a lasting impression!
Boston Cream Pie Cheesecake Ingredients
• Here’s everything you need to create this luxurious masterpiece!
For the Crust
- Graham Cracker Crumbs – This provides the perfect base for the cheesecake, but you can use digestive biscuits for a similar texture.
- Granulated Sugar – Sweetens the crust; ensure you use the appropriate amount for both crust and filling.
- Unsalted Butter – Adds richness to the crust; using salted butter can give a delightful twist.
For the Cheesecake Filling
- Full-Fat Cream Cheese – The star of the filling, making the cheesecake incredibly creamy; be sure it’s softened for easy mixing.
- All-Purpose Flour or Cornstarch – Helps stabilize the cheesecake filling; for a gluten-free option, substitute with gluten-free flour.
- Non-Alcoholic Vanilla Extract – Enhances flavor; opt for pure vanilla for a more robust taste.
- Eggs – Provide stability for the cheesecake; room temperature eggs incorporate better into the batter.
- Full-Fat Sour Cream – Adds a luscious tanginess; Greek yogurt can serve as a suitable substitute.
For the Pastry Cream
- Whole Milk – Essential for the pastry cream; use almond milk for a dairy-free option.
- Cornstarch – Acts as a thickener; you can swap it with instant pudding mix for a quicker approach.
- Salt – Enhances flavors significantly and is critical in both the pastry cream and cheesecake filling.
- Egg Yolks – Add richness to the pastry cream; choose fresh yolks for the best flavor.
For the Chocolate Ganache
- Heavy Cream – Vital for a silky chocolate ganache; using light cream may alter the consistency.
- Semi-Sweet Chocolate Chips – The primary chocolate ingredient for ganache; dark chocolate works well too depending on your preference.
Optional Garnishes
- Chocolate Shavings – Perfect for aesthetic appeal and a chocolate boost.
- Fresh Berries – Adds a burst of flavor and a touch of freshness.
- Whipped Cream – A delightful addition that complements the richness of the cheesecake.
With these ingredients in hand, you’re ready to craft an extraordinary Boston Cream Pie Cheesecake that’ll delight and impress everyone at the table!
Step‑by‑Step Instructions for Boston Cream Pie Cheesecake
Step 1: Prepare Graham Cracker Crust
Preheat your oven to 350°F (175°C). In a bowl, combine the graham cracker crumbs, sugar, and melted unsalted butter until well mixed. Transfer this mixture into a springform pan, pressing it firmly into the bottom and slightly up the sides. Bake for 8-10 minutes, or until golden brown, then allow it to cool completely while you prepare the cheesecake filling.
Step 2: Make Cheesecake Filling
Lower the oven temperature to 325°F (160°C). In a large mixing bowl, beat the softened cream cheese until smooth and creamy. Gradually add granulated sugar and flour or cornstarch, mixing until combined. Incorporate the eggs one at a time, followed by the sour cream and vanilla extract. Once smooth, pour the cheesecake mixture into the cooled crust, spreading it evenly.
Step 3: Bake Cheesecake
To prevent cracks, use a water bath: wrap the bottom of the springform pan in aluminum foil and place it in a larger pan filled with hot water. Bake the cheesecake for 60-75 minutes, or until the edges are set but the center still slightly jiggles. Turn off the oven and leave the cheesecake inside to cool gradually for 1 hour before transferring it to the fridge for at least 6-8 hours, preferably overnight.
Step 4: Prepare Pastry Cream
In a saucepan, heat the whole milk and sugar over medium heat until it’s steaming but not boiling. Meanwhile, in a bowl, whisk the egg yolks with cornstarch until smooth. Slowly temper the egg mixture with the hot milk, whisking continuously. Return the mixture to the saucepan and cook, stirring constantly, until thickened. Once thick, transfer to a bowl, cover with plastic wrap, and refrigerate for 2-3 hours.
Step 5: Make Chocolate Ganache
In a small saucepan, heat the heavy cream over medium heat until it begins to simmer. Remove it from the heat and pour it over the semi-sweet chocolate chips in a bowl. Let it sit for a minute, then stir until the mixture is smooth and glossy. Allow the ganache to cool and thicken slightly before using it to top the cheesecake.
Step 6: Assemble and Serve
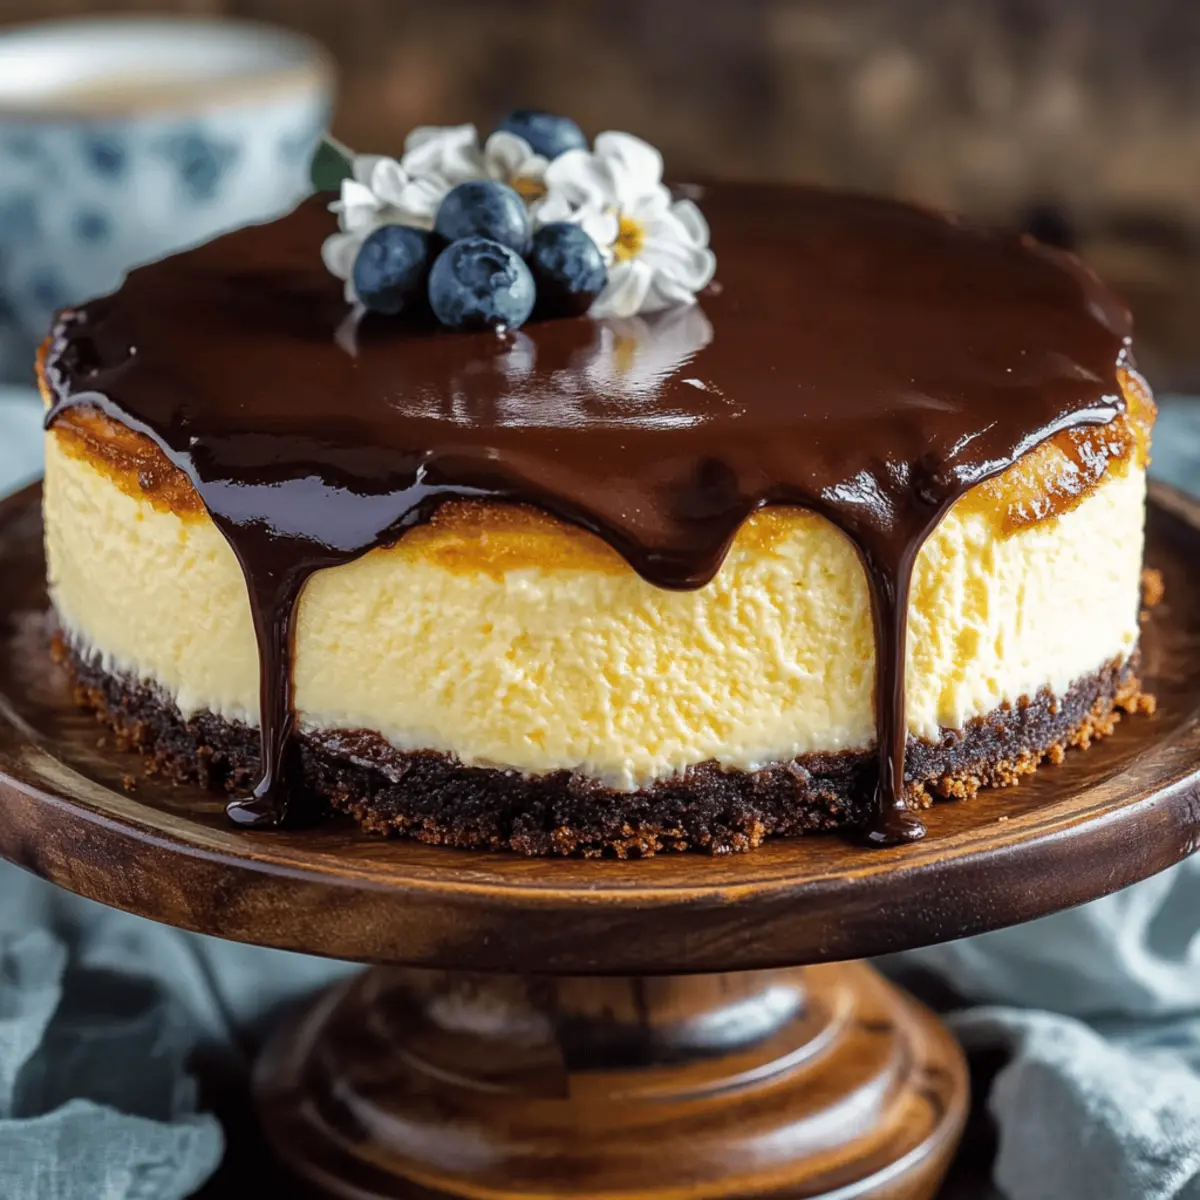
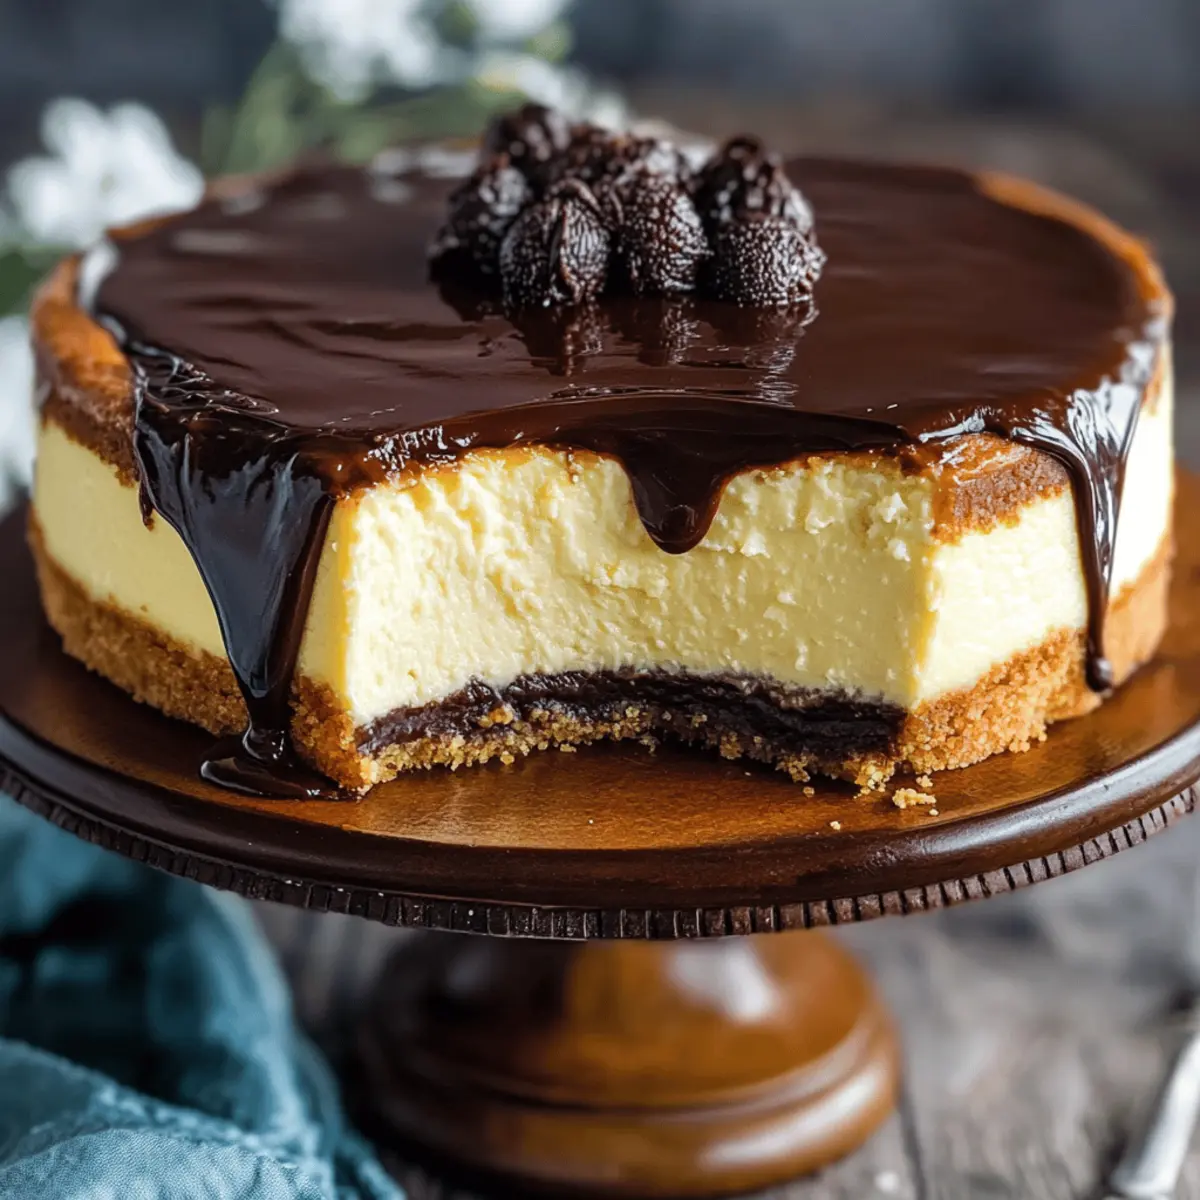
Once the cheesecake is thoroughly chilled, spread the cooled pastry cream evenly over the top layer. Gently pour the chocolate ganache on top, ensuring it covers the pastry cream completely. Refrigerate the assembled cheesecake for an additional 1-2 hours to set. Before serving, garnish with chocolate shavings, fresh berries, or whipped cream to enhance your Boston Cream Pie Cheesecake experience.
Storage Tips for Boston Cream Pie Cheesecake
Fridge: Store the cheesecake in an airtight container to maintain its creamy texture, enjoying it within 5 days for optimal freshness.
Freezer: For longer storage, wrap individual slices tightly in plastic wrap and foil; freeze for up to 2 months. Thaw in the fridge before serving.
Reheating: This cheesecake is best served chilled; simply slice and enjoy cold, or let it sit at room temperature for 20-30 minutes before serving.
Tip: To preserve the gorgeous layers of your Boston Cream Pie Cheesecake, avoid stacking slices atop each other during storage.
Make Ahead Options
These Boston Cream Pie Cheesecake layers are perfect for meal prep, making your hosting duties smoother! You can prepare the graham cracker crust up to 24 hours in advance; simply keep it stored in an airtight container to maintain its crunch. Additionally, the cheesecake filling can be made a day before serving to allow the flavors to meld beautifully. For best results, chill the cheesecake overnight, ensuring it sets properly. The pastry cream and chocolate ganache can also be prepared ahead of time and stored separately in the refrigerator for up to 3 days. When it’s time to serve, just assemble the chilled layers and enjoy your delectable dessert without the last-minute rush!
Expert Tips for Boston Cream Pie Cheesecake
-
Room Temperature Ingredients: Ensure all ingredients, especially cream cheese and eggs, are at room temperature for a smoother batter and creaminess in your cheesecake.
-
Avoid Overmixing: Mix until just combined to prevent air bubbles, which can cause cracks in your Boston Cream Pie Cheesecake as it bakes.
-
Water Bath Method: Use a water bath to create steam, helping the cheesecake bake evenly and reducing the risk of cracks.
-
Cool Gradually: Allow the cheesecake to cool in the oven with the door ajar after baking. This gradual cooling helps maintain a smooth texture and prevent cracking.
-
Chill Overnight: For the best flavor and texture, let your cheesecake refrigerate overnight before serving—it allows the flavors to meld beautifully.
-
Garnish Thoughtfully: Enhance the presentation and taste of your cheesecake with chocolate shavings, fresh berries, or a dollop of whipped cream for an elegant touch!
Boston Cream Pie Cheesecake Variations & Substitutions
Feel free to play around with this delightful dessert, making it even more uniquely yours!
-
Dairy-Free: Use coconut cream and dairy-free cream cheese in place of traditional dairy ingredients for a delicious alternative.
-
Gluten-Free: Swap graham cracker crumbs with almond flour or gluten-free graham cracker crumbs to create a delightful crust.
-
Chocolate Crust: Use chocolate wafer cookies instead of graham crackers for a rich, chocolatey base that elevates the dessert.
-
Festive Flavors: Add a tablespoon of orange zest to the ganache for a zesty twist, perfect during holiday seasons.
-
Mini Cheesecakes: Divide the batter into muffin tins for individual portions, making them perfect for parties or special gatherings.
-
Extra Richness: Fold in some melted chocolate into the cheesecake batter before baking for a richer chocolatey flavor.
-
Nutty Crunch: Sprinkle finely chopped nuts (walnuts or pecans) into the crust mixture for added texture and complexity.
-
Whipped Cream Topping: Top with homemade whipped cream flavored with vanilla or almond extract for an extra layer of flavor and creaminess.
Explore these variations and discover how a simple twist can transform your Boston Cream Pie Cheesecake into an even more memorable experience! For more indulgent dessert ideas, check out these Fried Strawberry Cheesecake Sandwiches or discover these delightful Sweet Coconut Cream Pancakes to complement your creamy cheesecake.
What to Serve with Boston Cream Pie Cheesecake
Create the perfect dining experience with delightful accompaniments that enhance your cheesecake’s rich flavors.
- Fresh Berries: The bright, tartness of berries cuts through the richness, adding a refreshing contrast to each bite.
- Whipped Cream: Lightly sweetened whipped cream provides a fluffy counterpart that complements the cheesecake’s creamy texture beautifully.
- Chocolate Mousse: If you crave more chocolate, a velvety chocolate mousse will echo the ganache while enriching the dessert experience.
- Coffee or Espresso: A robust cup of coffee or a shot of rich espresso balances sweetness and enhances the overall flavor profile.
- Vanilla Ice Cream: Creamy vanilla ice cream adds a cool, comforting touch, making each forkful of cheesecake extra indulgent.
- Candied Nuts: Crunchy, sweetened nuts add texture and a delightful flavor contrast, enhancing the luxurious nature of the cheesecake.
- Sparkling Wine or Champagne: Toast your gathering with sparkling wine, as the bubbles and acidity pair harmoniously with the cheesecake’s richness.
- Coconut Macaroons: These chewy treats introduce a tropical flair and delightful texture, making for an exotic touch alongside the cheesecake.
- Fruit Sorbet: A light mango or lemon sorbet adds a refreshing finish, cleansing the palate perfectly after the rich cheesecake.
Boston Cream Pie Cheesecake Recipe FAQs
How do I choose ripe ingredients for my cheesecake?
Absolutely! When picking your ingredients, make sure your cream cheese is soft and room temperature to ensure a creamy batter. For eggs, select large, fresh eggs for the best texture and flavor. As for the milk and sour cream, go for full-fat versions for a richer taste and creaminess. Remember, fresh ingredients make a world of difference in your Boston Cream Pie Cheesecake!
What is the best way to store leftover cheesecake?
Very good question! You can store your Boston Cream Pie Cheesecake in an airtight container in the refrigerator for up to 5 days. To maintain its creamy texture, I recommend placing a layer of plastic wrap directly on the surface of the cheesecake before sealing it. If you want to keep it longer, wrap individual slices tightly in plastic wrap and then aluminum foil, freezing them for up to 2 months. Just thaw in the fridge overnight before serving!
Can I freeze slices of Boston Cream Pie Cheesecake?
Yes, you can! To freeze your cheesecake, slice it into individual portions, then wrap each piece in plastic wrap followed by foil. Place them in a freezer-safe bag to prevent freezer burn. This way, your lovely dessert can be enjoyed even after a couple of months. Just remember to thaw each slice in the refrigerator for a few hours before serving!
What should I do if my cheesecake cracks during baking?
If you notice cracks forming, don’t panic! One tip is to avoid overmixing the batter, as it can incorporate too much air. Additionally, using a water bath during baking helps maintain even heat and moisture. If a crack does appear, you can cover it with ganache or whipped cream at serving time—no one will ever know!
Are there any dietary considerations for this cheesecake?
Absolutely! If you want to make this cheesecake gluten-free, simply swap out the graham cracker crumbs for gluten-free alternatives. You can also use dairy-free options like almond milk and coconut cream for the ganache. Always be cautious if you have guests with allergies—be sure to communicate any substitutions you’ve made, especially regarding eggs and dairy!
Decadent Boston Cream Pie Cheesecake for Ultimate Indulgence
Ingredients
Equipment
Method
- Preheat your oven to 350°F (175°C). Combine the graham cracker crumbs, sugar, and melted unsalted butter until well mixed. Transfer into a springform pan, pressing it firmly into the bottom and slightly up the sides. Bake for 8-10 minutes, then cool completely.
- Lower the oven temperature to 325°F (160°C). Beat the softened cream cheese until smooth. Gradually add granulated sugar and flour/cornstarch, mixing until combined. Incorporate the eggs one at a time, followed by the sour cream and vanilla extract. Pour into the cooled crust.
- Wrap the bottom of the springform pan in aluminum foil and place it in a larger pan filled with hot water. Bake for 60-75 minutes, then cool gradually in the oven for 1 hour before refrigerating for at least 6-8 hours.
- Heat the whole milk and sugar in a saucepan until steaming. Whisk egg yolks with cornstarch until smooth. Temper with hot milk, then return to the saucepan and cook until thickened. Transfer to a bowl, cover, and refrigerate for 2-3 hours.
- Heat the heavy cream until it simmers. Pour over the semi-sweet chocolate chips and let it sit for a minute before stirring until smooth. Allow to cool slightly.
- Spread the cooled pastry cream evenly over the cheesecake. Pour the chocolate ganache on top and refrigerate for 1-2 hours to set. Garnish with chocolate shavings, fresh berries, or whipped cream before serving.
Leave a Reply