
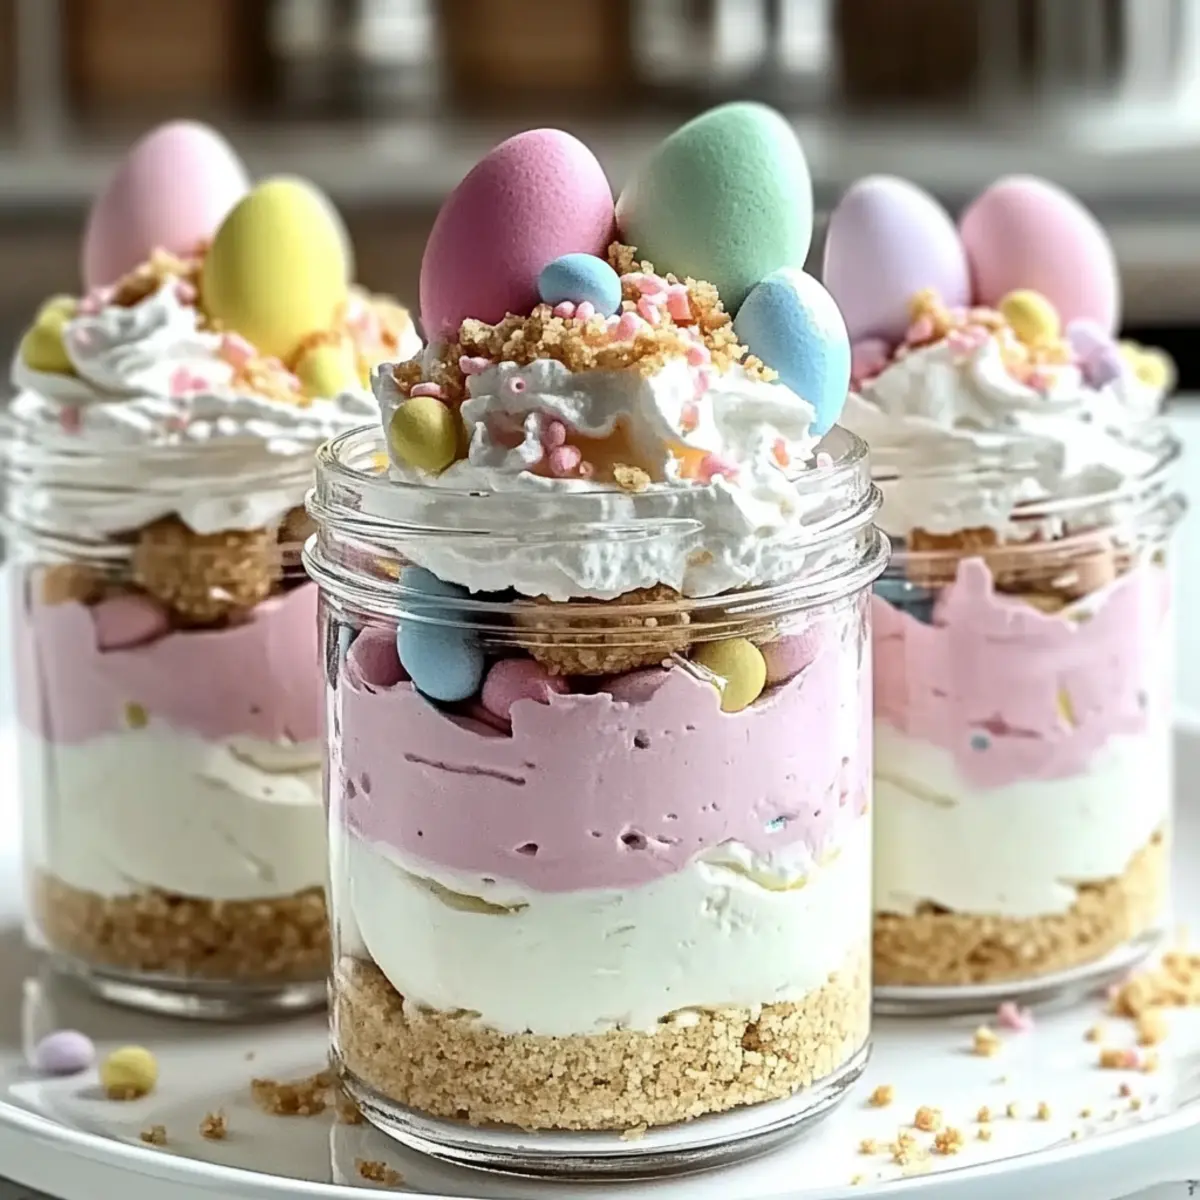
As I was sorting through my kitchen for spring baking inspiration, I stumbled upon an empty jar and an idea sparked—what if I transformed my favorite cheesecake into cute, handheld delights? Enter the Easter Egg Cheesecake Jars! These no-bake wonders feature creamy layers of pastel cheesecake filling resting atop a buttery graham cracker crust that simply melts in your mouth. Not only are they a breeze to whip up, but they’re also fully customizable; just add your favorite toppings, and they’ll stand out at any gathering. Best of all, they bring a playful, festive spirit to your Easter celebrations! Ready to dive into this delightful twist on a classic dessert? Let’s create some memorable moments together.
Why Are These Cheesecake Jars a Must-Try?
No-Bake Delight: These Easter Egg Cheesecake Jars are perfect for those who want a sweet treat without the fuss of baking. Enjoy delicious layers of creamy cheesecake that set beautifully in the refrigerator.
Customizable Creation: Feel free to make them your own! Experiment with different toppings like crushed Oreos or a drizzle of chocolate. The options are endless!
Festive Flair: With their vibrant colors and cute candy decorations, these jars double as eye-catching centerpieces, adding a joyous spirit to any spring gathering.
Quick and Easy: You’ll whip these up in no time, giving you more time to relax or chat with guests. Plus, they can be made ahead of time, just like the Fried Strawberry Cheesecake to share alongside!
Nostalgic Taste: Every bite is a delightful mix of flavors that remind you of simpler times, evoking fond memories of childhood desserts.
Crowd-Pleaser: It’s a treat everyone will love, whether it’s a family brunch or a festive celebration. These jars make dessert feel special and fun!
Easter Egg Cheesecake Jars Ingredients
For the Crust
• Graham Cracker Crumbs – Provides a sweet and sturdy base; try using crushed Oreos for a chocolatey twist.
• Granulated Sugar – Enhances the sweetness; adjust to taste for your preferred sweetness level.
• Unsalted Butter (melted) – Binds the crust ingredients together; melted coconut oil can be a great dairy-free substitute.
For the Cheesecake Filling
• Cream Cheese (softened) – Creates a rich and creamy base; use a vegan cream cheese for a plant-based option.
• Powdered Sugar – Sweetens the cheesecake layer; feel free to reduce the amount if you prefer a less sweet filling.
• Vanilla Extract – Adds flavor depth; almond extract can offer an interesting alternative flavor profile.
• Heavy Cream (whipped to stiff peaks) – Creates a light and airy texture; for a lighter option, use whipped coconut cream.
• Pink Gel Food Coloring or Freeze-Dried Strawberry Powder (optional) – Colors the cheesecake layer for visual appeal; this helps make it a festive dessert.
For the Toppings
• Whipped Cream – Adds a fluffy finish to the jars; you can use a dairy-free whipped topping if desired.
• Pastel Candy Eggs – Decorative topping that brings festive spirit; chocolate eggs can work well for a chocolatey touch.
• Rainbow or Pastel Sprinkles – Additional decoration for a cheerful and fun look; options like crushed nuts can add a nice crunch.
Step‑by‑Step Instructions for Easter Egg Cheesecake Jars
Step 1: Crust Preparation
In a medium bowl, combine the graham cracker crumbs, granulated sugar, and melted butter until the mixture resembles wet sand. Use your fingers or the back of a spoon to press the crust firmly into the bottom of each jar, ensuring it’s even and compact. Set the jars aside while you prepare the cheesecake filling.
Step 2: Cheesecake Mixture
In a mixing bowl, use an electric mixer to beat the softened cream cheese until it is perfectly smooth and free of lumps. Gradually add in the powdered sugar and vanilla extract, continuing to mix until the mixture is light, fluffy, and well combined. This will form the scrumptious filling for your Easter Egg Cheesecake Jars.
Step 3: Incorporate Whipped Cream
In a separate chilled bowl, whip the heavy cream using an electric mixer until stiff peaks form, which takes about 3-5 minutes. Gently fold the whipped cream into the cream cheese mixture in two parts, combining until just blended. This technique will keep the filling airy, making the cheesecake jars wonderfully light and delightful.
Step 4: Coloring the Mixture
Divide the cheesecake mixture into two separate bowls. In one bowl, add a few drops of pink gel food coloring or a spoonful of freeze-dried strawberry powder, gently stirring until evenly tinted. This step adds a fun pop of color, enhancing the visual appeal of your Easter Egg Cheesecake Jars.
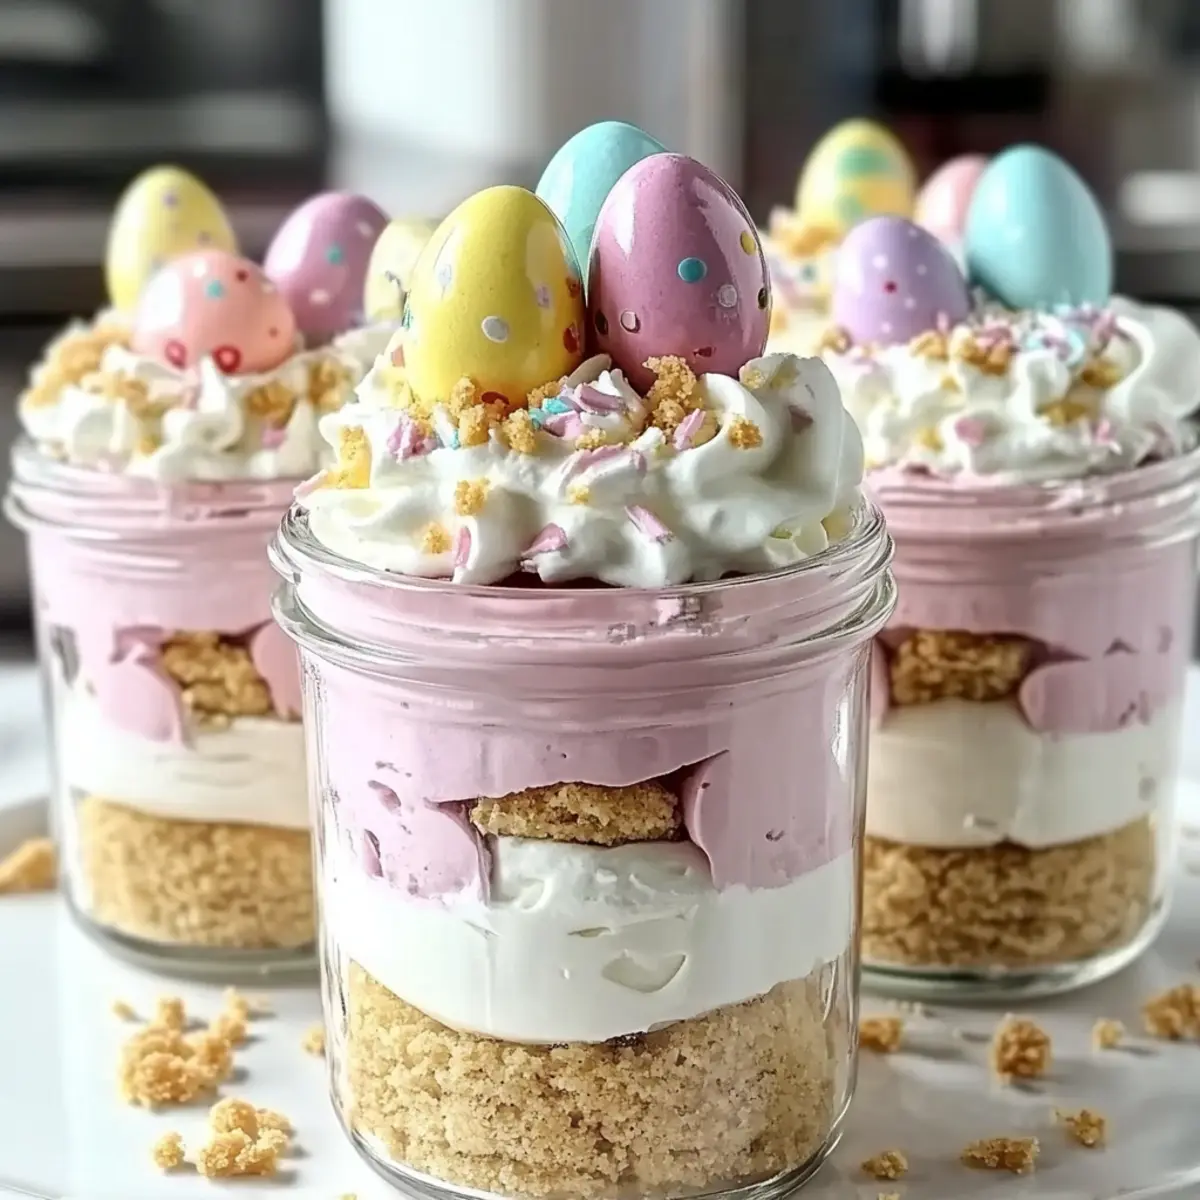
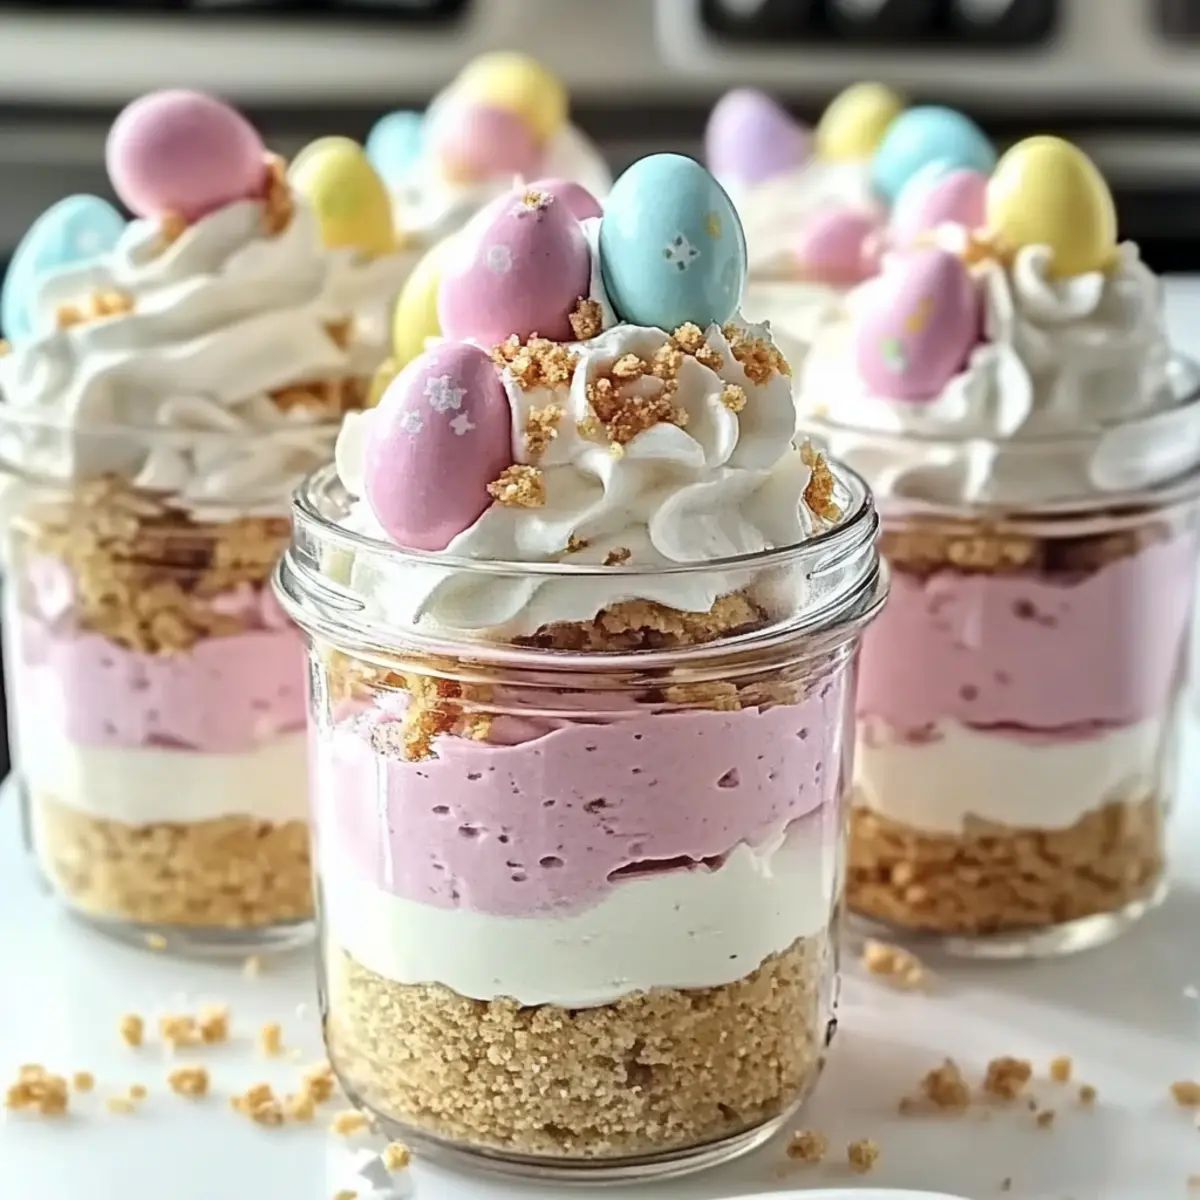
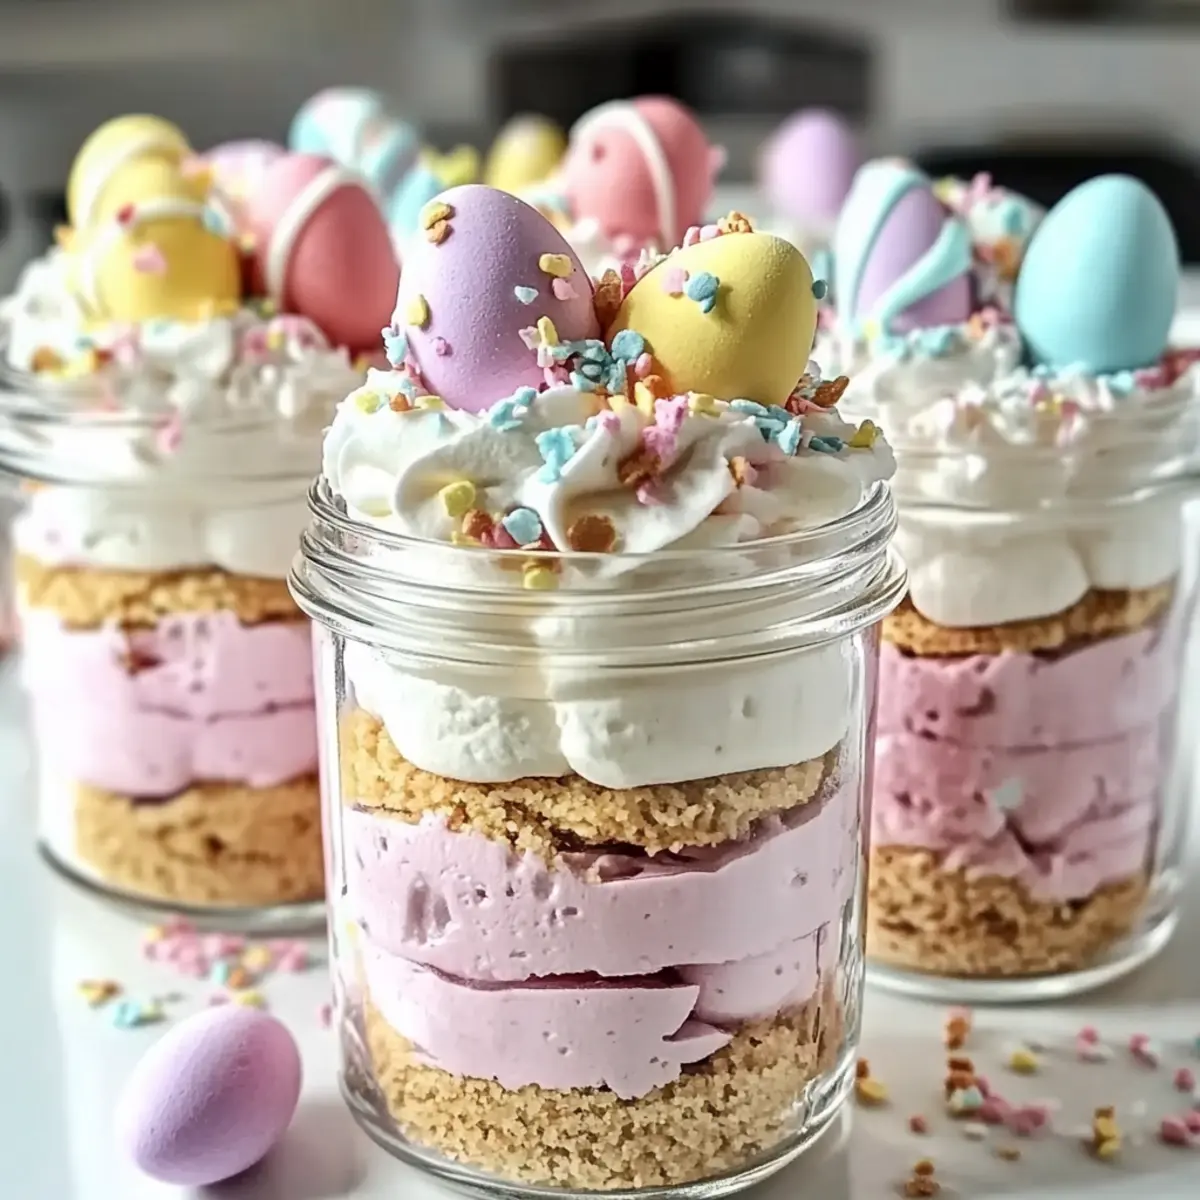
Step 5: Layering
Using a piping bag or a spoon, layer the pink cheesecake mixture over the crust, filling each jar about halfway. Follow with the plain cheesecake layer, piping or spooning it on top to create a beautiful two-tone effect. Ensure you leave some space at the top for the whipped cream topping, making these jars visually stunning.
Step 6: Topping
Once the layers are set, pipe a generous dollop of whipped cream on top of each jar, creating a fluffy and inviting finish. Decorate with pastel candy eggs and a sprinkle of colorful rainbow or pastel sprinkles, adding that playful touch that perfectly complements the festive spirit of your Easter Egg Cheesecake Jars.
Step 7: Chilling
Cover each jar with a lid or plastic wrap and refrigerate for at least 2 hours before serving. This chilling time allows the cheesecake to firm up and meld with the crust, resulting in a delightful texture. When ready, your Easter Egg Cheesecake Jars will be chilled, perfectly layered, and ready to impress your guests!
Storage Tips for Easter Egg Cheesecake Jars
Fridge: Store the jars in the refrigerator for up to 3 days. Make sure they’re covered with a lid or plastic wrap to maintain freshness and prevent any odors from affecting their lovely flavor.
Freezer: If you want to keep them longer, you can freeze the jars for up to 1 month. Just be sure to remove any toppings like whipped cream or candy eggs before freezing; add them back after thawing for the best appearance.
Thawing: When ready to enjoy, transfer the frozen jars to the fridge and let them thaw overnight. This way, they’ll maintain their creamy texture and delightful flavor once more.
Serving: For the best taste experience, always serve your Easter Egg Cheesecake Jars chilled straight from the fridge, allowing those refreshing layers of flavor to shine!
Expert Tips for Easter Egg Cheesecake Jars
• Soften Cream Cheese: Ensure your cream cheese is at room temperature to achieve a smooth and creamy cheesecake filling. Cold cream cheese can lead to lumps!
• Whip Cream Properly: Whip your heavy cream until stiff peaks form; this will give your cheesecake a light and airy texture that melts in your mouth.
• Chill Thoroughly: Don’t skip the chilling time! Refrigerating the jars for at least 2 hours allows the layers to firm up and enhances the overall flavor and texture of the Easter Egg Cheesecake Jars.
• Layer Neatly: Use a piping bag for a neat presentation. This not only looks professional but also makes it easier to create even layers without spilling.
• Topping Suggestions: Feel free to get creative with the toppings! Swap pastel candy eggs for fruit, nuts, or even chocolate shavings to personalize your jars while keeping them festive and fun.
Make Ahead Options
These Easter Egg Cheesecake Jars are a fantastic choice for meal prep, saving you time and letting you enjoy the festivities stress-free! You can prepare the crust and cheesecake filling up to 24 hours in advance. Simply combine the graham cracker crumbs, sugar, and melted butter for the crust, pressing it into the jars, then store them in the fridge. For the cheesecake mixture, whip the cream cheese with powdered sugar and vanilla, then fold in whipped cream. Layer both fillings in the jars, cover them tightly, and refrigerate. Just before serving, add the whipped cream topping and festive decorations for a fresh and delightful finish. This way, your cheesecake jars will be just as delicious and impressive as if made the same day!
What to Serve with Easter Egg Cheesecake Jars
As Easter approaches, you may want to create a delightful meal that complements these charming no-bake desserts.
-
Fruit Salad: A fresh mix of seasonal fruits adds a bright and refreshing contrast to the rich cheesecake, enhancing the overall dining experience. The vibrant colors will mirror your jars, creating a festive feel!
-
Spring Veggie Platter: Crisp carrots, cucumbers, and bell peppers bring crunch and freshness, balancing the sweet treat perfectly. Serve with a zesty dip for an extra pop of flavor!
-
Sparkling Lemonade: This invigorating drink, with its citrus zing, beautifully complements the sweetness of the cheesecake jars, making it a perfect choice for lively gatherings.
-
Mini Quiches: These savory bites can serve as a delightful starter, offering a warm, hearty contrast to the cool, creamy desserts. Their variety will please every palate at the table.
-
Flavored Iced Tea: With hints of peach or mint, this refreshing drink will complement the stunning flavors of your cheesecake jars, creating a delightful sip-and-savor experience.
-
Chocolate-Covered Strawberries: These decadent treats will appeal to fellow dessert lovers while providing an elegant touch to your Easter spread. Paired with the cheesecake, they promise a chocolatey bliss!
Easter Egg Cheesecake Jars Variations
Feel free to let your creativity shine with these delightful variations for the Easter Egg Cheesecake Jars!
- Dairy-Free: Substitute cream cheese with vegan cream cheese and use coconut whipped cream for a creamy texture without dairy.
- Chocolate Lovers: Swap out graham cracker crumbs for crushed Oreos for a rich chocolate crust. Add chocolate chips to the cheesecake filling for extra sweetness!
- Fruit-Infused: Incorporate pureed strawberries or blueberries into the cheesecake mixture for a fruity twist. This gives the jars a fresh, vibrant flavor!
- Nutty Crunch: Add crushed nuts like almonds or pecans between layers for extra texture and delightful crunch. Sprinkle nut toppings on the whipped cream for added flair!
- Citrusy Surprise: A hint of lemon zest in the cheesecake layer provides a refreshing zing that pairs beautifully with the sweetness. It’s a perfect brightening addition for springtime desserts.
- Layered Flavors: Create a vanilla and almond version by incorporating almond extract and layering the cheesecake with crushed Marzipan for a delightful surprise!
- Frozen Treat: Freeze the filled jars for a chilled dessert on a hot day. Enjoy them straight from the freezer for a refreshing scoopable dessert!
- Gourmet Touch: Drizzle homemade caramel or chocolate sauce on top before adding the candy eggs to elevate the presentation and flavor. This little touch transforms them into an upscale dessert!
There’s no wrong way to create your ultimate Easter Egg Cheesecake Jars! For more delicious no-bake ideas, check out these Fried Strawberry Cheesecake Sandwiches or for a rich twist, try these Oreo Cheesecake Cookie Cups. Your culinary creations will surely impress!
Easter Egg Cheesecake Jars Recipe FAQs
How do I choose ripe ingredients for the cheesecake jars?
Absolutely! For the best flavor, make sure your cream cheese is softened to room temperature, which will help you achieve a silky smooth mixture. While the other ingredients don’t strictly need to be fresh, using high-quality, fresh dairy and toppings will enhance your dessert’s overall taste. If you’re adding fruit, choose ripe options with vibrant color and no blemishes.
What’s the best way to store my Easter Egg Cheesecake Jars?
I recommend refrigerating the jars for up to 3 days. Cover them with a lid or plastic wrap to ensure they stay fresh and don’t absorb any odors from the fridge. If you want to keep them longer, they can be frozen for up to 1 month. Just remove any toppings before freezing, as they don’t freeze well!
How do I freeze my cheesecake jars properly?
Freezing is a great way to save leftovers! Here’s what you need to do: First, remove the whipped cream and any candy toppings. Then, cover the jars tightly with plastic wrap or transfer the contents to an airtight container. Make sure to label them with the date. When you’re ready to enjoy, thaw them overnight in the fridge before adding your toppings back on.
What if my cheesecake filling is too runny?
No worries! This can happen if the cream cheese wasn’t blended enough or if the whipped cream wasn’t whipped to stiff peaks. To troubleshoot, chill the jars for a bit longer as this might help the filling set up better. If you find the filling still needs thickening, consider folding in more whipped cream until you achieve the desired consistency!
Can I make these jars for someone with dietary restrictions?
Very! There are plenty of alternatives. Use vegan cream cheese and coconut whipped cream to switch this recipe to a plant-based option. For gluten-free friends, simply swap graham cracker crumbs with gluten-free cookie crumbs. Always double-check the ingredients in your toppings to ensure they align with any dietary needs.
Can I customize the flavors of these cheesecake jars?
Absolutely! You can experiment with different extracts like almond or lemon in the cheesecake mixture. Adding a layer of fruit puree or chocolate fudge between the layers can provide delicious flavor contrasts, too. Just ensure that whatever you add complements your festive theme!
Easter Egg Cheesecake Jars: A Fun No-Bake Spring Treat
Ingredients
Equipment
Method
- In a medium bowl, combine the graham cracker crumbs, granulated sugar, and melted butter until the mixture resembles wet sand. Press the crust firmly into the bottom of each jar. Set aside.
- Beat the softened cream cheese until smooth. Gradually add powdered sugar and vanilla extract, mixing until light and fluffy.
- In a separate bowl, whip the heavy cream until stiff peaks form. Gently fold it into the cream cheese mixture until just blended.
- Divide the cheesecake mixture into two bowls. Add pink gel food coloring or freeze-dried strawberry powder to one bowl and stir gently until tinted.
- Layer the pink cheesecake mixture over the crust in each jar, filling halfway. Follow with the plain cheesecake layer on top.
- Pipe whipped cream on top of each jar and decorate with pastel candy eggs and sprinkles.
- Cover each jar and refrigerate for at least 2 hours before serving to allow the cheesecake to firm up.
Leave a Reply