
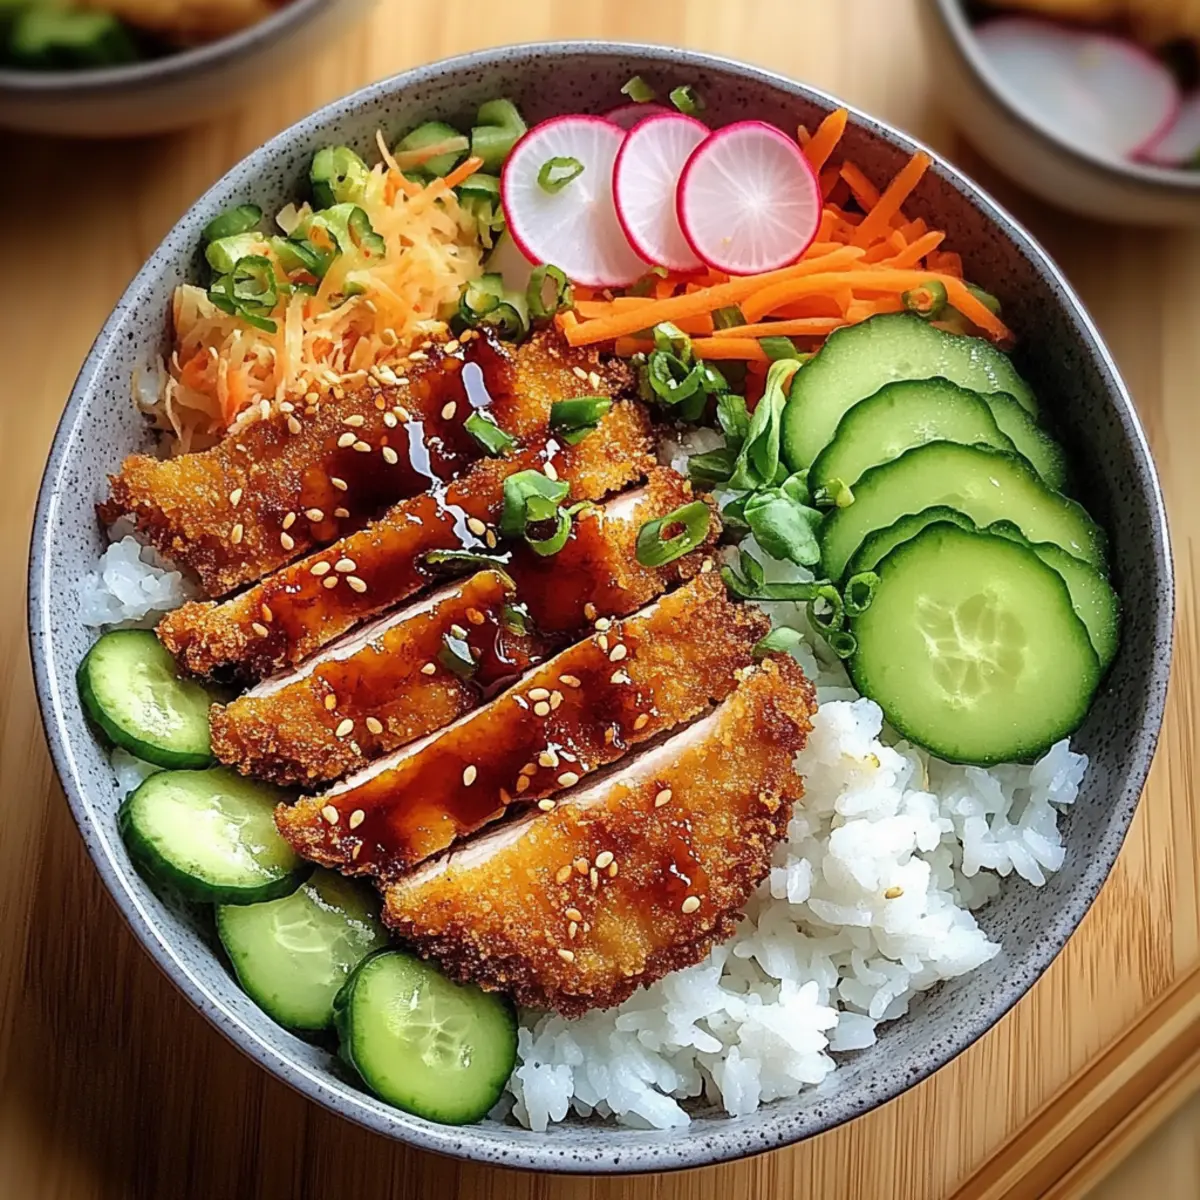
What if dinner could transport you straight to the bustling streets of Tokyo? My Japanese Katsu Bowls with Tonkatsu Sauce do just that, serving up a deliciously crispy chicken fillet on a bed of fluffy rice, vibrant veggies, and a tangy homemade sauce that will make you swoon. Not only is this dish quick to prepare, making it an incredible weeknight meal, but it’s also versatile – feel free to swap in your favorite protein like pork or tofu! Each bite offers a comforting balance of textures and flavors, satisfying both family members and friends alike. Curious to dive into this flavorful journey? Let’s cook up something extraordinary!

Why You’ll Love This Katsu Bowl Recipe
Simplicity, this dish is incredibly easy to make, perfect for both novice cooks and seasoned chefs.
Irresistible Flavor, the combination of crispy chicken and tangy tonkatsu sauce creates a flavor explosion that’s hard to resist.
Versatile Options, swap out proteins for a personal touch—try pork, tofu, or even eggplant for different tastes.
Crowd-Pleaser, serve this dish at gatherings and watch it disappear—everyone will be asking for seconds!
Healthy Additions, filled with fresh veggies like shredded cabbage and carrots that add extra crunch and nutrition.
Quick Cooking, complete this meal in under 30 minutes, making it an ideal option for busy weeknights.
Japanese Katsu Bowls Ingredients
• Get ready to create your deliciously crispy Japanese Katsu Bowls with Tonkatsu Sauce!
For the Chicken
- Chicken Breasts – Choose boneless, skinless for quicker preparation.
- Salt and Black Pepper – Season to enhance the chicken’s natural flavor.
- All-Purpose Flour – A coating that helps the breadcrumbs stick; swap for gluten-free flour as needed.
- Eggs – Use large eggs to help the panko adhere thoroughly.
- Panko Breadcrumbs – These create a light, crispy shell; consider gluten-free panko for dietary needs.
- Vegetable Oil – Essential for frying; canola or sunflower oil works great too.
For the Tonkatsu Sauce
- Ketchup – The sweet base for your sauce; substitute with other tomato sauces if preferred.
- Worcestershire Sauce – Adds depth and a savory kick to the mix.
- Soy Sauce – Introduces umami and saltiness; opt for tamari for a gluten-free option.
- Sugar – Balances the sauce’s flavors; you can use cane or brown sugar.
- Mirin – Brings sweetness and acidity; rice vinegar mixed with sugar also works.
- Dijon Mustard – Adds a zesty touch; leave out for a milder taste.
- Garlic Powder – Provides subtle richness; feel free to use fresh garlic for more intensity.
For the Bowl Assembly
- Cooked White Rice – Short-grain or sushi rice is ideal for a sticky base.
- Shredded Cabbage, Cucumber, Radishes, Carrots – Fresh vegetables for color and crunch; other options include snap peas or bell peppers.
- Chopped Green Onions and Sesame Seeds – Garnishes to add flavor and beautiful presentation.
Embrace the delicious challenge of crafting these remarkable Japanese Katsu Bowls with Tonkatsu Sauce; they’re sure to become a beloved favorite in your kitchen!
Step‑by‑Step Instructions for Japanese Katsu Bowls with Tonkatsu Sauce
Step 1: Prepare the Chicken
Start by placing the chicken breasts between two sheets of plastic wrap and gently pound them to a uniform thickness of about ½ inch for even cooking. This step ensures a tender and juicy result, so take your time and use a meat mallet or rolling pin. Once pounded, season both sides with salt and black pepper to enhance the natural flavors of the chicken.
Step 2: Set Up the Breading Station
Create a breading station by arranging three shallow bowls: one with all-purpose flour, a second with beaten eggs, and a third with panko breadcrumbs. This organization simplifies the coating process for your Japanese Katsu Bowls. Ensure your bowls are large enough to accommodate the chicken pieces, making it easy to dredge and coat each piece thoroughly.
Step 3: Coat the Chicken
Dredge each chicken breast in the flour, shaking off any excess before dipping it into the beaten eggs. Then, coat the chicken generously with panko breadcrumbs, ensuring an even, crunchy layer. This step is crucial for achieving that signature crispy texture in your katsu—take care not to rush through it, and feel free to press slightly to adhere the panko.
Step 4: Heat the Oil
In a large frying pan or skillet, heat about ½ inch of vegetable oil over medium-high heat until it’s shimmering but not smoking—around 350°F (175°C). You can test the heat by dropping in a small piece of bread; it should sizzle immediately. This temperature ensures a crispy exterior while cooking the chicken through to perfection.
Step 5: Fry the Chicken
Carefully place the coated chicken breasts into the hot oil, ensuring not to overcrowd the pan. Fry each piece for approximately 4–5 minutes on one side until golden brown, then flip and cook for an additional 4–5 minutes. The chicken should reach an internal temperature of 165°F (74°C). Once cooked, transfer the katsu to a plate lined with paper towels to drain any excess oil.
Step 6: Make the Tonkatsu Sauce
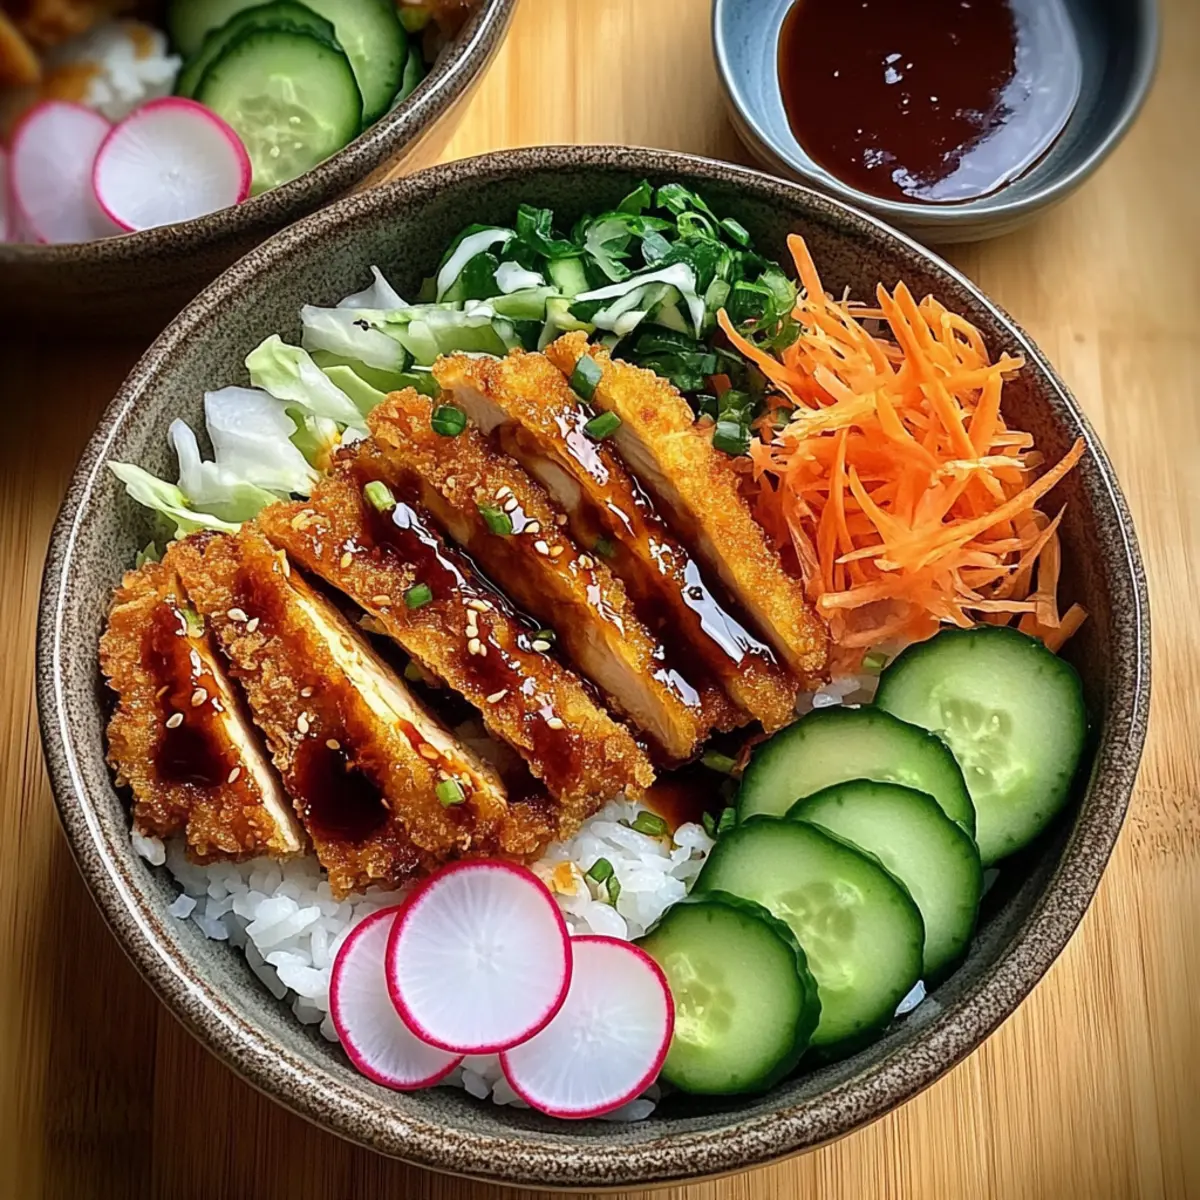
While the chicken is frying, prepare your homemade tonkatsu sauce. In a small bowl, mix together ketchup, Worcestershire sauce, soy sauce, sugar, mirin, Dijon mustard, and garlic powder. Whisk until smooth and well-blended. This sauce is the perfect tangy complement that elevates your Japanese Katsu Bowls with Tonkatsu Sauce.
Step 7: Slice the Chicken
Once the chicken is cooked and slightly cooled, slice it into thin strips, which allows for easy serving and a beautiful presentation in your bowls. The crispy edges should be visible, showcasing the perfect texture you achieved through frying. Set the sliced chicken aside as you get ready to assemble the bowls.
Step 8: Assemble the Katsu Bowls
Begin assembling your Japanese Katsu Bowls by layering a generous scoop of cooked white rice at the bottom of each bowl. Top the rice with a handful of freshly shredded cabbage, sliced cucumber, radishes, and carrots for a vibrant crunch. Lay the sliced katsu over the veggies, ready to be drizzled with that delicious tonkatsu sauce you’ve prepared.
Step 9: Garnish and Serve
Finish off your bowls with a generous drizzle of tonkatsu sauce over the crispy chicken, allowing the flavors to meld beautifully. Garnish with chopped green onions and a sprinkle of sesame seeds for an extra touch of flavor and visual appeal. Your Japanese Katsu Bowls are now beautifully arranged and ready to be enjoyed—a comforting and delicious meal awaits!
Japanese Katsu Bowls with Custom Twists
Feel free to get creative and tailor this delightful recipe to your taste preferences with these fun variations!
- Pork Alternative: Swap chicken for thinly sliced pork loin for a juicy and flavorful twist. The traditional katsu experience with a deeper umami flavor awaits!
- Tofu Delight: For a plant-based option, use firm tofu instead of chicken, pressing and slicing it beforehand for that crispy coating. You’ll be amazed at how satisfying a vegetarian katsu can be!
- Eggplant Option: Try breaded, sliced eggplant for a hearty, vegetarian-friendly alternative that packs a punch of flavor. This twist offers a delightful depth and soft texture balancing the crunch.
- Spicy Kick: Add a teaspoon of chili powder or Sriracha to your tonkatsu sauce for a delightful heat that dances on the tongue! Your katsu bowls will ignite taste buds with every bite.
- Flavored Rice: Cook your rice in vegetable or chicken broth instead of water for added flavor and nutrition. This simple change enhances your bowl’s taste profile right from the base.
- Unique Veggies: Mix in different vegetables like julienned bell peppers or snap peas for added crunch and vibrant color. A colorful bowl not only looks inviting but also pleases the palates!
- Fried Egg Topper: For an extra decadent treat, crown your katsu bowls with a runny fried egg. The yolk will add an indulgent richness that elevates each bite into a comforting delight.
- Asian Slaw: Serve with a quick pickled vegetable slaw on the side for a tangy crunch that complements the savory katsu. It adds a refreshing balance that brightens up the meal.
While you’re here, why not brainstorm additional sides? Miso soup or edamame pair beautifully with these bowls, creating a complete dining experience that will transport you to the heart of Japan.
Make Ahead Options
These Japanese Katsu Bowls with Tonkatsu Sauce are perfect for meal prep! You can prep the chicken up to 24 hours in advance by breading it and storing it in the refrigerator, covered, to maintain its tangy flavor and prevent sogginess. Additionally, you can prepare the tonkatsu sauce up to 3 days ahead; just refrigerate it in an airtight container. When you’re ready to serve, simply fry the chicken until golden and crispy (about 8–10 minutes), and assemble your bowls with freshly cooked rice and prepped veggies. This way, you can enjoy a delightful meal without the last-minute rush, just as delicious as if you’d made it from scratch!
Expert Tips for Japanese Katsu Bowls
-
Oil Temperature: Ensure your oil is hot enough before frying. Test by dropping in a small piece of bread; it should sizzle immediately to create a crispy crust.
-
Resting Chicken: Allow the fried chicken to rest on paper towels to keep it juicy and prevent steaming. This step helps maintain that coveted crispy texture.
-
Uniform Thickness: Pound the chicken to an even ½ inch thickness. This ensures it cooks evenly, resulting in a perfectly golden katsu.
-
Breading Technique: Don’t rush the coating process. Press the panko into the chicken for better adherence, ensuring maximal crunch in your Japanese Katsu Bowls.
-
Crisp Upon Reheating: If you’re saving leftovers, reheat chicken in an oven or air fryer to maintain that delicious crispiness before serving.
How to Store and Freeze Japanese Katsu Bowls
Fridge: Store leftover chicken and tonkatsu sauce in airtight containers for up to 3 days. This keeps your Japanese Katsu Bowls fresh while maintaining their delightful flavors.
Freezer: If you’d like to freeze the chicken, wrap each piece tightly in plastic wrap and place it in a freezer bag for up to 3 months. Defrost in the fridge before reheating.
Reheating: To maintain the crispy texture, reheat the chicken in an oven or air fryer until hot (around 350°F/175°C) for about 10 minutes. This way, your katsu stays crunchy and delicious!
Tonkatsu Sauce Storage: The homemade tonkatsu sauce can be kept in the fridge for up to two weeks in an airtight container. Feel free to make extra for more flavorful meals!
What to Serve with Japanese Katsu Bowls with Tonkatsu Sauce
Indulging in a flavorful katsu bowl is just the beginning—let’s elevate your meal experience with these delightful companions.
-
Miso Soup: A warm bowl of miso soup provides a comforting umami backdrop, balancing the crispy textures of your katsu. It’s a classic pairing that warms the soul and tickles the taste buds.
-
Edamame: These tender, salted young soybeans add a satisfying crunch and a refreshing contrast to the richness of the katsu, making them a perfect snacking option.
-
Steamed Broccoli: Adding steamed broccoli introduces a vibrant green element, enhancing the dish’s nutrition while providing a lovely textural contrast. The light seasoning allows the katsu to shine.
-
Pickled Vegetables: The tangy bite of pickled carrots or daikon complements the sweet and savory tonkatsu sauce, offering a refreshing palate cleanser between bites.
-
Sesame Spinach Salad: A light spinach salad dressed in sesame oil brings a beautiful contrast of flavors while adding brightness to your meal. The nuttiness pairs wonderfully!
-
Japanese Green Tea: Calm your cravings with a soothing cup of Japanese green tea, its mild bitterness elegantly complementing the rich katsu sauce. A nourishing sip between bites is simply delightful.
Elevate your dinner experience by including these sides and beverages alongside your delectable Japanese Katsu Bowls with Tonkatsu Sauce, ensuring everyone feels satisfied and energized.
Japanese Katsu Bowls with Tonkatsu Sauce Recipe FAQs
What kind of chicken should I use for the katsu?
Absolutely use boneless, skinless chicken breasts for the best results! They are easier to prepare and cook evenly, ensuring your katsu is tender and juicy. However, you can also try chicken thighs for a richer flavor, or go vegetarian by substituting with tofu or eggplant for a delightful twist.
How should I store leftovers?
For optimal freshness, store leftover chicken and tonkatsu sauce in airtight containers in the refrigerator. The chicken will stay good for up to 3 days, while the sauce can be enjoyed for up to two weeks. Make sure to let the chicken cool completely before sealing it up to avoid moisture buildup.
Can I freeze my leftovers?
Yes! Freeze leftover chicken katsu by wrapping each piece tightly in plastic wrap, then placing it in a freezer bag. It should last for up to 3 months. To reheat, simply defrost in the fridge overnight, then use an oven or air fryer at 350°F (175°C) for about 10 minutes to maintain that crispy texture.
What if my katsu isn’t crispy?
If you find your katsu isn’t staying crispy, ensure the oil is hot enough before frying. A low temperature may cause the coating to absorb excess oil, resulting in a soggy katsu. You can check if the oil is ready by dropping in a small piece of bread—it should sizzle immediately. Also, let the chicken rest on paper towels after frying to avoid steaming.
Is this recipe suitable for gluten-free diets?
Very! You can easily adapt Japanese Katsu Bowls with Tonkatsu Sauce for gluten-free diets. Simply substitute regular all-purpose flour with gluten-free flour and use gluten-free panko breadcrumbs. When making the tonkatsu sauce, select a gluten-free soy sauce or tamari to keep all flavors intact without compromising dietary needs.
Can I make the tonkatsu sauce ahead of time?
Absolutely! The tonkatsu sauce can be prepared in advance and stored in the refrigerator for up to two weeks. This is a great way to enhance flavor and convenience. Just whisk all ingredients together and keep it in an airtight container, so it’s ready for your meal.

Crispy Japanese Katsu Bowls with Homemade Tonkatsu Sauce
Ingredients
Equipment
Method
- Place chicken breasts between plastic wrap and pound to uniform thickness of about ½ inch.
- Season both sides of the chicken with salt and black pepper.
- Set up a breading station with flour, beaten eggs, and panko breadcrumbs in separate shallow bowls.
- Dredge chicken in flour, dip in eggs, and coat with panko breadcrumbs.
- Heat ½ inch of oil in a large frying pan over medium-high heat until shimmering.
- Fry each piece of chicken for 4-5 minutes on each side until golden brown and cooked through.
- Mix ketchup, Worcestershire sauce, soy sauce, sugar, mirin, Dijon mustard, and garlic powder in a bowl until smooth to make the tonkatsu sauce.
- Slice the cooked chicken into thin strips.
- Assemble the bowls starting with cooked white rice, followed by shredded vegetables, then sliced chicken, and drizzle with tonkatsu sauce.
- Garnish with chopped green onions and sesame seeds before serving.
Leave a Reply