
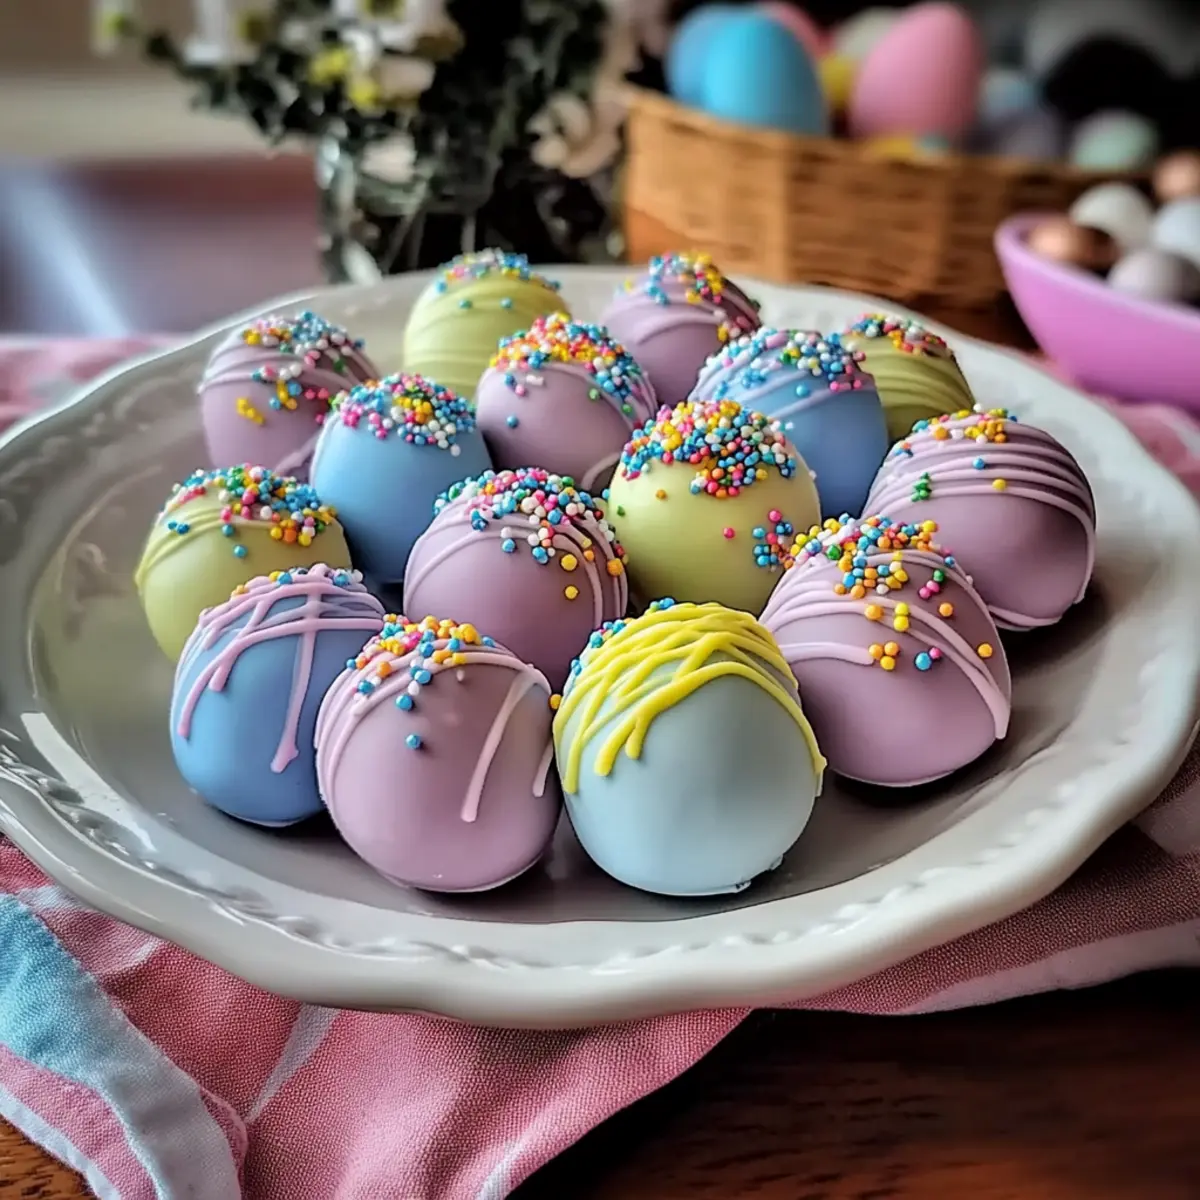
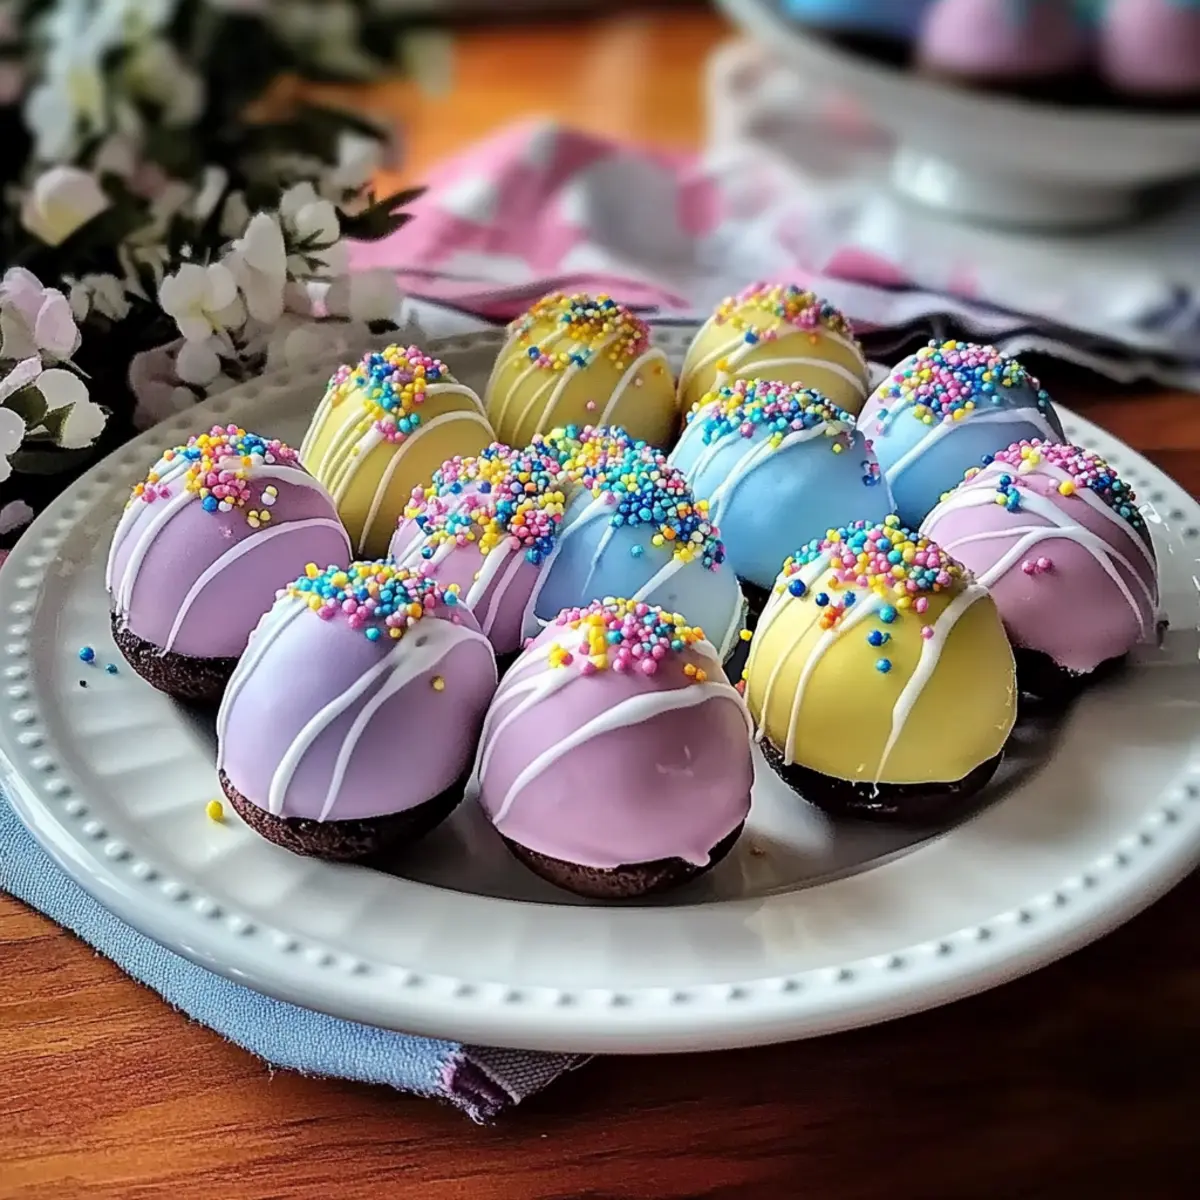
As the sun begins to shine and Easter approaches, the excitement for festive treats fills the air. That’s why I’m thrilled to share my recipe for Easter Egg Oreo Balls! These delightful no-bake desserts are a celebration in themselves, featuring a luscious creamy filling wrapped in a vibrant candy shell. What makes them truly special is their simplicity and the joy of customization—perfect for gathering loved ones or indulging in a personal treat. With just a handful of ingredients, you can whip up these fun bites that are sure to be a hit with both kids and adults alike. Can you already envision the colorful creations that will brighten your holiday table? Let’s dive into this sweet adventure!
Why Are Easter Egg Oreo Balls Perfect?
Endless Customization: The fun doesn’t stop at just making these treats; you can decorate them however you please! Bright flavors: Add different extracts or utilize various cookie bases for unique twists. Simple and Quick: With no baking required, you can prepare these in minutes, perfect for last-minute holiday plans. Crowd Favorite: They’re sure to impress guests at gatherings; just like my Oreo Cheesecake Cookie Cups make every occasion special. Kid-Friendly: Involve the little ones in decorating, turning it into a cherished family activity. Get ready to watch these colorful confections disappear from the table!
Easter Egg Oreo Balls Ingredients
For the Filling
• Oreo Cookies – The star ingredient providing a deep chocolate flavor and texture; opt for Golden Oreos for a lighter twist or graham crackers for a unique base.
• Cream Cheese – Creates a rich and creamy filling that binds everything together; dairy-free cream cheese works as a great substitute.
• Vanilla Extract (optional) – Enhances the flavor of the filling; feel free to leave it out if desired.
For the Coating
• White Candy Melts – Perfect for a smooth, vibrant shell; consider white chocolate chips for a similar texture—just add a bit of coconut oil.
• Pastel Food Coloring – Essential for that festive look; gel food coloring gives the best results for brightening your treats.
For Decoration
• Sprinkles/Sanding Sugar (optional) – Adds a fun finish to your festive balls; choose colors that match your theme to make them pop!
These Easter Egg Oreo Balls are not only delicious but also allow for creative expression during your holiday festivities!
Step‑by‑Step Instructions for Easter Egg Oreo Balls
Step 1: Crush the Oreos
Begin by placing your Oreo cookies in a food processor. Pulse until they are finely crushed into a sand-like consistency. If you don’t have a food processor, you can also use a rolling pin over a zip-top bag to achieve the same texture. This crushed mixture will form the flavorful base for your Easter Egg Oreo Balls.
Step 2: Mix the Filling
In a mixing bowl, combine the crushed Oreos with softened cream cheese and optional vanilla extract. Stir the mixture using a spatula or mixer until it forms a thick, cohesive dough. This process takes about 2-3 minutes; the mixture should be well-blended, and you shouldn’t see any white streaks of cream cheese. Now you’re ready to shape these delectable balls!
Step 3: Shape the Balls
Scoop out about 1 tablespoon of the Oreo mixture and roll it into an egg shape, roughly 1-1.5 inches long. Place each shaped ball on a parchment-lined baking sheet to prevent sticking. Aim for uniform sizes for a beautiful presentation. After shaping, refrigerate the balls for at least 30 minutes until firm, making them easier to coat.
Step 4: Chill the Balls
Once shaped, place your baking sheet with the Oreo balls in the refrigerator for 30 minutes or in the freezer for about 15 minutes. This chilling step is crucial for ensuring that the balls maintain their shape when you dip them in melted candy later on. You’ll know they are ready when they feel firm to the touch.
Step 5: Melt the Coating
Prepare your white candy melts according to the package instructions. Use a microwave-safe bowl and heat in 30-second intervals, stirring in between to prevent overheating. If using chocolate chips, add a teaspoon of coconut oil to ensure a smooth consistency. The melted coating should be silky and free of lumps for the prettiest layer on your Easter Egg Oreo Balls.
Step 6: Color the Coating
Once melted, divide the candy coating into smaller bowls if you wish to create different colored coatings. Add your pastel food coloring gradually, stirring until you achieve the desired hue. The vibrant colors will make your Easter Egg Oreo Balls a feast for the eyes. Remember, gel food coloring works best for vivid shades.
Step 7: Dip the Eggs
Carefully dip each chilled Oreo ball into the melted coating, ensuring it is fully covered. Use a fork or dipping tool to allow excess coating to drip off before placing the ball back on the lined baking sheet. This technique helps create an even coating, making your Easter Egg Oreo Balls look professionally crafted.
Step 8: Decorate Your Eggs
While the coating is still wet, sprinkle your choice of colorful sprinkles or sanding sugar on top of the coated Oreo balls. You can even drizzle additional colors over the candy coating for extra flair. Get creative during this step—your imagination is the limit with decorating these fun treats!
Step 9: Let Them Set
Leave the decorated Easter Egg Oreo Balls at room temperature for about 15 minutes or refrigerate for 10 minutes to allow the coating to harden completely. You’ll know they’re ready when the candy shell feels firm to the touch. Once set, they’ll be ready to dazzle your friends and family at your holiday gathering!

Easter Egg Oreo Balls Variations & Substitutions
Feel free to let your creativity shine by customizing these delicious treats!
- Dairy-Free: Swap cream cheese with dairy-free cream cheese for a vegan-friendly option that’s just as delightful.
- Alternative Cookie Base: Use graham crackers or chocolate chip cookies for a different flavor profile that can surprise your taste buds.
- Color Choices: Experiment with vibrant colors by mixing in different pastel or bright food coloring, making your treats pop for any occasion.
- Nutty Flavor Boost: Stir in crushed nuts, like almonds or walnuts, into your filling for an extra crunch and flavor layer.
- Flavor Extracts: Add a teaspoon of flavored extracts, like almond or mint, to the filling for a unique twist that your guests will love.
- Chocolate Coating: Instead of a colorful candy shell, dip your Oreo balls in dark or milk chocolate for a classic indulgence. Drizzle with white chocolate for visual appeal.
- Textured Finish: Roll the dipped balls in additional toppings, such as crushed candies, coconut flakes, or crushed cookies, for a delightful texture contrast.
- Mini Egg Shape: For an Easter surprise, shape your balls into mini egg forms and use candy-coated chocolate shells instead of the typical candy melts for an extra treat, reminiscent of Easter eggs.
These variations and substitutions will make your Easter Egg Oreo Balls a hit at any holiday gathering! For more creative ideas, check out my Oreo Cheesecake Cookie Cups and get inspired for your next dessert adventure!
Helpful Tricks for Easter Egg Oreo Balls
- Chill Before Dipping: Ensure the Oreo mixture is well-chilled before dipping. This helps maintain their shape during coating, preventing messy results.
- Use a Fork for Dipping: A fork is your best friend! It offers a clean and even layer of coating on your Easter Egg Oreo Balls, and allows excess to drip off easily.
- Mind Your Melting: Be cautious when melting candy; overheating can cause it to seize. Melt in intervals and stir to maintain a smooth consistency.
- Go Easy on Coloring: When adding food coloring, start with a tiny amount. You can always add more, but it’s hard to lighten overly vibrant hues in your coating.
- Personalize Your Sprinkles: Choose sprinkles that complement the colors you’ve used in the candy coating. This will elevate the festive look, making your Easter Egg Oreo Balls truly shine.
Make Ahead Options
These Easter Egg Oreo Balls are perfect for meal prep enthusiasts looking to save time during the busy holiday season! You can prepare the Oreo filling and shape the balls up to 24 hours in advance; just refrigerate them tightly covered to maintain their freshness. Additionally, once coated, you can store the decorated balls in an airtight container in the refrigerator for up to 5 days. When ready to serve, simply take them out and let them sit at room temperature for about 15 minutes before indulging for the best flavor and texture. By prepping these ahead of time, you can enjoy festive treats with minimal effort!
What to Serve with Easter Egg Oreo Balls?
Elevate your festive dessert table with delightful pairings that enhance the spirit of celebration.
-
Creamy Vanilla Ice Cream: A scoop of smooth ice cream offers a comforting balance to the rich sweetness of the Oreo balls.
-
Fresh Berries Medley: Juicy strawberries and tart raspberries provide a refreshing contrast, cutting through the creaminess and adding a pop of color.
-
Mint Chocolate Chip Cookies: These cookies echo the chocolatey flavors of the Oreo balls while introducing a refreshing twist, making them perfect for your Easter spread.
-
Chocolate Milkshakes: Rich and indulgent, chocolate milkshakes bring nostalgia and joy, enhancing the festive atmosphere of your gathering.
-
Crispy Spring Vegetable Platter: Crunchy carrots, cucumbers, and bell peppers create a light, fresh counterpoint to the sweet, creamy treats, making for a well-rounded meal.
-
Lemonade Sparkling Punch: Refreshingly zesty lemonade with a hint of fizz invigorates the palate, perfectly complementing the sweetness of the dessert.
-
Mini Cupcakes: These little delights maintain the festive spirit and offer a delightful surprise of flavors that will leave guests wanting more.
-
Chocolate Dipped Pretzels: Salty and sweet, these are a perfect bite-sized snack that compliments the dessert table beautifully, adding crunch and texture.
Mix and match these pairings to create a vibrant and inviting celebration, making your Easter gathering unforgettable!
How to Store and Freeze Easter Egg Oreo Balls
Fridge: Store your Easter Egg Oreo Balls in an airtight container in the refrigerator for up to 5 days. This keeps them fresh and ready for a sweet treat anytime!
Freezer: For longer storage, freeze the Oreo balls in a single layer on a baking sheet before transferring to a freezer-safe container. They can be frozen for up to 2 months.
Thawing: When you’re ready to enjoy your frozen Easter Egg Oreo Balls, simply transfer them to the fridge to thaw overnight. This keeps their delicious flavors intact.
Separation Tip: To prevent the coating from sticking together, layer wax paper between the balls in the container before sealing.

Easter Egg Oreo Balls Recipe FAQs
How do I choose ripe ingredients for my Easter Egg Oreo Balls?
Absolutely! When selecting your ingredients, choose creamy, softened cream cheese that’s not expired or overly watery. For Oreos, any classic or flavored variety works, but ensure the cookies are fresh and intact. Look for bright, vibrant pastel food coloring without any lumps for that perfect festive finish. If you’re using sprinkles for decoration, pick ones that remain crunchy rather than going stale.
How should I store leftover Easter Egg Oreo Balls?
To keep your Easter Egg Oreo Balls fresh, store them in an airtight container in the refrigerator for up to 5 days. If you think they might last longer, placing them in the freezer is an excellent option! Just freeze them in a single layer on a baking sheet for about an hour, then transfer them into a freezer-safe container. This way, they’ll maintain their taste and texture for up to 2 months.
Can I freeze Easter Egg Oreo Balls? If so, how?
Yes, you can definitely freeze your Easter Egg Oreo Balls! Start by laying them out in a single layer on a baking sheet lined with parchment paper. Freeze them for about an hour until they are firm. Then, transfer the balls to a freezer-safe container, layering with wax paper to avoid them sticking together. When you’re ready to enjoy, simply move them to the fridge to thaw overnight!
What should I do if the coating on my Easter Egg Oreo Balls isn’t smooth?
Very! If your coating isn’t smooth, it might be due to overheating the candy melts. To troubleshoot, simply add a teaspoon of coconut oil to the melted candy to help achieve a creamier consistency. If you’re using chocolate chips, make sure to melt them in 30-second intervals while stirring frequently—this will keep them from seizing up and ensure a luscious coating. If your balls are sticking to the fork, make sure they are well-chilled before dipping.
Are there any dietary considerations for Easter Egg Oreo Balls?
Absolutely! If you’re making these treats for a gathering, consider using dairy-free cream cheese for a lactose-free option. For a gluten-free treat, check that your Oreos are certified gluten-free, or substitute them with a gluten-free cookie option. Always inform guests about the ingredients, especially if they have allergies. As for pets, keep these sweet treats far away from them—chocolate and certain sweeteners can be harmful to animals!
Easter Egg Oreo Balls: Your Fun No-Bake Holiday Treat!
Ingredients
Equipment
Method
- Begin by placing your Oreo cookies in a food processor and pulse until finely crushed.
- In a mixing bowl, combine the crushed Oreos with softened cream cheese and optional vanilla extract. Stir until it forms a thick dough.
- Scoop out about 1 tablespoon of the mixture and roll it into an egg shape. Place on a parchment-lined baking sheet.
- Refrigerate the shaped balls for at least 30 minutes until firm.
- Melt the candy melts according to package instructions. If using chocolate chips, add coconut oil for a smooth consistency.
- Once melted, divide the coating into smaller bowls and add pastel food coloring until desired hue is achieved.
- Dip each chilled Oreo ball into the melted coating, allowing excess to drip off before placing back on the baking sheet.
- While the coating is still wet, sprinkle with colorful sprinkles or sanding sugar.
- Let them set at room temperature for 15 minutes or refrigerate for 10 minutes until the coating hardens.
Leave a Reply