
As the aroma of warm bread fills the air, memories of shared meals and laughter around the table come rushing back. Today, I’m excited to share this delightful No-Oven Turkish Bread recipe with you, a simple yet satisfying way to enjoy homemade flatbread using just a skillet. This quick bread not only boasts a soft and fluffy texture but is also incredibly versatile—perfect for dipping into your favorite sauces or wrapping around grilled meats. Whether you’re having a cozy night in or entertaining friends, this easy bread recipe will elevate your culinary experience without heating up the entire kitchen. Are you ready to bring the taste of Turkey to your home? Let’s get cooking!
Why is No-Oven Turkish Bread a Must-Try?
Simplicity made delicious: Forget complicated oven techniques! This no-oven recipe transforms everyday ingredients into something extraordinary with a simple skillet.
Fluffy texture on the fly: Each bite is light and airy, perfect for soaking up soups or sauces, turning any meal into a celebration!
Versatile uses in your kitchen: Whether as a base for wraps or served alongside your favorite dips, this flatbread shines in various culinary settings, making it ideal for both casual and festive occasions.
Quick preparation time: It’s ready in just over an hour, so you can whip it up even on busy days! If you’re exploring more bread ideas, check out our Easy Skillet Bread for even more inspiration.
Crowd-pleasing appeal: Everyone loves fresh bread at the table. This recipe guarantees smiles and satisfied tummies, whether for family dinners or impromptu gatherings!
No-Oven Turkish Bread Ingredients
• Get ready for fluffy perfection!
For the Dough
- All-Purpose Flour – Provides structure and fluffiness; substitute with bread flour for a chewier texture.
- Salt – Enhances flavor; essential for balance in your bread.
- Sugar – Adds a touch of sweetness and promotes browning.
- Instant Yeast – A key leavening agent for rising; can be substituted with active dry yeast (activate it first).
- Warm Milk – Enriches the dough; use plant-based milk for a dairy-free option.
- Warm Water – Hydrates the dough to create a soft texture.
- Olive Oil or Melted Butter – Adds moisture and flavor; choose based on your taste preference.
For Topping
- Melted Butter – Gives your bread a richness and flavor boost.
- Garlic (optional) – Offers an extra layer of deliciousness.
- Sesame Seeds (optional) – Adds delightful texture and visual appeal.
- Chopped Fresh Parsley or Cilantro – Enhances freshness and brightens up your bread.
Dive into this No-Oven Turkish Bread recipe and let the delightful flavors and textures transform your meal into something special!
Step‑by‑Step Instructions for No-Oven Turkish Bread
Step 1: Mix Dry Ingredients
In a large mixing bowl, combine 3 cups of all-purpose flour, 1 teaspoon of salt, 1 tablespoon of sugar, and 2 teaspoons of instant yeast. Whisk these dry ingredients thoroughly until well blended, ensuring that the yeast is evenly distributed among the flour. This dry mix is the foundation of your No-Oven Turkish Bread, contributing to its lovely texture.
Step 2: Combine Wet Ingredients
In a separate bowl, warm 1 cup of milk and 1/2 cup of water until just lukewarm—this helps activate the yeast. Mix in 2 tablespoons of olive oil or melted butter for added richness. Gently stir these wet ingredients together, ensuring they’re combined well. This mixture will bring moisture to your dough and help it rise beautifully.
Step 3: Form the Dough
Pour the warm wet mixture into the bowl with the dry ingredients. Stir using a wooden spoon until a shaggy dough forms, indicating that the ingredients are coming together. This step typically takes 2-3 minutes of mixing, so don’t rush! Once combined, you’ll prepare to knead the dough into a soft, elastic texture.
Step 4: Knead the Dough
Turn your shaggy dough onto a lightly floured surface and knead it for about 8-10 minutes. Use the heel of your hand to push the dough down and away from you, folding it back on itself before turning it a quarter turn. It’s ready when it feels smooth, pliable, and springs back when poked. This kneading process is crucial for achieving fluffy No-Oven Turkish Bread.
Step 5: Let the Dough Rise
Shape the kneaded dough into a ball and place it in a greased bowl, covering it with a damp kitchen towel. Let it rise in a warm area for about 1 hour, or until it doubles in size. Keep an eye on it, as the dough will become fluffy and soft. This rising phase is essential for developing flavor and texture in your flatbread.
Step 6: Shape the Bread
Once risen, punch down the dough to remove excess air, then turn it onto a floured surface. Divide the dough into 6 equal portions and shape each into a flat disc about 1/2 inch thick. Use your hands or a rolling pin, aiming for a consistent thickness to ensure even cooking. This will prepare the dough for its skillet journey to become No-Oven Turkish Bread.
Step 7: Cook the Bread
Heat a non-stick skillet over medium heat for 2-3 minutes. Place each disc of dough into the skillet, cooking for about 3-4 minutes on one side, or until golden brown spots appear. Flip the bread carefully and cook for another 3-4 minutes until the other side is also golden. The heat will create a beautiful crust while keeping the inside soft and fluffy.
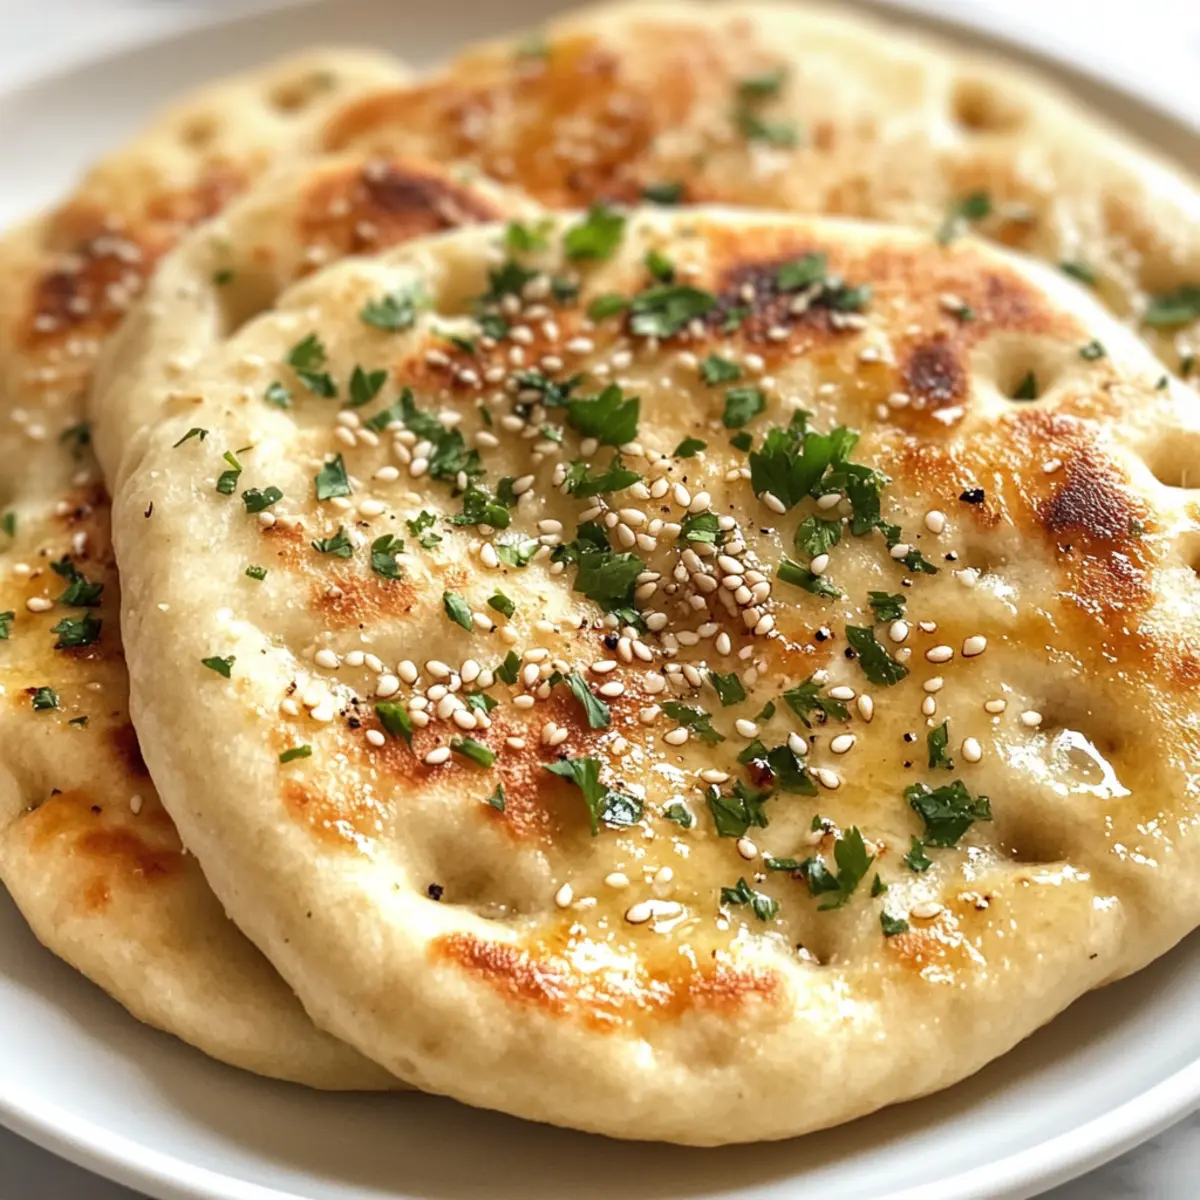
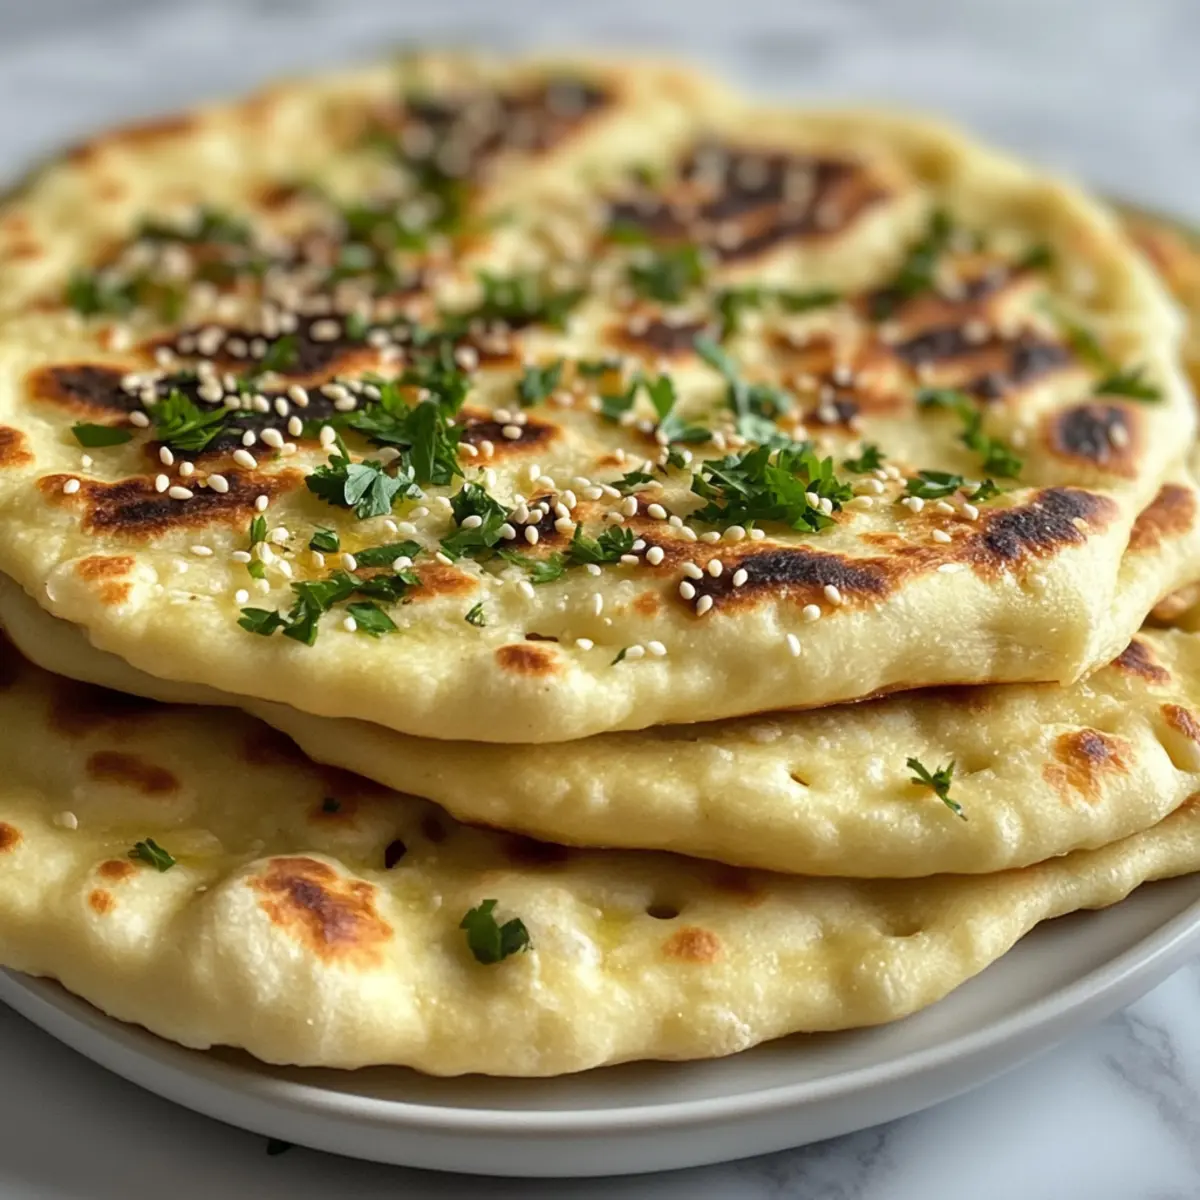
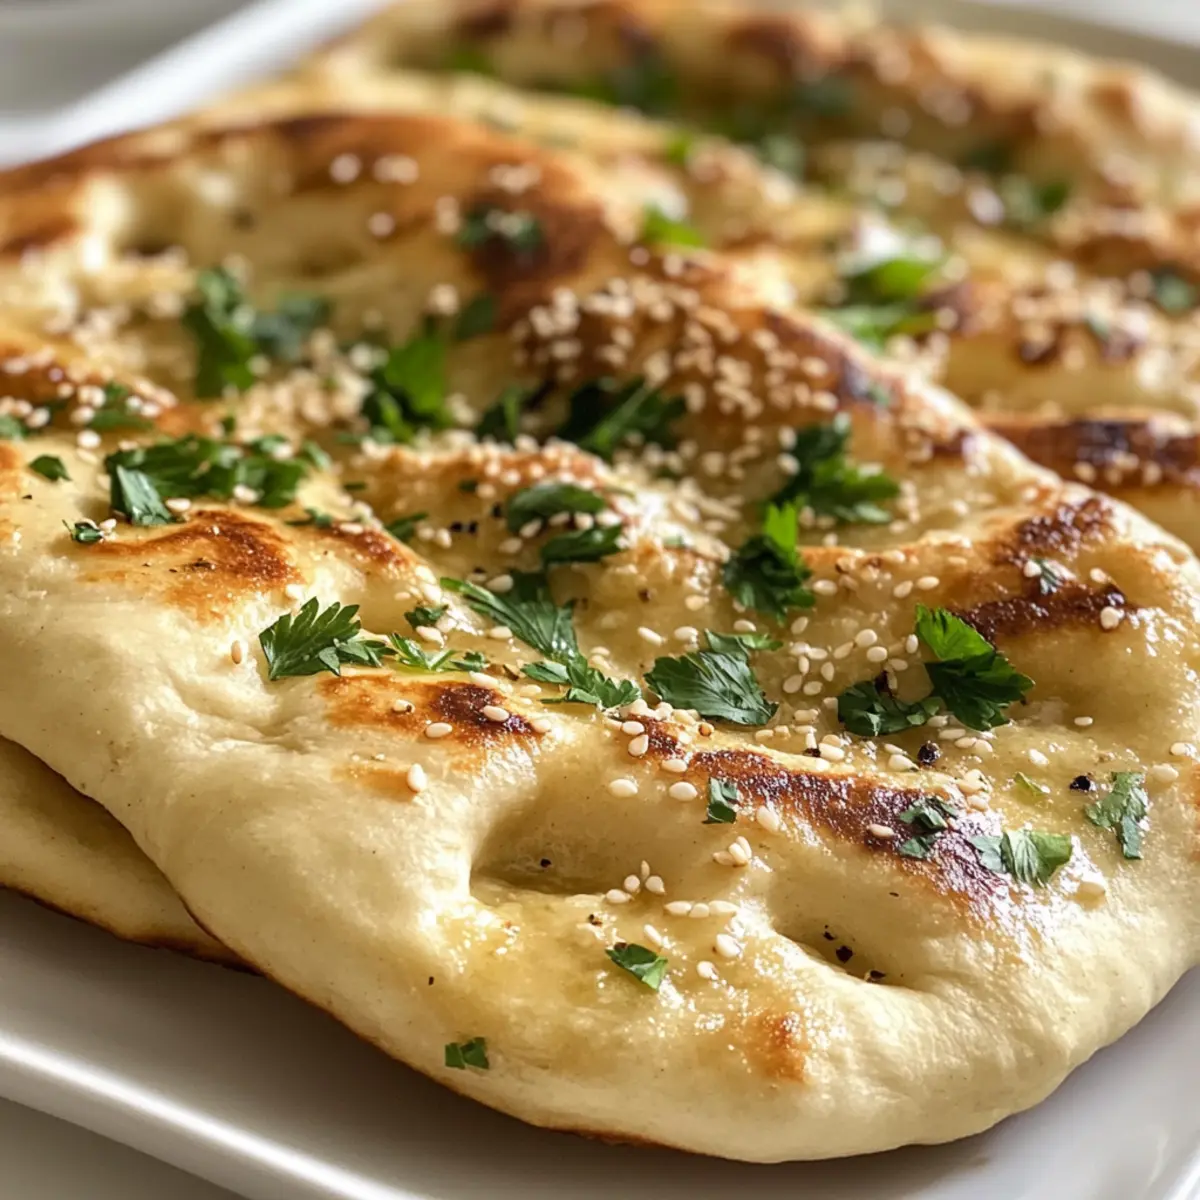
Step 8: Add Toppings
Once cooked, remove the bread from the skillet and brush with melted butter. Optional: sprinkle minced garlic and sesame seeds on top for added flavor and texture. You can also garnish with chopped fresh parsley or cilantro for a pop of color. This final touch will make your No-Oven Turkish Bread even more delightful and aromatic as you serve it!
How to Store and Freeze No-Oven Turkish Bread
-
Room Temperature: Store your No-Oven Turkish Bread in an airtight container at room temperature for up to 2 days to keep it soft and fresh.
-
Fridge: If you need to keep it longer, place it in the refrigerator for up to 4 days. Make sure to wrap it well to prevent it from drying out.
-
Freezer: For extended storage, freeze the bread by wrapping it tightly in plastic wrap and placing it in an airtight container or freezer bag. It can be stored for up to 3 months.
-
Reheating: To enjoy your bread again, simply reheat it in a skillet over medium heat for a few minutes or microwave it for 20-30 seconds, ensuring it’s warm and fluffy once more!
Expert Tips for No-Oven Turkish Bread
-
Perfect Dough Rise: Ensure your dough doubles in size during the rise. If it’s too cold, find a warm spot like near a heater or in the oven (turned off) to encourage rising.
-
Kneading Matters: Knead your dough for at least 8 minutes. Insufficient kneading can lead to dense No-Oven Turkish Bread, so invest the time for perfect fluffiness.
-
Watch the Heat: Medium heat is crucial. If the skillet is too hot, the bread may burn on the outside while remaining raw inside. Adjust as needed for even cooking.
-
Customize Your Flavors: Feel free to experiment by adding spices like cumin or herbs into the dough for a unique twist on your Turkish flatbread.
-
Keep It Fresh: Serve immediately for the best taste, but if you have leftovers, store them in an airtight container at room temperature for up to two days. Reheat before enjoying!
What to Serve with No-Oven Turkish Bread?
Savor this delightful homemade flatbread by pairing it with delicious accompaniments that elevate your dining experience and bring smiles to the table.
-
Creamy Hummus: A rich, velvety dip that perfectly complements the fluffy texture of the bread. Scoop it up warm for an irresistible bite.
-
Roasted Vegetable Medley: Colorful and caramelized, roasted veggies add a delightful crunch that contrasts beautifully with the soft bread, enhancing every mouthful.
-
Herbed Yogurt Dip: Tangy and refreshing, this yogurt sauce brightens the dish, providing a creamy balance that is both flavorful and satisfying.
-
Spicy Lamb Kebabs: Serve your flatbread with juicy kebabs for a heartier meal. The combination of flavors will transport you straight to a vibrant Turkish feast.
-
Cucumber-Avocado Salad: Cool and crisp, this salad brings a refreshing touch that complements the carbs beautifully while adding nutritional value.
-
Red Lentil Soup: A warm and wholesome soup that pairs effortlessly with the bread. Perfect for soaking up juices and adding flavor to each bite.
-
Minted Lemonade: This refreshing drink cuts through the richness of the bread and adds a bright, citrusy note to your meal, perfect for a sunny day.
-
Baklava for Dessert: End your meal on a sweet note with this flaky pastry. Its honeyed layers will contrast beautifully with the savory bread you’ve enjoyed.
Make Ahead Options
These No-Oven Turkish Bread are perfect for meal prep enthusiasts! You can prepare the dough up to 24 hours in advance by mixing and kneading it, then storing it in the refrigerator. Just wrap it tightly in plastic wrap to maintain freshness and prevent it from drying out. When you’re ready to enjoy, let the chilled dough come to room temperature for about 30 minutes before shaping and cooking. Alternatively, if you have time constraints, you can cook the bread ahead of time, then cool and store it in an airtight container at room temperature for up to 2 days. Reheat in a warm skillet for that just-made taste. Enjoy the convenience of homemade No-Oven Turkish Bread ready whenever you are!
No-Oven Turkish Bread Customizations
Feel free to make this No-Oven Turkish Bread your own with these exciting twists and substitutions!
- Dairy-Free: Substitute warm milk with your favorite plant-based milk to enjoy a delicious vegan option.
- Herb-Infused: Mix finely chopped fresh rosemary or thyme into the dough for a fragrant flavor boost.
- Spicy Kick: Add a teaspoon of red pepper flakes to the dough for a subtle heat that elevates each bite.
- Cheesy Twist: Fold shredded cheese like feta or mozzarella into the dough before shaping to add melty goodness.
- Whole Wheat Upgrade: Use whole wheat flour instead of all-purpose for a heartier, fiber-rich bread.
- Garlic Lover’s Delight: Incorporate roasted garlic into the dough for an aromatic twist that will impress your taste buds.
- Sweet Option: Add a tablespoon of honey or maple syrup to the wet ingredients for a subtly sweet version, perfect for breakfast!
- Make It Colorful: Top with colorful seeds or spices like poppy seeds or za’atar for a beautiful finish.
With these variations, you’re sure to create a No-Oven Turkish Bread that delights the whole family. Don’t forget to explore our Easy Skillet Bread if you’re craving more homemade bread inspiration!

No-Oven Turkish Bread Recipe FAQs
What is the best way to choose ripe ingredients for No-Oven Turkish Bread?
Absolutely! For the best results, always choose fresh ingredients. Use all-purpose flour that feels fine and is free of lumps. When selecting instant yeast, ensure it hasn’t expired for optimal rising. Fresh milk is essential, so opt for one that’s unspoiled and kept in the refrigerator—this guarantees a soft and fluffy texture.
How should I store No-Oven Turkish Bread and how long will it last?
To keep your No-Oven Turkish Bread fresh, store it in an airtight container at room temperature for up to 2 days. Avoid exposing it to moisture to maintain its softness. If you need to extend its life, it can be refrigerated for up to 4 days, just ensure it’s tightly wrapped to prevent drying out.
Can I freeze No-Oven Turkish Bread? What’s the best way to do it?
Absolutely! Freezing your flatbread is quite simple. Wrap each piece tightly in plastic wrap and then place it in an airtight freezer bag. This method prevents freezer burn and keeps it fresh. You can freeze it for up to 3 months. When you’re ready to enjoy it, simply thaw it in the refrigerator overnight or heat it directly from frozen in a skillet for a few minutes.
What should I do if my dough doesn’t rise properly?
Very! If your dough seems stubborn and isn’t rising, it often needs a bit more warmth. Try placing it in a warm, draft-free area, or you can even create a cozy environment by preheating your oven to the lowest setting for a minute, then turning it off before placing the dough inside. Alternatively, ensure your yeast is fresh and activated, as old yeast can prevent proper rising.
Are there any dietary considerations to keep in mind for No-Oven Turkish Bread?
Of course! This recipe is quite adaptable. If you’re catering to dietary restrictions, substitute the warm milk with a plant-based option like almond or oat milk for dairy-free needs. Additionally, if anyone has gluten sensitivities, consider using gluten-free all-purpose flour, though this may slightly alter the texture. Always check in on any allergies related to the toppings, like sesame seeds or herbs!
Can I add different flavors or ingredients to the No-Oven Turkish Bread?
Absolutely! Feel free to enhance your No-Oven Turkish Bread by adding spices like cumin or smoked paprika directly into the dough for extra flavor. You can also stir in fresh herbs like rosemary or thyme or mix in toppings like cheese or olives before cooking in the skillet for a delightful twist. Experimenting is a wonderful way to personalize this recipe!
No-Oven Turkish Bread: Fluffy Flatbread Your Family Will Love
Ingredients
Equipment
Method
- Mix the dry ingredients: combine flour, salt, sugar, and yeast in a large bowl.
- Combine the wet ingredients: warm milk and water, and mix in olive oil or melted butter.
- Form the dough by pouring the wet ingredients into the dry mix and stirring until a shaggy dough forms.
- Knead the dough on a floured surface for about 8-10 minutes until smooth and elastic.
- Let the dough rise in a greased bowl covered with a damp towel for about 1 hour.
- Shape the dough into discs about 1/2 inch thick after punching it down.
- Cook the bread in a non-stick skillet over medium heat for about 3-4 minutes per side.
- Brush with melted butter and add optional toppings like garlic or sesame seeds.
Leave a Reply