
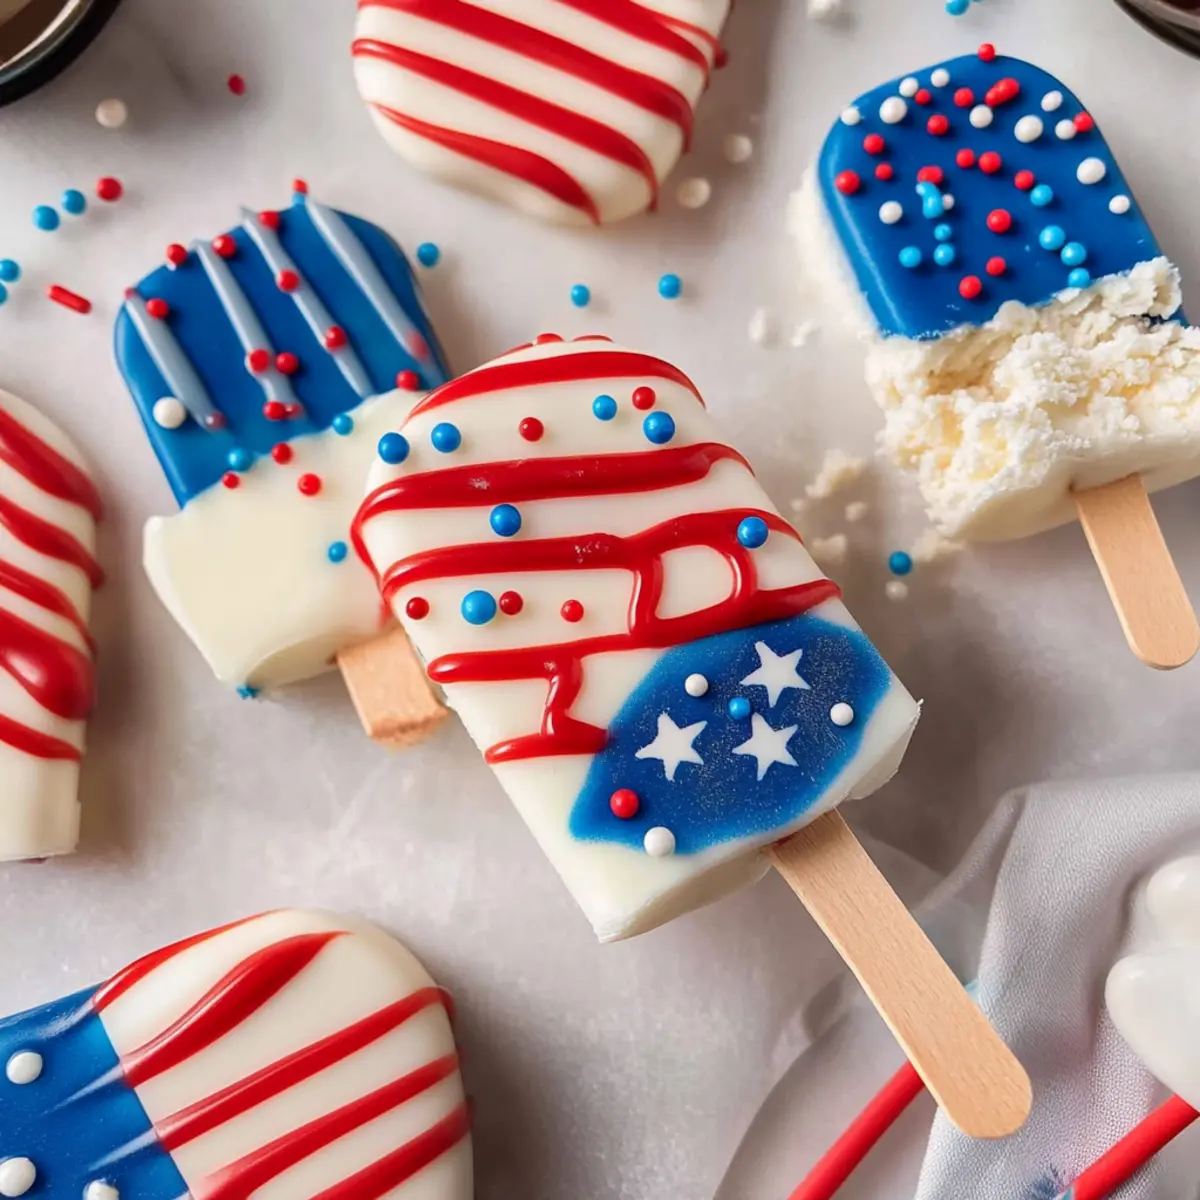
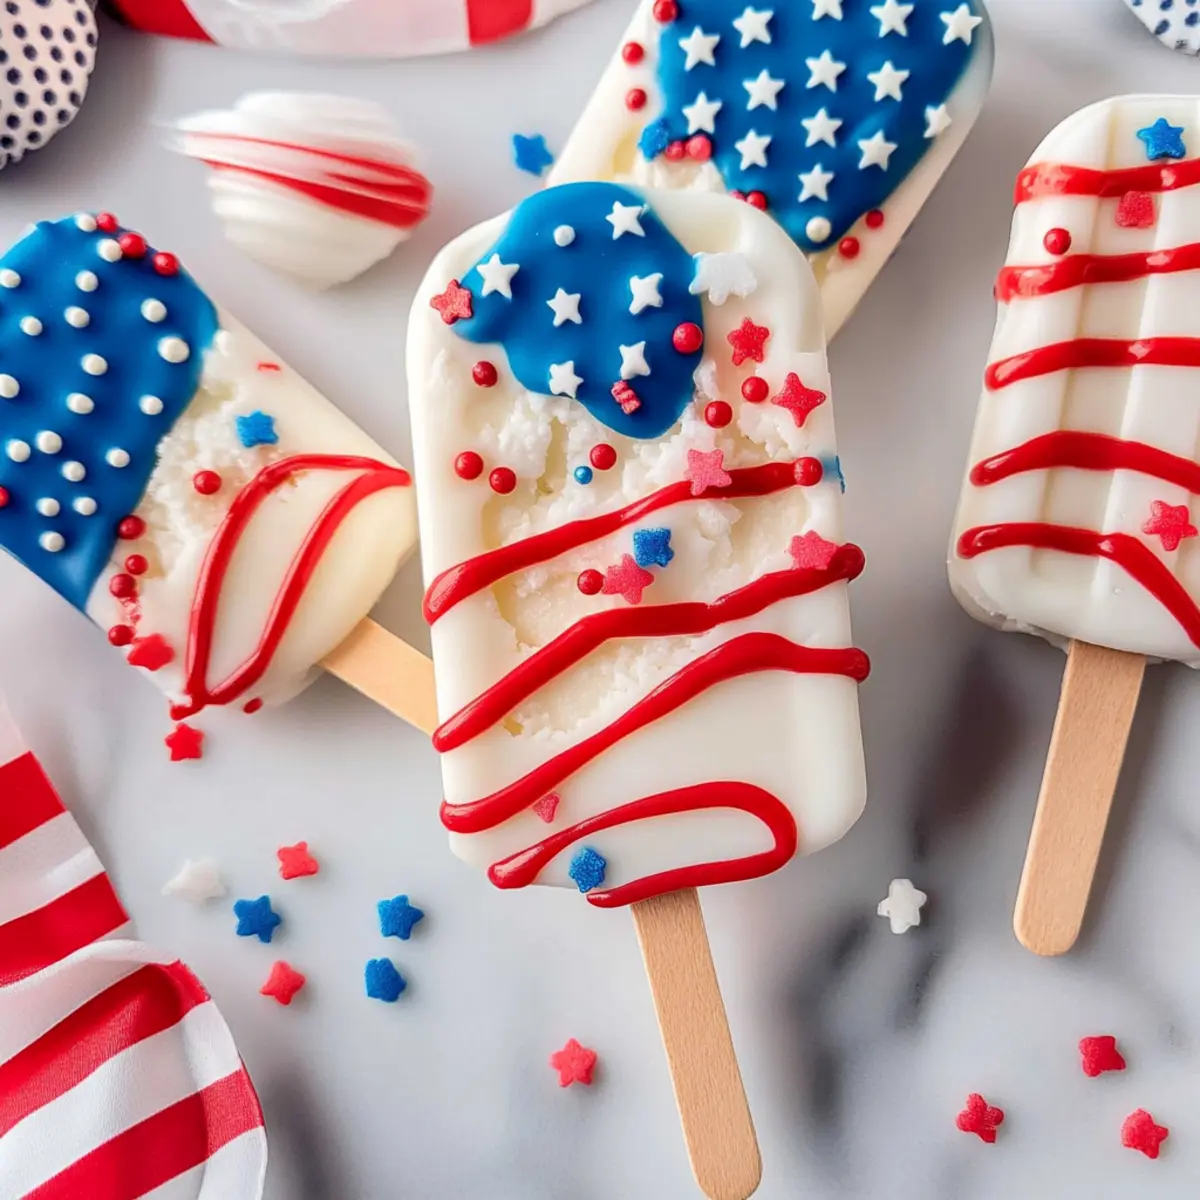
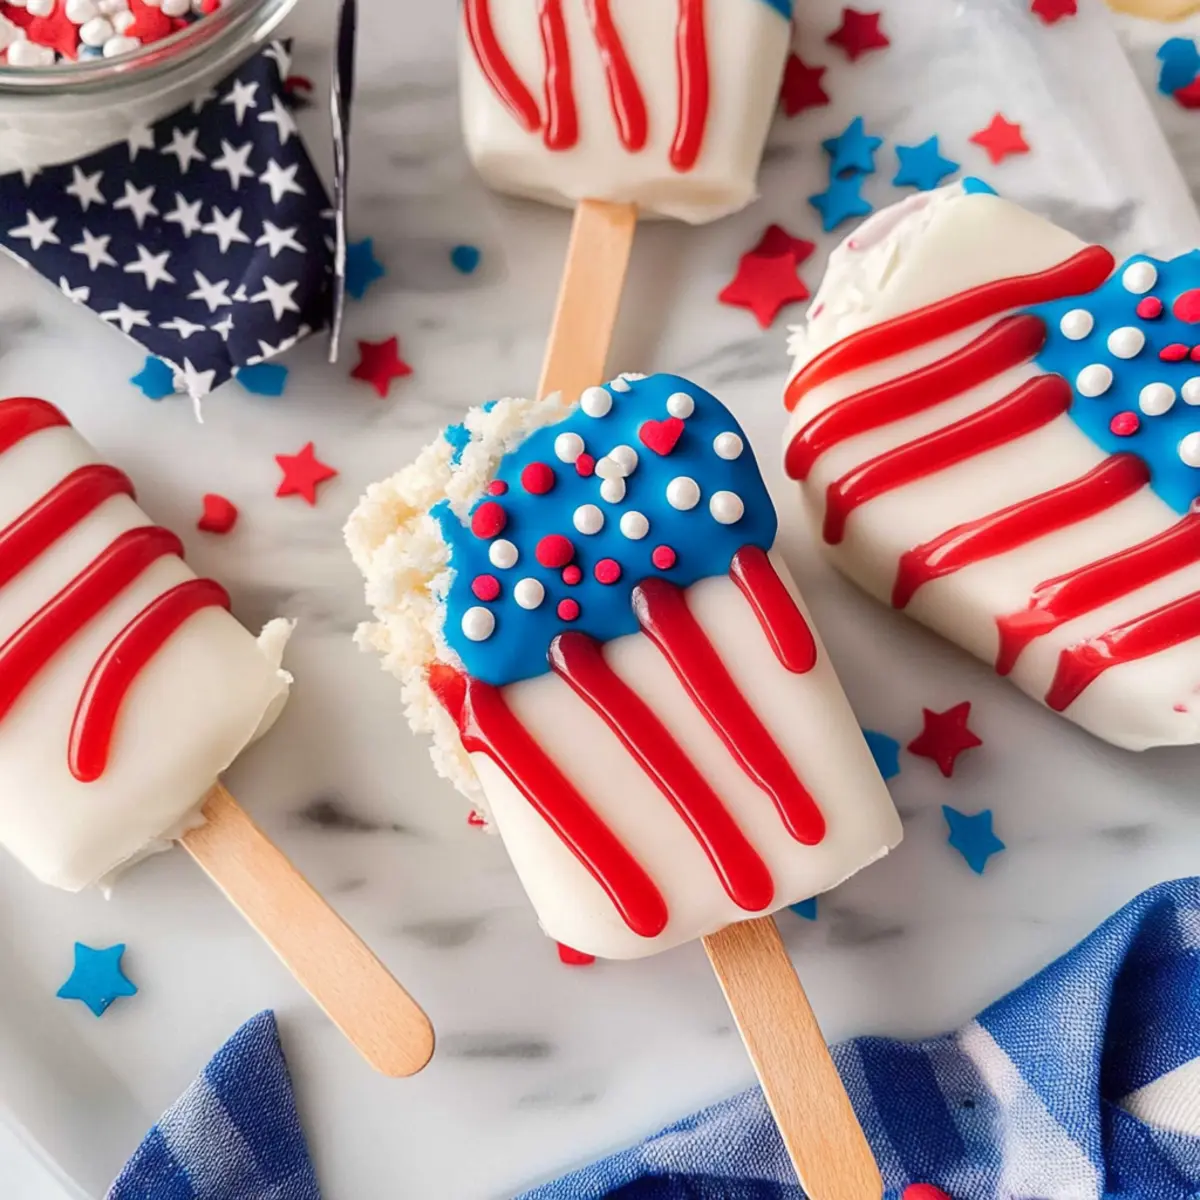
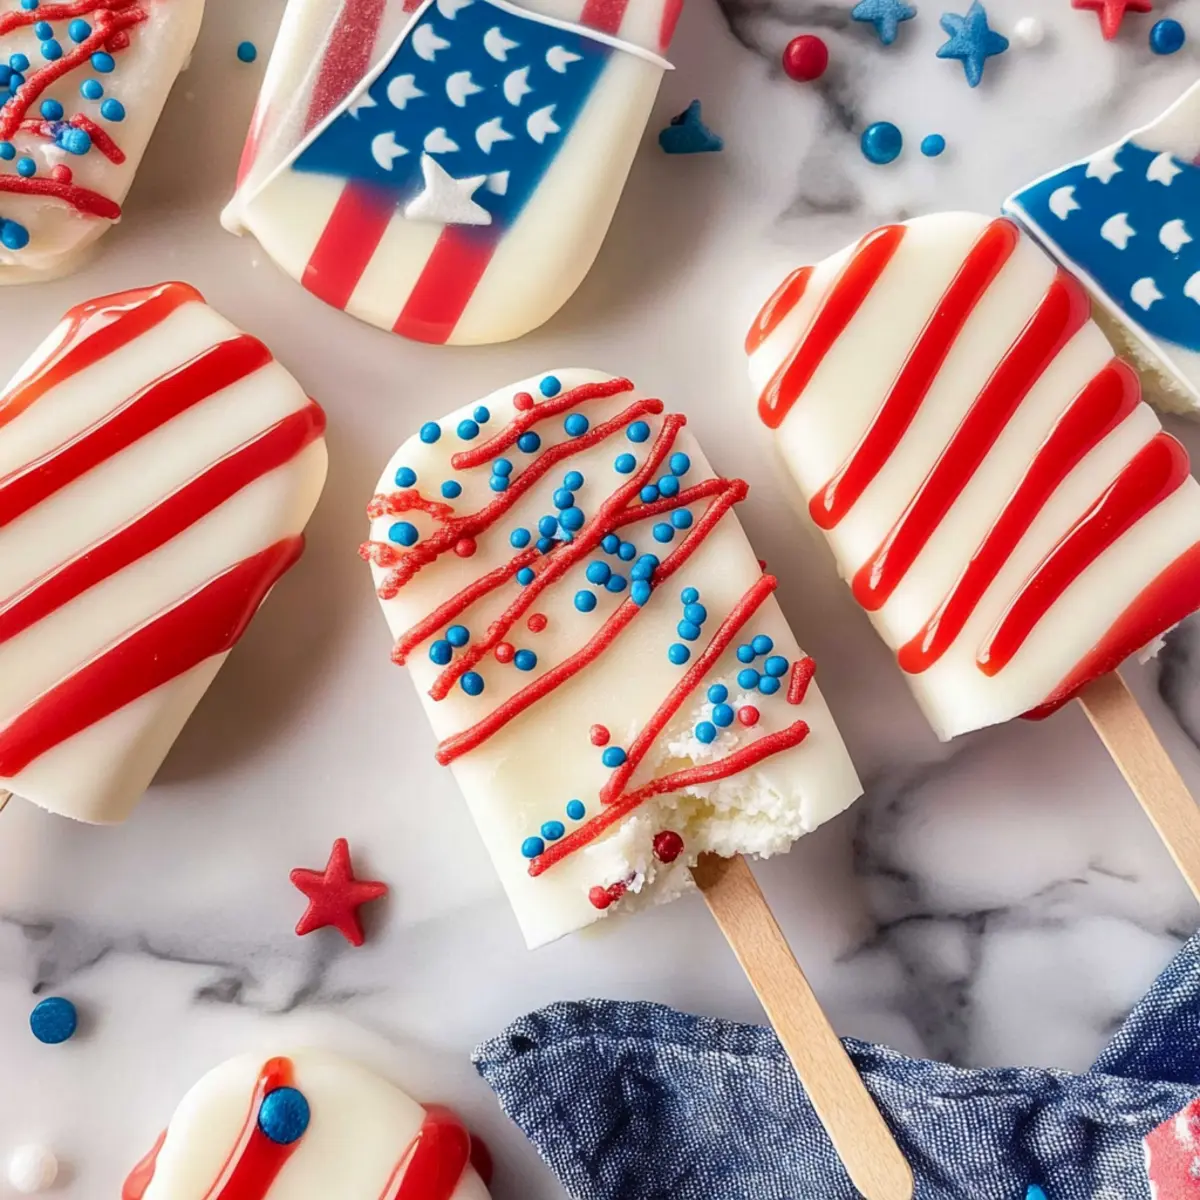
As the sun shines brighter and the smell of summer fills the air, I find myself dreaming of festive treats that scream celebration. Enter 4th of July cakesicles—an effortless no-bake dessert that perfectly captures the spirit of Independence Day! These delightful bites combine leftover cake and frosting, coated in luscious white chocolate for a sweet finish that’s great for both kids and adults. Not only are they quick to whip up, but they’re also a crowd-pleaser, making them the ideal addition to your summer gatherings. Ready to transform your holiday into a delicious celebration? Let’s dive into the fun of creating these patriotic sweets!
Why Are Cakesicles Perfect for Summer?
Endless Creativity: Cake decorating meets fun with cakesicles! You get to unleash your imagination, crafting a variety of patriotic designs for 4th of July parties or any festive occasion.
No-Bake Magic: Skip the oven and save time—these cakesicles come together with minimal effort! Perfect for busy summer days when you want a sweet treat without the hassle.
Crowd-Pleasing Flavor: Bursting with moist cake and a silky white chocolate coating, each bite of these treats is a delightful experience that will keep your guests coming back for more.
Versatile and Fun: Make them festive with red, white, and blue, or customize them further for birthdays with different colors and sprinkles. These cakesicles are truly adaptable to any celebration.
Chill Out: Prepare in advance and keep them in the fridge until you’re ready to serve! These fun desserts can be prepped days ahead—ideal for those busy summer gatherings.
Cakesicles Ingredients
For the Cake Mixture
• Crumpled Cake – This is the base for the cakesicle; use leftover cake or half a boxed cake mix for convenience.
• Vanilla Frosting – It adds moisture and sweetness; store-bought or homemade options work beautifully.
For the Coating
• White Candy Melts – This decadent coating gives cakesicles their sweet and creamy exterior; feel free to substitute with chocolate melts if you prefer.
• Refined Coconut Oil (optional) – Add a bit to thin out the candy melts for easier dipping.
For the Drizzle
• Powdered Sugar – To create that colorful drizzle for festive decoration; it’s key for adding that extra touch of fun.
• Water – This helps adjust the consistency of the drizzle for easy application.
• Red and Blue Gel Food Coloring – Use this to achieve vibrant shades perfect for your 4th of July cakesicles.
The simplicity and joy of making cakesicles is just one reason they’re the ultimate no-bake summer treat!
Step‑by‑Step Instructions for 4th of July Cakesicles
Step 1: Prepare Cake Mixture
Begin by crumbling the leftover cake in a large mixing bowl, ensuring there are no large chunks. Mix in vanilla frosting until the mixture reaches a dough-like consistency, which should take about 2-3 minutes. Make sure the color of the mixture is uniform for a delightful flavor in each cakesicle.
Step 2: Mold Mixture
Take your silicone cakesicle molds and start pressing the cake mixture firmly into each cavity, ensuring even distribution to avoid air pockets. Insert popsicle sticks into each molds’ center, pushing them in until they are just stable. This step should take about 5 minutes, so work diligently but carefully.
Step 3: Chill
Once the molds are filled, place them in the freezer for approximately 30 minutes, allowing the cakesicle mixture to solidify completely. A good test for doneness is pressing lightly on the cakesicle; if it holds its shape, it’s ready for the next step.
Step 4: Melt Coating
In a microwave-safe bowl, add the white candy melts and heat them in the microwave at 50% power, stirring every 30 seconds. This process should take around 2-3 minutes until the melts are fully smooth. If the mixture is too thick, incorporate a teaspoon of refined coconut oil to achieve a thinner consistency.
Step 5: Coat Cakesicles
Carefully remove the frozen cakesicles from their molds and dip each one into the melted candy coating. Allow excess coating to drip off by tapping the cakesicle gently against the side of the bowl. Ensure the coating evenly envelops each cakesicle for a smooth finish.
Step 6: Decorate
In a small bowl, mix powdered sugar with water and red and blue gel food coloring to create vibrant drizzle. Transfer this mixture into a zip-top bag, snip off a corner, and drizzle it artistically over each coated cakesicle. Add sprinkles for that extra festive touch, enhancing their visual appeal.
Step 7: Set
Finally, place the decorated cakesicles on parchment paper and let them sit undisturbed at room temperature until the coating is fully hardened. This may take about 15-20 minutes. Once set, your delightful 4th of July cakesicles are ready to be enjoyed!
How to Store and Freeze Cakesicles
Fridge: Keep cakesicles in an airtight container in the fridge for up to 5 days. This helps maintain their freshness and creaminess, especially on warm summer days.
Freezer: For longer storage, freeze cakesicles for up to 1 month. Arrange them in a single layer on a baking sheet until solid, then transfer to a freezer-safe bag.
Thawing: To enjoy the cakesicles after freezing, simply thaw them overnight in the fridge before serving. This ensures they retain their delightful texture.
Serving Tip: If serving outdoors, keep cakesicles chilled in a cooler to prevent melting, especially if they contain frosting and white chocolate.
What to Serve with Festive 4th of July Cakesicles?
Imagine a sun-drenched picnic table filled with laughter and delicious treats, where every bite adds to the joy of summer celebrations.
-
Refreshing Fruit Salad: A vibrant mix of seasonal fruits adds brightness and a refreshing contrast to the sweetness of the cakesicles. Strawberries, blueberries, and watermelon make it particularly festive.
-
Classic Coleslaw: The crunchiness and tangy flavor of coleslaw perfectly balance the creamy sweetness of your cakesicles, creating a satisfying harmony on the plate. It’s a summer barbecue favorite that everyone loves!
-
Grilled Corn on the Cob: Sweet, charred corn brings a smoky, buttery element to your spread, enhancing the festive summer vibes. Slathered with a little lime and sprinkle of chili, it’s a delightful companion.
-
Lemonade Slushies: Chill your guests with thirst-quenching lemonade slushies, combining zesty citrus with icy texture for a refreshing sip that pairs well with sweet treats.
-
Chocolate Dipped Pretzels: The salty crunch of pretzels enveloped in chocolate beautifully contrasts with the soft cakesicles, creating a fun and playful mix of textures.
-
Patriotic Punch: Mix up a batch of refreshing punch with red fruit juices, blue soda, and sparkling water for a vibrant drink that echoes your cakesicles’ festive spirit.
-
Mini Cheesecakes: Creamy, rich mini cheesecakes can complement the lightness of the cakesicles, bringing a touch of indulgence to your dessert table. They can be adorned with fresh berries for added flare!
-
Vanilla Ice Cream: Serve a scoop of creamy vanilla ice cream alongside your cakesicles for a classic pairing that delivers a delightful temperature contrast—a true summer treat!
-
Grilled Chicken Skewers: Juicy, marinated chicken skewers make for a savory main course that balances out the sweetness of your cakesicles, making your meal complete.
Let the flavors mingle and celebrate this joyful season with these delicious pairings!
Expert Tips for Perfect Cakesicles
-
Choose the Right Cake: Use a moist leftover cake or half a boxed cake mix to ensure your cakesicles have a delightful texture. Avoid dry cake to prevent crumbling.
-
Mold Mastery: Silicone molds offer easy release; press the cake mixture firmly to avoid air pockets. Hand-shaping is an option but may yield uneven results.
-
Temperature Check: Ensure both cakesicles and the coating are at room temperature before dipping. This will help avoid cracking and achieve a smooth finish.
-
Drizzle Dilemma: For the best results, use gel food coloring for vibrant drizzles without thinning your mixture. Avoid using liquid food coloring, as it can alter the consistency.
-
Make-Ahead Magic: Prepare and freeze your cakesicles up to a month in advance. Thaw them in the fridge before serving to save time on busy summer days.
Make Ahead Options
These festive 4th of July cakesicles are perfect for meal prep, allowing you to enjoy your holiday gatherings without last-minute stress! You can prepare the cake mixture and mold the cakesicles up to 24 hours in advance by freezing them in their molds. Just remember to cover the molds tightly with plastic wrap to prevent freezer burn. Once you’re ready to serve, simply dip the frozen cakesicles in melted coating and decorate with your vibrant drizzle. If you need to plan further ahead, the coated cakesicles can be frozen for up to 1 month; just thaw them overnight in the refrigerator before serving for the best quality. This way, you’ll have delicious, ready-to-enjoy treats that are just as delightful and fresh!
Cakesicles Variations & Substitutions
Feel free to get creative with these cakesicles and make them truly your own with these delightful twists!
-
Chocolate Delight: Swap in chocolate cake and chocolate frosting for an indulgent, rich flavor that chocolate lovers will adore. The combination of both flavors elevates the creamy filling to a new level!
-
Colorful Celebrations: Use different colored gel food coloring to match various holidays like Halloween or Easter, making these cakesicles a go-to treat all year round. Imagine crafting shades of orange and purple for a spooky festive vibe!
-
Nutty Crunch: To add texture, mix in some finely chopped nuts or toasted coconut to the cake mixture. It creates a lovely crunch that complements the softness of the cakesicle.
-
Fruit Fusion: Incorporate crushed fruit, like strawberries or blueberries, into the cake mixture for a refreshing burst of flavor and natural sweetness. It’s a delicious way to enjoy a fruity twist!
-
Spicy Kick: For those who enjoy a little heat, try adding a dash of cinnamon or cayenne pepper to the cake mixture. This surprising twist adds depth and an exciting kick to your treats.
-
Vegan Version: Substitute a vegan cake mix and use a dairy-free frosting along with dark chocolate melts to create a plant-based alternative. Your vegan friends will appreciate the thoughtfulness in every delightful bite!
-
Cheesecake Cakesicles: Use a cheesecake-flavored frosting and crumbled graham crackers instead of cake for a cheesecake-inspired variation. It’s like grabbing a slice of cheesecake, but in a fun, poppable form!
-
Fruity Sprinkles: Top your cakesicles with refreshing freeze-dried fruit pieces or edible glitter to add an anniversary party or wedding-ready touch. It’s all about making each bite more exciting!
If you’re looking for more inspiration on perfecting cakesicles, check out my Ultimate Guide to Cake Pops or explore fun Summertime Dessert Ideas that’ll keep your gatherings sweet and memorable!
4th of July Cakesicles Recipe FAQs
How do I choose the right cake for my cakesicles?
Absolutely! For the best results, opt for a moist leftover cake or half a boxed cake mix. Avoid using a dry cake, as this can lead to crumbling and a less enjoyable texture. Cakes like vanilla, funfetti, or chocolate all work beautifully, each offering a unique flavor profile.
How should I store my cakesicles?
Very simple! Keep your cakesicles in an airtight container in the fridge for up to 5 days. This will help maintain their freshness and creaminess. If you want to enjoy them later, freeze them in a single layer on a baking sheet until solid, then transfer to a freezer-safe bag for up to 1 month.
What’s the best way to thaw frozen cakesicles?
The best way to enjoy your frozen cakesicles is to thaw them in the fridge overnight. This gentle process helps retain their delightful texture while ensuring they’re ready to be enjoyed without melting too quickly.
Can I customize the cake and frosting flavors?
The more the merrier! You can absolutely substitute with your favorite cake and frosting flavors. For example, try chocolate cake with cream cheese frosting for a decadent twist. Just make sure to remain within the moist cake domain for a successful cakesicle!
Why did my candy coating crack?
Cracking can occur if your cakesicles and the coating are at different temperatures. Make sure both are at room temperature before dipping; this will create a bond that prevents cracking. If it continues, consider adding a tablespoon of refined coconut oil to your candy melts to help with smooth dipping.
Are there any dietary considerations I should keep in mind?
Absolutely! If you’re preparing these treats for guests, consider common allergens. The cakesicles contain eggs and dairy if using traditional cake or frosting, so make sure to check if anyone has allergies. You can also explore vegan alternatives for both cake and frosting to make them more inclusive for all dietary needs.
Delicious Cakesicles: Your No-Bake Summer Treats Delight
Ingredients
Equipment
Method
- Begin by crumbling the leftover cake in a large mixing bowl, ensuring there are no large chunks. Mix in vanilla frosting until the mixture reaches a dough-like consistency, about 2-3 minutes.
- Take your silicone cakesicle molds and press the cake mixture firmly into each cavity, avoiding air pockets. Insert popsicle sticks into each mold’s center.
- Place the molds in the freezer for approximately 30 minutes until solidified.
- In a microwave-safe bowl, add white candy melts and heat at 50% power, stirring every 30 seconds until smooth, about 2-3 minutes. Add coconut oil if needed.
- Carefully remove the cakesicles from molds and dip each in melted candy coating, allowing excess to drip off.
- Mix powdered sugar with water and food coloring for drizzle. Transfer to a zip-top bag, snip a corner, and drizzle over cakesicles.
- Place the decorated cakesicles on parchment paper and let them set at room temperature until hardened, about 15-20 minutes.
Leave a Reply